Final - 60 Second Commercial
DUE Friday, May 31 at the end of class.
1. Must be 60 seconds exactly, No more, No less.
2. Must persuade us to believe we need the product.
3. Story must demonstrate the quality of the product you are emphasizing.
4. Commercial must have a main claim
5. Commercial must have a call to action
6. Commercial must have contact info
7. Must have product shot at the end
8. Must turn in updated storyboard
9. Turn in authorization form
10. Reflection on
1. Your experience creating a commercial,
2. Your experience working in premiere.
Deliverables
1. Outline of Commercial
2. Storyboard of Commercial, Annotated with Camera shots info and description of scene
3. Authorization Form
4. Reflection
5. Commercial
8 step How To Movie
|
Due Sunday, April 29 at 11:59 PM - Proposal, storyboard and How To Clips.
How to 8 Step Movie STEP ONE 1. Read the Authorization form. You must review your videos everytime for items in this list 2. Fill out, then Turn In the Proposal Form - for this project, dont worry about the timeline yet. 3. Complete a Storyboard Form. Review Camera Angles Lecture for angles to include in this video STEP TWO You will create a movie based on a demonstration of how to do something simple, like tie a shoe. Here are the requirements 1. Choose an event to demonstrate. Keep it simple, like how to pour a glass of milk, how to sharpen a pencil etc. 2. Proposal Must submit a proposal of the entire movie idea. Use Proposal form. - dont worry about the timeline section, just fill out the first page It must be cleared by teacher to progress to the next step. 3. Storyboard Storyboard your movie idea. Show the progression of steps to complete your demonstration. Refer to the Camera Angle lecture, and choose the best camera angles to most clearly show the viewer each step in your story. Must submit storyboard showing at least 8 steps and 4 camera angles Use storyboard form. It must be cleared by teacher to progress to the next step. 4. Shoot Your sequence. Using your camera phone or a still camera, shoot your demonstration sequence. Be sure what you are trying to demonstrate is clear and precise. You are telling a story, so you don't want anything to be confusing or not clear. Think about camera angles, points of view etc. Must show at least eight steps to the how to movie Must include at least 4 different types of shots Work these out in your storyboard. 5. Must comply with all of the common sense statutes in the Authorization form. 6. Upload clips to your Google Drive. Make a folder for this project, then a folder for the clips. Upload them to your clips folder. Then share the clips folder. Your clips are due on Sunday April 29th at 11:59 pm. 7. Editing. We will be editing these shots together. 8. Final piece. Your final piece will be a 8 shot sequence with titles, Open and Close Screen. |
| ||||||||
Camera AnglesReview the camera angles powerpoint to the right. Include these angles when you build your storyboards.
Storyboard |
| ||||
DVD Package - Unit One
|
1. You will choose a fictitious (fake) company to work with during this project.
2. We will be creating a DVD package to promote a product. A DVD package consists of the DVD label itself, C jewel case cover, a jewel case booklet, and a jewel case tray art piece. You will create artwork for each that serves to promote the product that you have chosen to work with from the company you have chosen. 3. We will then go through a process to make a 30 second commercial promoting the product. Step One. Read the attached article. Write a reflection on how the CD-ROM/DVD can be used to help market your product(s). Step Two. Ad Analysis You will choose FOUR of the Advertisements posted below and complete the Ad Analysis worksheet for each of the four ads you choose.. Turn in one worksheet for each ad. Look closely at each part of the ad, and be sure to identify who the advertiser is. Step 3 Brainstorm Product ideas Write your ideas on the form to the right. Include a sentence or two to further describe the idea. Then list another. Should be able to have six different ideas at a minimum. Shoot for 10 though. |
| ||||||
Photoshop Exercises
For each exercise, download the pdf instructions as well as the source pictures from the slideshow by CONTROL CLICKing on the photos. Create a project folder for each exercise. Upload the folder and share it to [email protected]
Please do not send them in one at a time. Wait until all 8 exercises are done, then share the master folder all at once.
Please do not send them in one at a time. Wait until all 8 exercises are done, then share the master folder all at once.
|
Exercise 1 - Vignetting
|
Exercise 2 - Horizon and Vertical Lines
|
|
|
|
|
| ||||
|
Exercise 3-Soft Filter
|
Exercise 4 - Unsharp Mask in the Channel
| ||||
|
Exercise 5 - History Brush
|
Exercise 6 - Replace Color
| ||||
|
Exercise 7 - Crane
|
Exercise 8 - Quick Mask
| ||||
Image Manipulation
|
Images due on Wednesday/Thursday, February 14/15
After we go over these techniques in class together, download the file to the right and continue exploring IMAGE>ADJUSTMENTS in Photoshop. |
| ||
Signature Tile
|
Monday: Color Theory Presentation - Take Notes Day
Project DUE: Friday, February 1 Repetition and Pattern In this project, you will be creating a repeating pattern design out of your signature. The objective is to make a simple design become a more complex and completely different design through the use of color and repetition. By repeating the same shapes, you will create a pattern that should create a feeling of rhythm and movement. Objective Understanding Closed shapes and how to fill them Using the transform, paint brush, and paint bucket tools Using creative thinking skills to figure out how to create a unique design using your name. Deliverables: You will create TWO different tile designs. Take 2 worksheets and work up four design variations for each sheet. Turn in the worksheet to be scanned. Must indicate which one of the 4 designs you want scanned. Retreive your scan from the server. To Connect: 1. Choose the finder from the application dock. 2. From the left hand column of the FINDER, choose ALL. 3. From the second column of the finder window, choose TEACHER STATION Choose CONNECT from the upper right corner of the window. Username=eagles, Pword= win 4. From the third column, choose Media Server 2 5. From the next column, choose CLASSES. 6. Then choose 2017_18 folder. 7. Then choose the period folder. 8. Then the Sig Tile Folder, and choose your 2 tile files As you execute these in Photoshop, you will choose 2 different color themes to work with. One must be Complimentary colors. The other is your choice between Monochromatic, Analogous, Primary or Tertiary. Turn them in to the server, then upload to your google drive, then share to [email protected] |
| ||||||
Tile Pattern
|
Monday: Review the Pattern Powerpoint with class
Tile Pattern Due Friday, January 26 at end of class Repetition and Pattern In this project you will create a repeating pattern design, by creating a simple design then duplicating and rotating it, over and over. The objective is to make something simple in detail, more complicated and interesting to the viewer. By repeating the same shapes, you will create a pattern that should create a feeling of rhythm and movement. Objective
|
| ||
2a. Selection Tools
|
Lesson for Wednesday, January 17.
Download the file to the right and we will complete it in class |
| ||
2b.. TalkShape
|
Lesson for Friday, January 19.
Download the file to the right and we will complete it in class |
| ||
1. Photoshop Toolbox
|
Lesson for Tuesday, January 16.
Download the pdf to the right. We will go over it in class |
| ||
End Semester One
Step 1 - IDENTITIES
YOUR NAME STORY
Due by 11:59 pm Monday, December 4
Sure, we know each other’s names, but do we know the story behind that name?
Think about the story of your name.
Create a new Google Doc, name it “Identities”
Sit down with a family member, mom, Dad, Grandparent, Aunt etc and ask them questions 1-8
write down your answers and thoughts and feelings about the story of your name. then on your own complete questions 9-18
1. State your name, age, birthday, place you were born
2. Why did your parents choose your name?
3. What is the family History?
4. If you were named after someone, who was it?
5. In what country did your name originate?
6. What does it mean?
7. How do you feel about it?
8. Would you change your name? To What?
YOUR HOBBIES
9. School subjects and activities you excel in
10. Your personality
11. Your role models
12. Your plans after high school
13. Your favorite foods
14. Your favorite things to do not at school
15. Your favorite music groups or singers
16. Favorite colors
17. Things you do for fun
18. What were 3 stories from the news that happened the day that you were born.
Step 2 - Identity List
Due, at the end of class Wednesday, December 6
Step A - List
Begin compiling a list of 40 words that describe you, your name story, your family, your character, your interests etc. Use your name. We want descriptive words. If you are an athlete for instance, describe the kind of athlete you are rather than list the sports you play.
Step B - Matching
From your list, choose Three (3) pairs of words. Match words that offer a funny or unique pairing. The more naturally the words go together, the less creative or more expected the result will be. For instance, "green" and "pants". These 2 words naturally go together, so there isnt an unexpected outcome from this pairing. While "cereal" and "mustache" could create some very interesting images.
Step C - Drawing
Now make a drawing of your interpretation of the two words together.
Make Five (5) drawings for each of the 3 pair of words as a minimum quantity.
Deliverables:
The more quality drawings/pairs you do, the better your chance of a higher grade.
Thats 15 drawings in all, plus the word list.
Step 3 - Name Logo
|
Due, at the end of class Monday, December 11
Now that you have 5 drawings (thumbnails) for three different pairs of words that are from your name list (Thats 15 in all minimum), you have a great start on your name logo. Choose the best of each of the 3 groups, and construct them in illustrator. Design your name into the design to make a complete logo. We are not designing a picture, we are designing a logo. THE NAME IS THE MOST IMPORTANT PART. Remember the skills that you have learned from the broker sign and the retro badge logo assignments, as well as the texture, text effects, color theory and all the techniques from all the tutorials we have completed.. Rubric: I am looking for good use of the pen tool, color theory, use of compound paths, use of patterns, textures, typography, and creativity. |
Suggestions of shapes to build your
name logo with, see below |
Step 4 - Name Logo Powerpoint.
Due Wednesday/Thursday, at end of class on finals day
The final step to your project is to make a presentation that explains all the steps you took to get to the final design. Remember, I dont want any pre-made background templates! Be sure to make your own, and not the one you used for the scavenger hunt project
Slide 1
Title Slide. Include your name, class period, project name
Slides 2-3
This is where you should state your name and summarize what you learned when you did the Identities assignment. That was where you asked the family history and the meaning of your name. Give us the background of how you got your name and what it means or represents.
Slide 4-5.
Show us your word list. Explain what you learned from this step and how you got so many words. Tpe it into the document, dont place a scan of a hand-written list.
Slide 6-8
Show us your word pairings and your set of sketches for each pair. One pair per slide. You may have to crop the original picture that you turned in for the thumbnails assignment. We want to see clearly what you drew for each pair.
Explain how you came up with the drawings
Slide 9
Show us your final Illustrator Logo. Explain each part and how this represents you.
Slide 10
Reflect on this assignment and tell us what you learned about yourself from executing this project.
NOTE: To get your final .ai logo file into google presentation, we need to change the file format first.
Step 1 - Open Adobe photoshop.
Step 2 - Open your logo file in photoshop.
Step 3 - Make sure your color mode is in RGB, so go to IMAGE > MODE > RGB.
Step 4 - Choose FILE > SAVE AS. A pop-up window will appear.
Step 5 - In the FORMAT box of the pop-up window, Choose CompuServe GIF.
Be sure you have the destination pointed to the correct folder.
Step 6 - Then choose SAVE from the pop-up window
Share the powerpoint to [email protected] to turn in your final.
Squiddy - Masks and Clipping Paths
|
Due Friday, December 1, at end of period.
In this tutorial, we’re going to cover the benefits, some uses, and the ’how-to’ of two powerful methods to hide or show areas of an Illustrator document without deleting objects that you want to be invisible, which allows you to go back and re-work more easily. Download the tutorial and the texture picture to a new project folder called Squiddy on your desktop. Deliverables: Complete the tutorial and share the file to [email protected] |

| ||||||
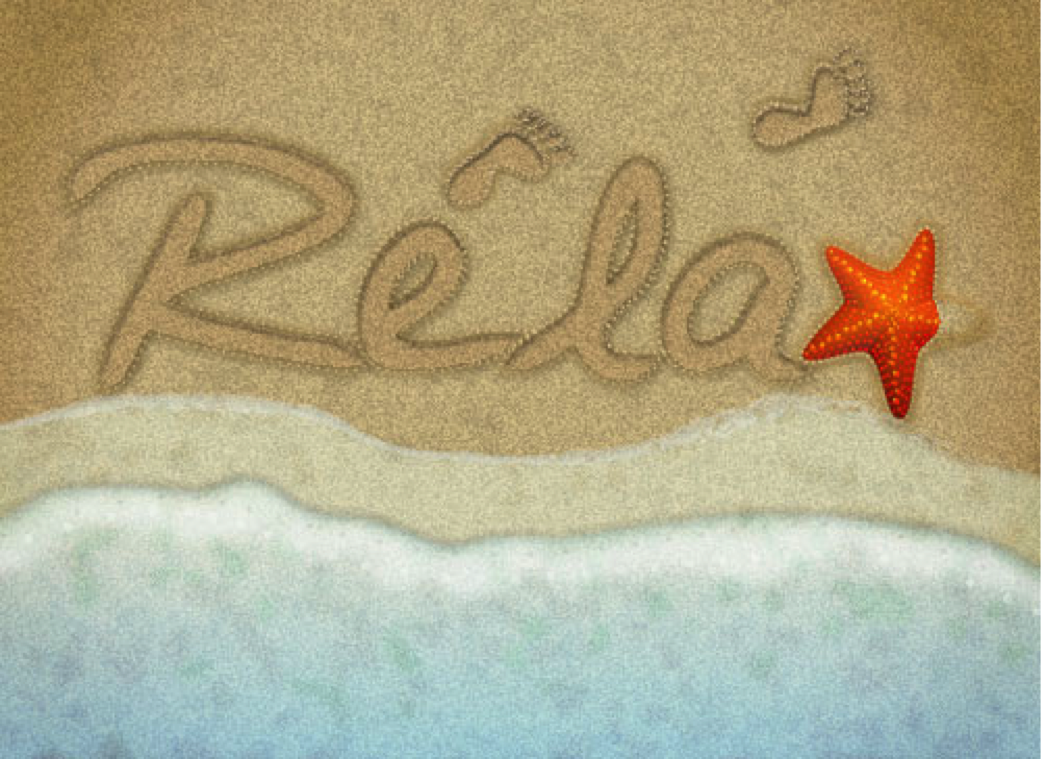
Sand TextDue Friday November 17 at end of period.
Learn how to create a sand text effect using Adobe Illustrator. For beginners, you will learn how to create a nicely textured background. Using basic tools and effects along with vector shape building techniques, you will learn how to create the main shape. As we go along, you will also learn how to add shading and highlights using the Gaussian Blur effect. In this tutorial, I will guide you in every step to create the starfish and the waves…. So let’s get started! |
| ||
Illustrator Sampler 2Due Friday, November 17 at the end of the period.
Download the pdf to the right. Open a new document in Illustrator that is 8.5 x11 inches. Then choose FILE > PLACE and navigate to where you saved the pdf download. Once it is on your new document, choose OBJECT > LOCK > SELECTION. In each box, create an image depicting the word listed. If it says to use specific tools, use them, if it does not list a tool, use any tools you want. You also need to apply color to your images. Make them as clean and neat as possible (hint: ZOOM in)! |
| ||
Retro LogoDue Thursday, November 9th.
This tutorial will help you create a vector retro badge or emblem. Particularly, in this year, the number of websites using these as attention grabbers is increasing, and it is being touted as a design trend that is not very likely to cease anytime soon. So, it becomes very important as a designer to know how to create these badges. Having these in your arsenal is sure to grab some attention! It is also a great way to improve your skills and expand your capabilities in illustrator. So what are we waiting for, let’s get started by downloading the file below. Don't forget to create a new project folder on your computer. |
|
| retrobadgelogo.pdf |
|
|
Ring
|
Due, Friday, November 3rd, at end of class.
1. Download the pdf to the right, and follow the steps to create your Ring. 2. Create a new folder in your projects folder called Ring, and when you are done, 3. Upload your file to your google drive, and share it to [email protected]. |
| ||
Complex Pathfinder
|
Due, Friday, November 3rd, at end of class.
We will be working with the pathfinder feature in illustrator with this tutorial. We are working towards having the skills to imagine, sketch, refine, and execute our own logo project. This exercise is another step towards that goal. 1. Download the pdf to the right, and follow the steps to create your pathfinder logo. 2. Create a new folder in your projects folder called pathfinder, and when you are done, 3. Upload your file to your google drive, and share it to [email protected]. |

| ||
Broker Sign
|
Due Friday, October 27 at end of class.
Download the picture to the right, and save it to your desktop in your project folder. Open a new document in illustrator, and choose FILE > PLACE to place the picture onto your page. You are going to use various tools to draw over the picture, so you'll want to lock it down so it doesn't move on you. To do this, have the picture selected, and choose OBJECT > LOCK > SELECTION. From there, start drawing using the pen tool. Remember that all SHAPES need to be closed, which means you have to click the pen tool back onto the starting point to close it. |
| ||
Simple Landscape Tutorial
|
Due Tuesday at end of class
Perform this tutorial to gain illustrator skills for the pictogram assignment. |
| ||
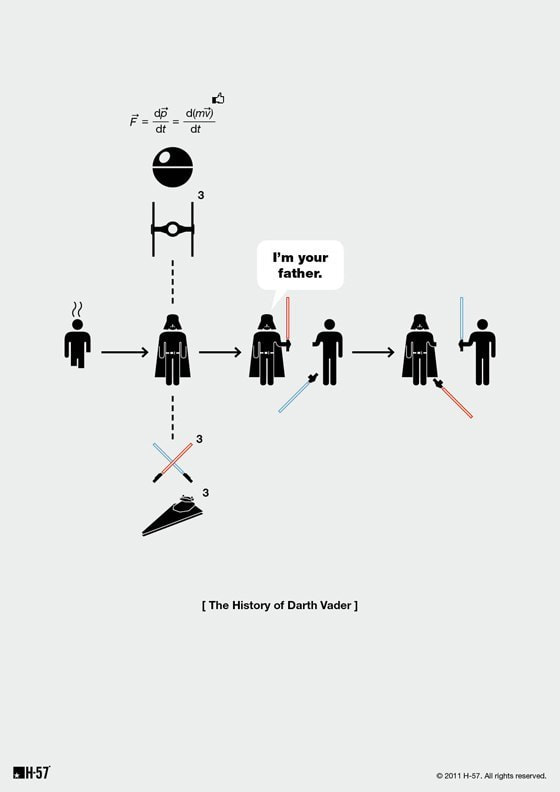
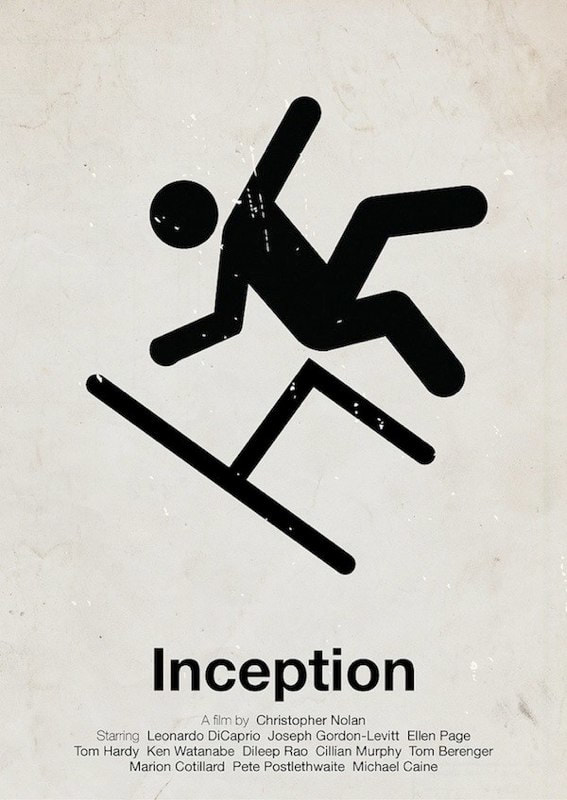
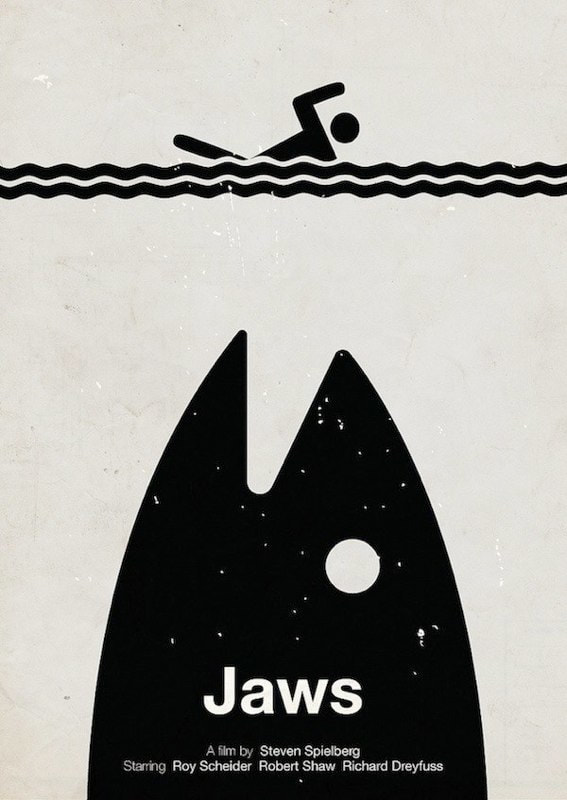
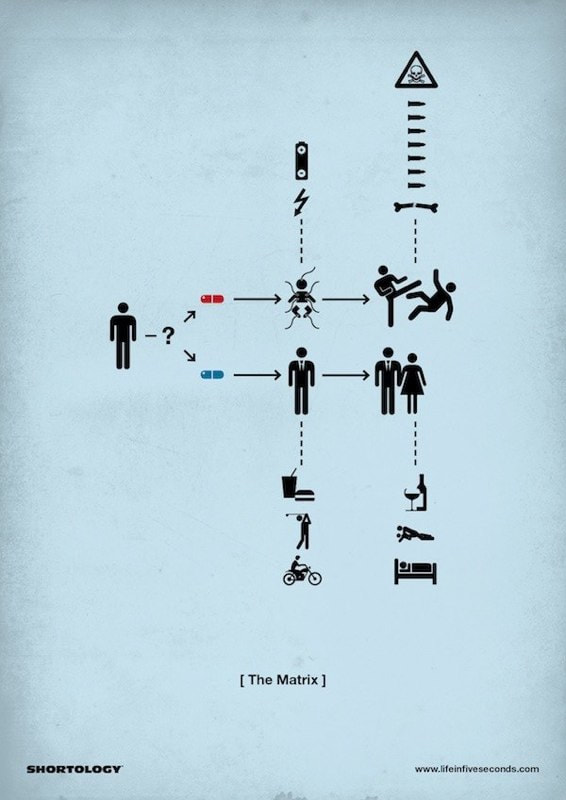
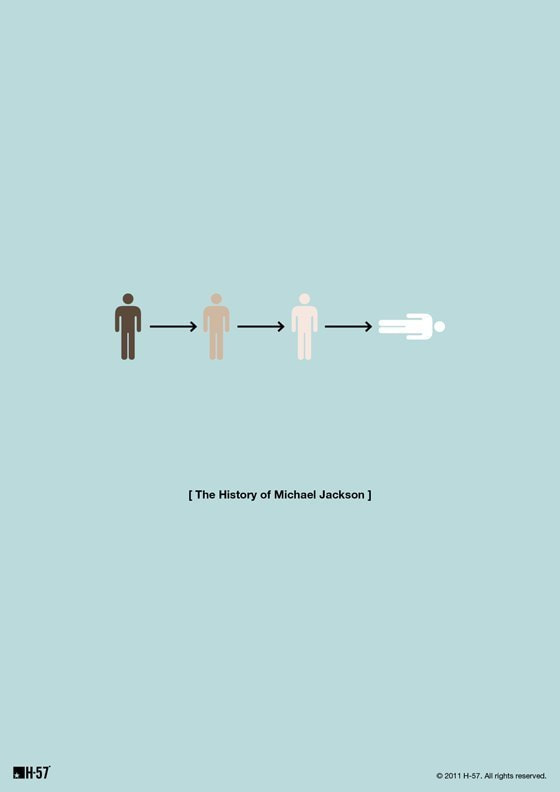
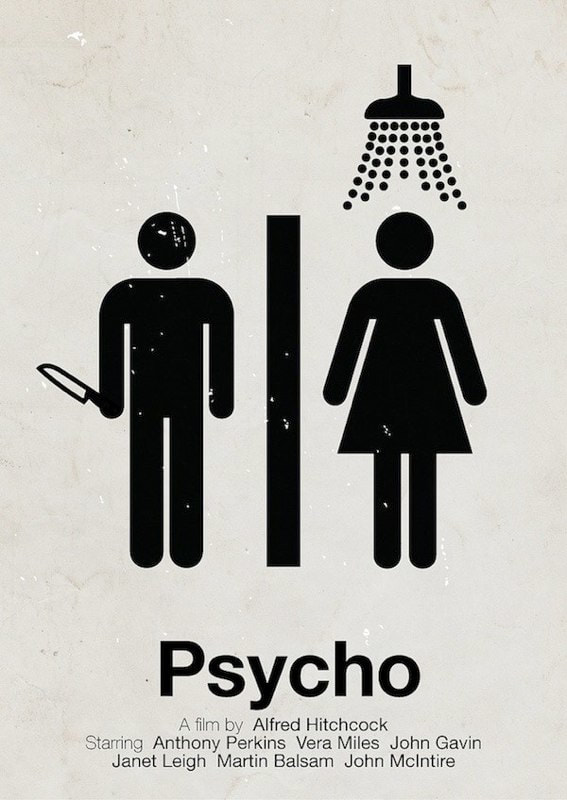
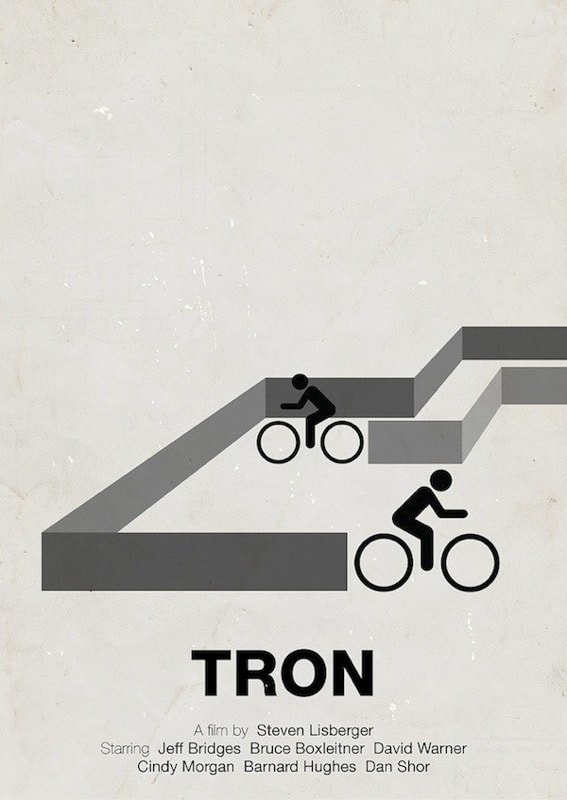
Pictograms
|
Final Artwork Due Friday, October 21 at the end of class
Preliminary Work (Outline and sketchbook) Objectives: Approach a problem from a unique perspective. Streamline a complex storyline into a simple, clear visual narrative. Improve your drawing skills with Adobe Illustrator. Draw simply but well. ASSIGNMENT Design an icon that prompts action. Your assignment is to concept, sketch, and design an icon that depicts the main storyline of a famous book or movie. We’ll go from developing your sign idea, to sketching thumbnails, to creating a more high-fidelity sketch, to vectorizing your final sign in Adobe Illustrator. Pictogram signs are an incredibly powerful tool to change your surroundings in a way that’s meaningful to you. Get creative, and have fun with it! See Examples to the Right. PROJECT DELIVERABLE A completed project will include:
|

|


Can You Make This Shape?
|
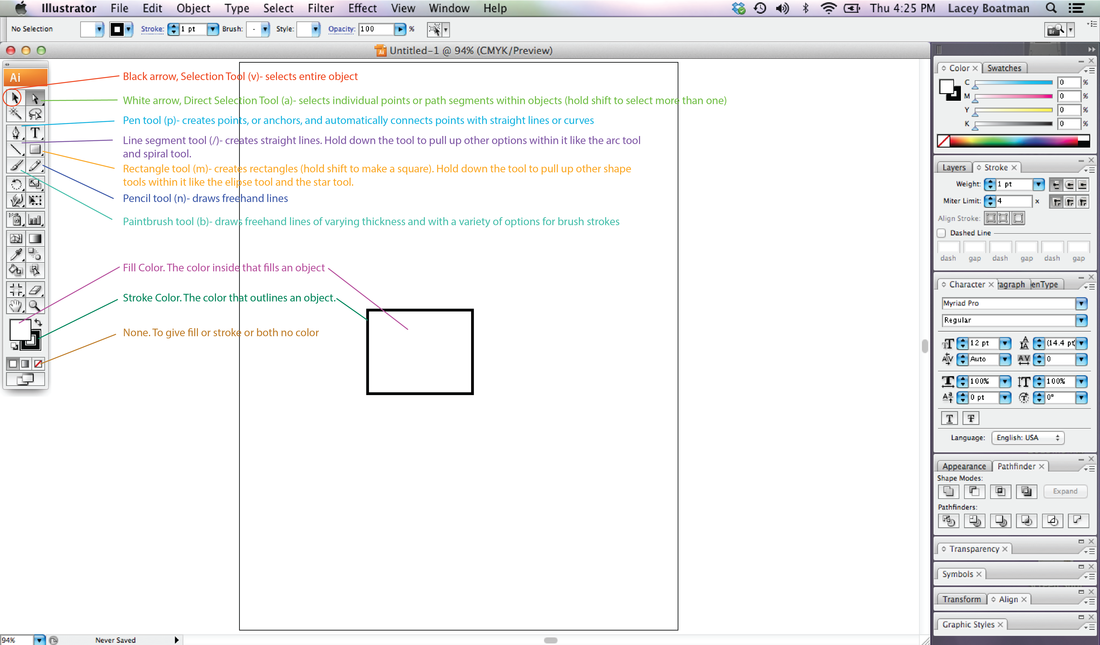
Assignment Due Friday, October 6.
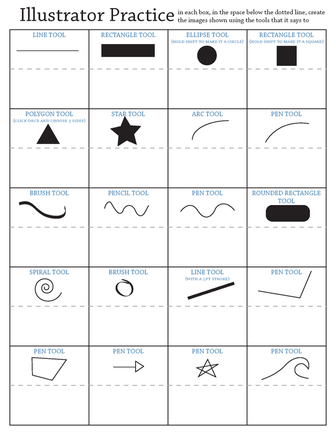
How was this shape made in Illustrator? Can you make the same shape? Open Illustrator and try. Activity: Open Illustrator, create a new document at letter size, File > New Go through the tools and take notes on the page as well as follow along in Illustrator using each tool. Look at the Illustrator Tools Overview for what tools should be discussed. Make sure to show how to create curves using the pen tool. PRACTICE 1 This exercise is meant to provide students with practice using the various tools in Illustrator. Check out the attachments to see the process. Practice it yourself before guiding the class. Before going into the practice worksheet, let students open Illustrator and "play" in the program for 5 minutes. They can explore and use whatever tools they want. After 5 minutes begin the exercise. Before starting the process, students need the "Illustrator Practice 1" document on their computers. It can be emailed to them, given to them on a flash drive, uploaded as a Google Doc and shared with them so they can download it, uploaded to a website for them to download, etc. |
| ||
Jarret Krosoczka Video
JarrettJKrosoczka_2012X-480p from steve exum on Vimeo.
Due by 11:59, Thursday 9/14
View the above video
Once you view it, answer these questions then write a reflection about what you find inspiring about his story.
Questions
1. What were the obstacles that Jarrett encountered as a young child?
2. What people in his life were helpful and kind to Jarrett and how did they make a difference in his life?
3. How did his passion for art help him throughout his life?
4. What is your overall impression of this artist and his story?
Reflection
Relate it to some creative aspect of your life, and describe how it applies to you.
Remember that our reading skill for the month is describe, so be descriptive in your writing.
I need well written sentences and well thought out answers.
Formulate a position to take about what inspired you and why that is important to you, and support it in your writing.
Lone Star
|
Due, Friday, September 1 at the end of the period.
I tried to recreate a really cool shape I saw on Pinterest sometime ago that was about some hipster badges. I thought it was a great exercise to learn about LINE and how to build with it in Illustrator. |
| ||
Copyright Assignment
DUE: FRIDAY, AUGUST 3, 2012
Benedict.com provides a lot of useful information regarding copyright, patent and trademark rules and regulations. This page also offers stories of documented copyright infringement disputes. The stories are divided into three (3) main categories: movies, music and web.
ASSIGNMENT:
Benedict.com provides a lot of useful information regarding copyright, patent and trademark rules and regulations. This page also offers stories of documented copyright infringement disputes. The stories are divided into three (3) main categories: movies, music and web.
ASSIGNMENT:
- Go to .www.benedict.com
- Explore the disputes in the WEB section and choose two (2) cases to write about from the menu on the left.
- Open your google account, and create a new google doc.
- Title your document “Copyright Assignment” and IN YOUR OWN WORDS, give a brief account (Summary) of the two (2) cases you have chosen.
- Include in your Summary: The parties involved, what they are arguing about and who won the case. If the case is still in court, state that the outcome is pending.
- Download at least two (2) images per story from the Internet to illustrate your stories.
- If you search for “Free Use” or “Royalty Free” images, many sites will come up. It is OK if the images you choose have watermarks.
- You may use Photoshop to edit each of your images but it is not required.
- Insert the pictures into your stories. (In Word: Insert > Photo > Picture From File).
- You may resize the photos once you insert them into Microsoft Word.
- When finished, fill out the top portion of the task sheet, save and print your Microsoft Word document, STAPLE THE TASK SHEET ON TOP and turn everything in.
Copyright Mashup Discussion
|
1. Watch Video One which is the original unedited raw video.
2. Watch Video 2 which is the Auto-tuned version. 3. Discuss in a group of 4 the following 3 questions 4. Open a google doc and summarize what your group came up with for the answers to these questions. 1. What, if any rights does the original Producer of this work have regarding the use and distribution of this work? 2. Does the auto-tuned version violate rights of the original owner? Is it harmful or helpful? Explain. 3. Are there any benefits to society from this free flow of material and derived work? 5. Share your document to [email protected] |
VIDEO ONE - ORIGINAL
VIDEO TWO - AUTO-TUNED VERSION
|
Fair Use Video
Watch the video and find the answer to these question.
1. What is fair use. Explain your answer.
2. What 3 elements do film makers have to deal with the most when using copyrighted material?
3. Before 1922, what is everything considered?, And After 1922, what is everything assumed to be?
1. What is fair use. Explain your answer.
2. What 3 elements do film makers have to deal with the most when using copyrighted material?
3. Before 1922, what is everything considered?, And After 1922, what is everything assumed to be?
Copyright
|
Due, August 20 @11:59pm
Copyright is the right to use ideas or information created by someone else. The copyright law is intended to protect the rights of content developers and describes restrictions that can be placed on copying materials. In other words, if you create information, you should get credit. This credit can come in the form of money if you sell the information in a book, CD, or subscription Internet service. In some cases, people aren't concerned about money, but they want to make certain that their name or organization is associated with the information. In a global community such as the Internet, the laws become an issue. For example, the copyright laws in different countries vary. Class ActivityRead the first three and a half pages of the document, stop before Notice of Copyright.
Condense your findings down to bullet points and report all the key elements of the sections. Use Google Docs and share it, title it Copyright Basics |
| ||
Scavenger Reflection
Due @ 11:59pm Sunday, August 13
1. Write A reflection of what you learned during the creative process. Be descriptive.
2. Relate and Apply what you learned to other class assignments you have done.
1. Write A reflection of what you learned during the creative process. Be descriptive.
2. Relate and Apply what you learned to other class assignments you have done.
Photoshop Template Making
August 7-11
This week we are working on making the template background for our digital Scavenger Hunt Presentation.
REMEMBER: We want to use a low contrast background. You will need to re-arrange the content that is currently on the presentation, and lets be consistent with placement, font choice and other aesthetics.
Resend completed presentation with the word TEMPLATE in the subject line of the email.
DIGITAL SCAVENGER HUNT 1
DUE Tuesday, August 1, 2017
Take the words from the word list below, and make a powerpoint/Google Slides presentation. One word per slide. Find the most outrageous photo to use as an example of the word.
DO NOT USE THE STANDARD TEMPLATES FROM THE PROGRAM. BUILD YOUR OWN MASTER SLIDE!!!!!!!!!!!
You must include your sources! You can make a references section in the back, or include it on each slide as in the example.
This project is about perception, creative thinking and digital media use. Be inspired to show the world through your eyes.
1. Site the definition for each of the words, the phonetic breakdown and the part of speech
2. Find a picture that expresses the essence or the spirit of the word.
REMEMBER- Don’t stop at your first idea. Find the most eccentric way out example of the word. Be creative, use the definition to help you find the most expressive picture you can find…..and have fun with it.
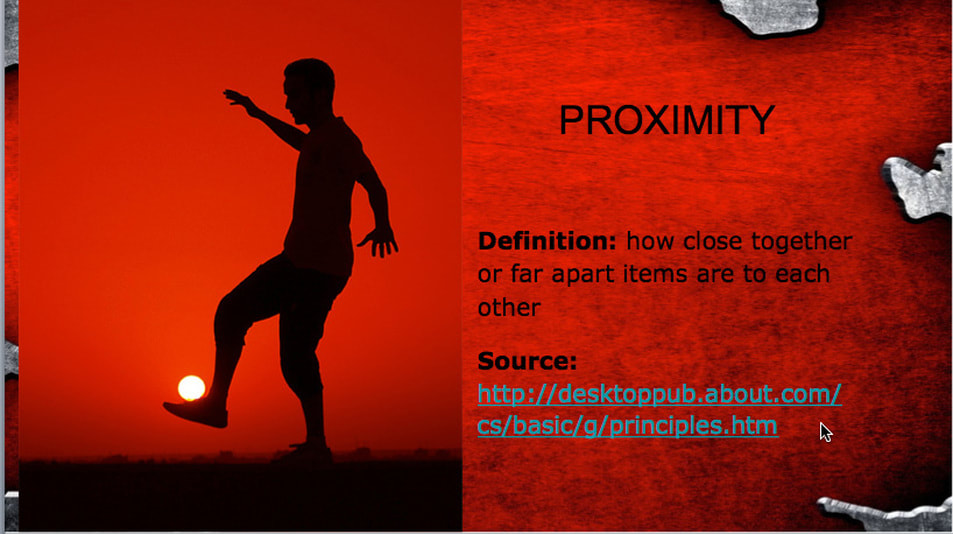
EXAMPLE
proximity [prok-sim-i-tee]
noun
1. nearness in place, time, order, occurrence, or relation.
Although his presence was sporadic and invisible, just the thought of hisproximity delighted and intimidated me.
Show me a picture that exemplifies this definition. Keeping with the context of graphic design.
Use the word list below
Take the words from the word list below, and make a powerpoint/Google Slides presentation. One word per slide. Find the most outrageous photo to use as an example of the word.
DO NOT USE THE STANDARD TEMPLATES FROM THE PROGRAM. BUILD YOUR OWN MASTER SLIDE!!!!!!!!!!!
You must include your sources! You can make a references section in the back, or include it on each slide as in the example.
This project is about perception, creative thinking and digital media use. Be inspired to show the world through your eyes.
1. Site the definition for each of the words, the phonetic breakdown and the part of speech
2. Find a picture that expresses the essence or the spirit of the word.
REMEMBER- Don’t stop at your first idea. Find the most eccentric way out example of the word. Be creative, use the definition to help you find the most expressive picture you can find…..and have fun with it.
EXAMPLE
proximity [prok-sim-i-tee]
noun
1. nearness in place, time, order, occurrence, or relation.
Although his presence was sporadic and invisible, just the thought of hisproximity delighted and intimidated me.
Show me a picture that exemplifies this definition. Keeping with the context of graphic design.
Use the word list below
WORD LIST:
BUTTONS RED SQUARE CLUTTER
UNDERNEATH CAN'T LIVE WITHOUT STRIPES CURVY LINES
SOUND EMPTY DELICIOUS UPSIDE DOWN
SILENCE WATER
PATTERN
TOGETHER
PUSH
DEVELOP
PASSION
BUTTONS RED SQUARE CLUTTER
UNDERNEATH CAN'T LIVE WITHOUT STRIPES CURVY LINES
SOUND EMPTY DELICIOUS UPSIDE DOWN
SILENCE WATER
PATTERN
TOGETHER
PUSH
DEVELOP
PASSION
Your Attitude and Work
Due at 11:59 pm Sunday, July 30th
Vocabulary:
Tolerant Dependable Enthusiastic Positive
Negative Uncooperative Courteous Lazy
Dependable Honest Intelligent Careful
Flexible Reliable
Exercise 1: (classwork)
Find the definitions for each.
Exercise 2: (classwork)
Identify work traits that demonstrate a positive attitude
Discuss the traits that you listed
How can one employee’s negative outlook affect the job performance of others?
Exercise 3: (Homework)
How do the positive traits and behaviors affect the work environment?
The Employer? ( Remember, to be of value to an employer an employee needs to be an enthusiastic representative of the business and offer the finest service)
Each day presents new opportunities to work at developing a positive outlook.
Homework.
Write a sentence that shows a positive outlook for each of the following situations
Write a sentence that shows a negative outlook for each of the following situations.
Situations:
- You depend on a friend to pick you up from work. He does not come
- A parent has to meet your teacher at school
- You are applying for a job
- Your parent breaks an arm at work
- The family car has engine trouble
- Your peer tell you that you are doing something wrong
- You feel alone.
Superhero Sketch
Continue to develop the idea for your superhero. Add to the list of words to support your chosen word. Remember, that is the theme of your hero, not its definition. Make a developed drawing of your hero, then take a picture, upload it to your google account, and share it to [email protected]. Write your explanation in the body of your email. 2 sentences DESCRIBING your hero and his power and what he is all about.
2017/18 Submit Forms
|
Expectation Contract
Internet Use Contract Due JULY 31st, 2017 Download it from the docs to the right, print it out, and have both you and your parents sign it, then turn it in on or before JULU 31ST, 2017 |
| ||||
Google Account/Inspirational Quote
Due July 23rd
Send me an unbelievably inspirational quote from your google account, and include an explanation as to why it is important to you.
Be sure it is an account with your name in it. I wont know who [email protected] is.
This must be a gmail account, not yahoo, hotmail or anything else, just gmail.
Send me an unbelievably inspirational quote from your google account, and include an explanation as to why it is important to you.
Be sure it is an account with your name in it. I wont know who [email protected] is.
This must be a gmail account, not yahoo, hotmail or anything else, just gmail.
Materials List |
| ||
Due July 31st, 2017
2016/17 Projects
Create the Package for your Promotional CD
|
CD Cover Design
Template CD400_out is the Front and Back Booklet Template CD400_in is the Page 2 and 3 of Booklet Template CDt100_in is the Inside tray art Template CDt100_out is the Outside tray art Template UD109 is the CD label itself. Your design needs to reflect the look of your commercial. Include the "Call to Action", contact info, headlines, etc. |
|
| ||||||||||
Edit Commercial
Due Friday May 26 at end of class.
Use your training in Adobe premiere to edit your commercial.
60 seconds exactly.
Use Transitions, titles and a call to action
Use your training in Adobe premiere to edit your commercial.
60 seconds exactly.
Use Transitions, titles and a call to action
Acquire Assetts
Due Friday, May 19 at the end of class
Use your storyboard as a guide to how and what to shoot for your commercial. Dont forget the cut in shot, which is for instance if some one asks what time it is, and the other person says 2:00, we usually put in a close up of a watch saying 2:00.
Use a good variety of types of shots as well as a variety of camera angles to keep your stiory interesting.
YOU MUST INCLUDE A CALL TO ACTION. What do you want people to do specifiacally.
STORYBOARD
|
Due friday May 12 at the end of class
Download the form from the downloads page. You will need several sheets to properly complete the storyboard. You must include 1. Pictures of each significant frame of you commercial 2. Indicate in your drawing the camera angle you plan to use. 3. Annotate each frame a. Camera movement. b. Transitions. c. camera angle. d. Shot type. e. include audio (sound effect, music, spoken word etc) 4. Titling 5. call to action |
| ||||
7 SHOT EXERCISE
Due Wednesday, May 10, at the end of class
You will create a movie based on a demonstration of how to do something simple, like tie a shoe.
Here are the requirements
1. Choose an event to demonstrate.
Keep it simple, like how to pour a glass of milk, how to sharpen a pencil etc.
2. Shoot Your sequence.
Using your camera phone or a still camera, shoot your demonstration sequence. Be sure what you are trying to demonstrate is clear and precise. You are telling a story, so you don't want anything to be confusing or not clear. Think about camera angles, points of view etc.
Must show at least seven steps to the how to movie
3. Must comply with all of the common sense statutes in the Authorization form.
4. Upload clips to your Google Drive.
Make a folder for this project, then a folder for the clips. Upload them to your clips folder. Then share the
clips folder.
Your clips are due on Sunday August 30th at 11:59 pm.
5. Editing.
We will be editing these shots together.
6. Final piece.
Your final piece will be a 7 shot sequence with titles, Open and Close Screen.
7. Export the movie to an mp4 file.
ASAP Summer Trip
See Mr Exum if you are interested.
|
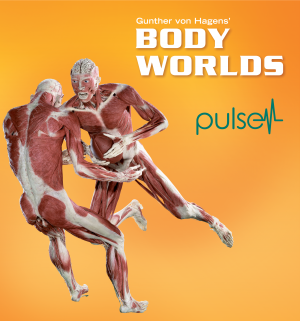
Come experience the West Coast debut of inventor Dr. Gunther von Hagens’ BODY WORLDS: Pulse — a convergence of aesthetic anatomy, health and wellness.
This special exhibition presents the body in health and distress, its vulnerabilities and potential, and many of the challenges the human body faces as it navigates the 21stCentury. Through interactive multimedia, guests will learn about the wonders of the real human body, and marvel at its elegance and complexity. californiasciencecenter.org/exhibits/body-worlds-pulse?gclid=Cj0KEQjwoqvIBRD6ls6og8qB77YBEiQAcqqHe4ZMGRv_eqasR54HkReGVAjb9n4Vp3EMhv1TbKBPeBcaAiwI8P8HAQ DEAM BIG IMAX Movie
From the world’s tallest buildings to underwater robots and a solar car race across Australia, Dream Big 3D celebrates the human ingenuity behind engineering marvels big and small, and shows how engineers push the limits of innovation in unexpected and amazing ways. Discover the inspiring stories of human grit and aspiration that reveal the compassion and creativity that drive engineers to create better lives for people and a more sustainable future for us all. Narrated by Academy Award® winner Jeff Bridges. californiasciencecenter.org/imax/dream-big-3d?gclid=Cj0KEQjwoqvIBRD6ls6og8qB77YBEiQAcqqHe8HGIXmLTDJqTynZED5A93wenBS3NdrXXO1tf0_lDdcaAoRp8P8HAQ GRIFFITH OBSERVATORY
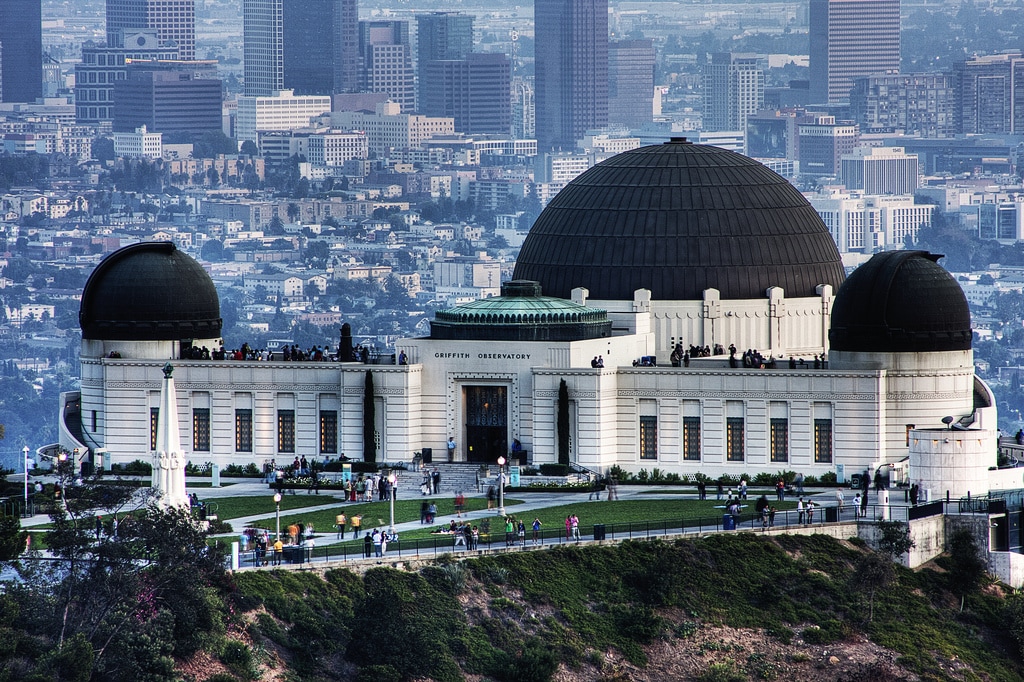
Southern California’s gateway to the cosmos! Visitors can look through telescopes, explore exhibits, see live shows in the Samuel Oschin Planetarium, and enjoy spectacular views of Los Angeles and the Hollywood Sign. www.griffithobservatory.org/ |

|
7 Shot Exercise
Due Monday, May 1st at the start of class.
1. Choose an event to demonstrate.
Keep it simple, like how to pour a glass of milk, how to sharpen a pencil etc.
2. Shoot Your sequence.
Using your camera phone or a still camera, shoot your demonstration sequence.
Be sure what you are trying to demonstrate is clear and precise.
You are telling a story, so you don't want anything to be confusing or not clear. Think about camera angles, points of view etc.
3. Due Date.
Your photos are due on Mondayat start of class.
4. Editing.
We will be editing these shots together.
5. Final piece
Your final piece will be a 7 shot sequence with titles, Open Screen and Close Screen.
eForce
|
Due at the end of class on Wed, April 26, 2017
Client Research and Meeting Preparation: You will review the background of E-Force by looking at their website (www.e-force.com) and will prepare for your client meeting by answering the following questions about the company: 1. Who, in detailed description, is the client's primary audience? 2. What are 6 current strengths of the client's product, from what you have seen? 3. Where do you think the client's mission/product needs clarification or revision? Next, list three-five questions you have for the client to help clarify confusions or bring your further understanding about the client’s needs |
| ||
Ad Analysis


Choose THREE of the Advertisements posted to the right and answer the questions on the ad Analysis worksheet.
Turn in one worksheet for each ad.
| 2c_adanalysis.docx |
Promotional DVD Homework
Due Wednesday, April 12
1. Choose your top 3 ideas from your brainstorm list
2. Write an overview for each of what will happen in your commercial. Should be three paragraphs. This is the story you are telling in your commercial. BE sure there is a beginning, a middle, and an end to your story. Use your skills with DESCRIBE.
3. Write an overview for each of you 3 ideas.
Promotional DVD Part One
|
Due Friday, April 7 at end of class
You will be making a cover design, a label design and a 60 second commercial for the product. So you will need to pick something that you can actually make, be realistic with your ideas. Brainstorm ideas for the company and the product that you can work with for this project. You should be able to have a list of 10 - 15 ideas. Explain or describe a little bit about the idea when you list it. Next up is the Video Proposal Form |
Form due Friday, April 7 at end of class
| ||||||
Typography Self Portraits
|
Due, Friday, March 17 at the end of class.
Medium: Adobe Photoshop Time: 1-2 Weeks Grade: 9-12 Art Principles: BALANCE, COMPOSITION, EMPHASIS, CONTRAST Objective: Create a portrait using only a variety of Letters and numbers and or symbols. Tool: Text tool Using the images we will shoot for your head shot as a guide, your assignment is to make a self-portrait using only typographic characters. Use the letters to illustrate your face, thinking about how your design reflects you. Think about your own identity and study your face and its characteristics. Examine the forms of typographic elements closely to determine what will represent you best. Process letters, numbers, and alphabetic symbols such as parentheses are allowed, as are combinations of different typefaces. Your design should be black and white. TIP: Do not to outline or fill in large areas. Attention to detail is important. Limit the amount of parethesis and letter "C"'s. |
|
1. Take your picture
Make it interesting
Asymetrical angles and Profiles
Choose File>Save from the menu bar.
Choose Desktop, and create a new folder called TypefaceProject
Name your photo"Me", then save your photo to this folder
2. Open your image in Photoshop
Click on the Photoshop Icon in the Dock (the blue PS)
Go to File > Open and locate the photo of yourself.
Click OK and the file will open.
3. Rename the original image and save:
Go to File > Save As and type in your first name, then click ok
Rationale: The reason you are doing this step is so that you work on a copy of the original and not the original itself.
4. Be sure the following palettes are open:
Go to Window from the menu bar. Show the following Palattes:
Layers Palette
Character Palette
History Palette
(If it has a check next to its name, it is already open on the right side of your screen. If it is not checked, let go of the mouse
when you scroll over the name and it will appear on the right side of the screen.)
5. Choosing the best character:
Start with an eyebrow or something clear or simple.
Choose the Type tool.
Type a letter or character that you think will closely represent the shape of the eyebrow. When you click on the image with the
type tool, Photoshop will add a new layer to your layers palette. I strongly suggest you name it after the part of the face you
are trying to represent i.e. R pupil, or L eyelash, etc. This will make it easier to find in the layers later if you need to.
Manipulation Options:
Character Palette: (on right side of screen)
Change Font Families
Change Font Size
Change Font Style
Scale Font Horizontally or Vertically
Edit > Transform (From the Menu Bar)
Scale – make the item larger or smaller
Rotate – change the angle of the item
Skew – slide the top to the right or left while the bottom stays fixed
Warp – change any side or corner independantly
Flip Horizontal/Vertical
You will need to experiment with each selection until you find one that you think best fits the portrait.
6. Move the font into place:
You can move your font into place over your portrait using the Move Tool ( the black arrow and the first tool in the tool box on
the left side of your screen) or by clicking inside the box and moving the font over into position.
7. Check your work without the image underneath:
Go to the Layers palette (on the right side of your screen) and find the “background layer” and close (click on) the eye; the image
will disappear. Click again and it will reappear. You can periodically re-check your progress by doing this step to see how your
font portrait is coming along without the image underneath.
8. Creating a new Layer:
Go to the menu bar and click Layer > New > Layer.
A window will appear and you will need to name the new layer.
I strongly suggest you name it after the part of the face you are trying to represent i.e. R pupil, or
L eyelash, etc. This will make it easier to find in the layer later if you need to.
9. Working with Layers:
It is important that you understand what layer you are on at all times. You can tell what layer you are on because it will be
highlighted in the Layers Palette.
10. What if you do not like something you created and want it GONE?
You can always choose edit>undo from the menu bar. If there is more than one step you want to undo, click on the last layer in
your History palette, now keep clicking on each layer above the last until your mistake disappears. When it disappears, continue
with the correct procedure.
11. Save your work:
Go to File > Save
Be sure to save it to your project folder on your desktop. Proceed to SHARE it to: [email protected]
Pop Art Exercise
|
Due Wednesday, March 1 at end of period
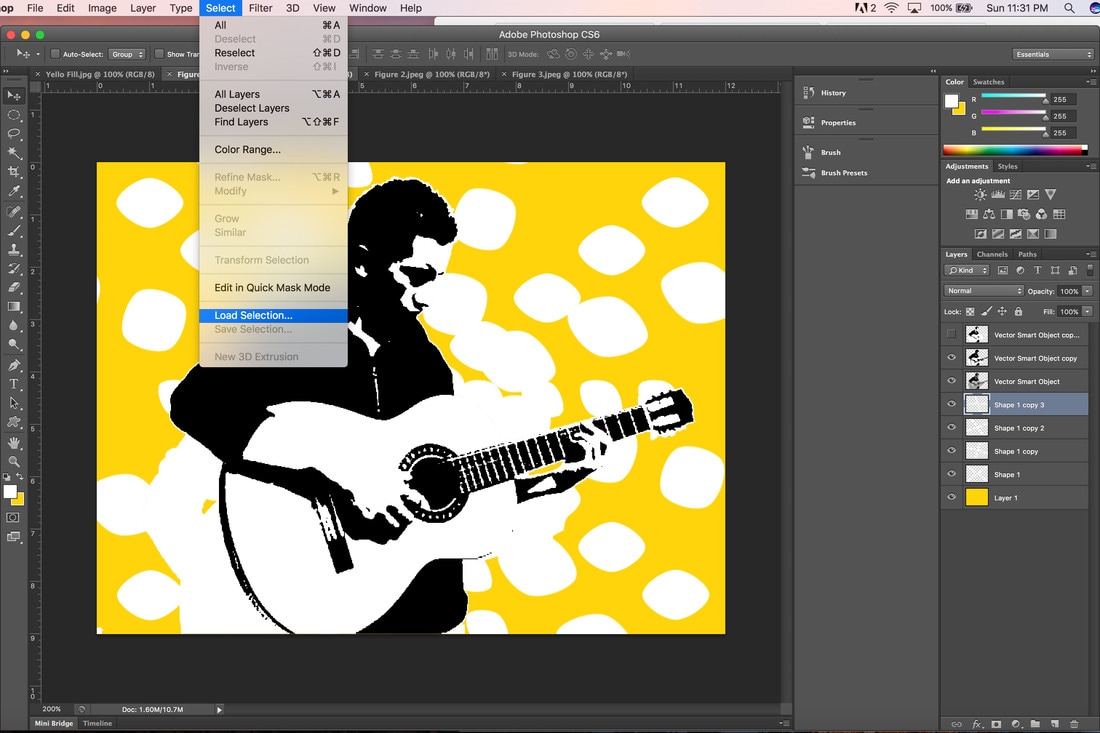
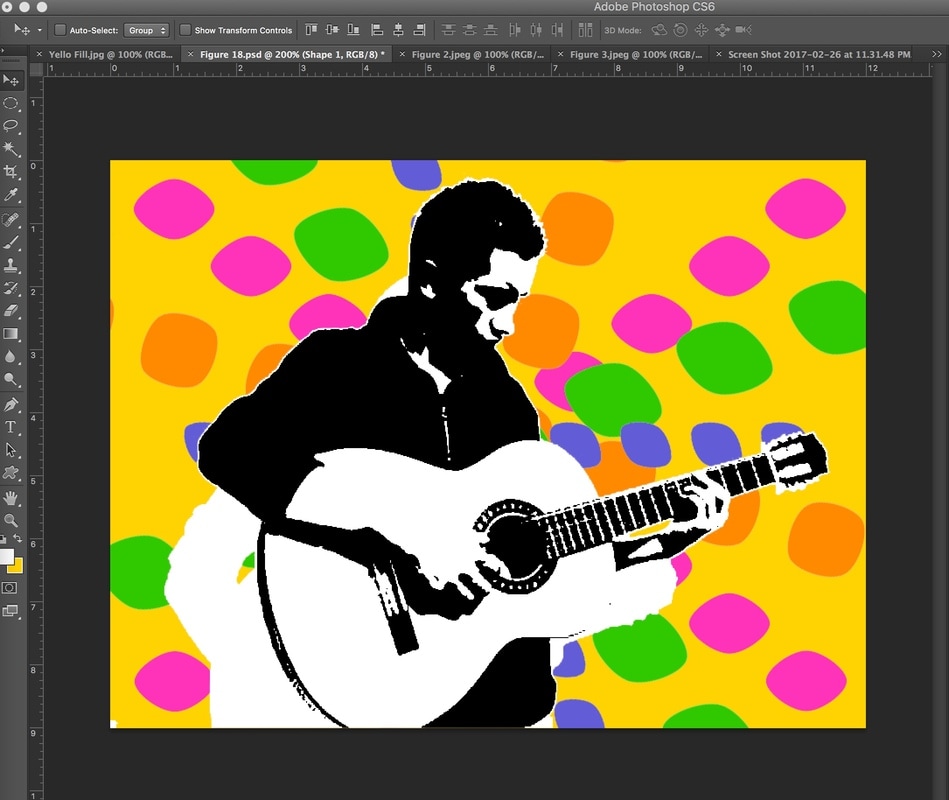
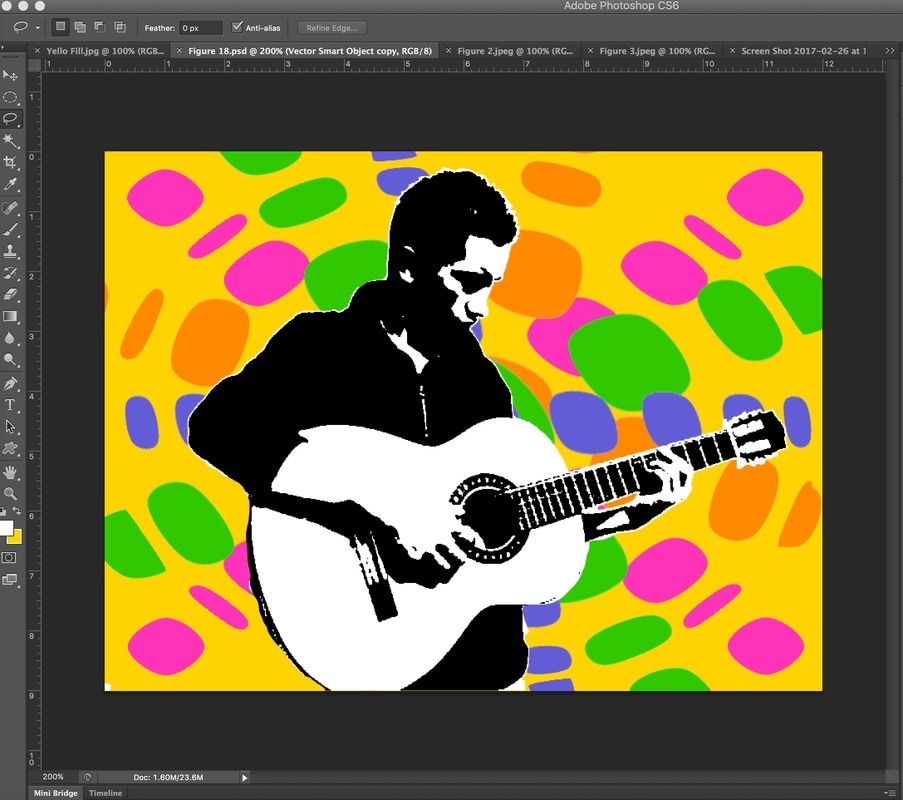
We’ll create a popart design using an image of the singer shown. 1. Download the image to the right and save it to your "PopArt" folder in your projects folder. 2. Open Photoshop, and then open the Guitarist image.. 3. Choose the Lasso Tool from the Tool Box. 4. Trace around the outer edge of the guitarist. To add to the selection, hold SHIFT. To subtract from the selection, hold OPTION. 5. Press Ctrl+Shift+I, or choose SELECT > INVERSE to inverse the selection. 6. Press delete to remove the background area. 7. Now duplicate the guitarist layer twice. 8. Select the top layer. From image menu select ADJUSTMENTS > THRESHOLD. 9. Apply settings as shown 10. Since the guitar is white, we can’t see much effect in the guitar area. For that we’ll remove the guitar from this layer and apply threshold again on the layer below. 11. Create a selection of the guitar using the magic wand tool with a tolerance of 5. If the wand selects the white hilight around his shoulder, use the lasso tool and hold OPTION to subtract from the selection. 12. Press delete to remove guitar to reveal the unadjusted guitar on the layer below. 13. Select the second layer from top. From image select ADJUSTMENTS > THRESHOLD. Apply settings of 128 as shown. 14. Now, Select the Background Layer. Fill the background layer with yellow. 15. Turn off all of the guitarist layers. 16. Draw an X shape using CUSTOM SHAPES from the tool menus, and the X from the Options Bar. 17. Duplicate this layer many times. 18. If your layer looks like figure 16, then you need to rasterize the layer. Choose LAYER>RASTERIZE>LAYER. 18. Scale and rotate each of the X layers randomly to resemble something like you see in Figure 17. 19. Unhide all the GUITARIST layers. 20. Fill each of the X layers with a different color. To do that, we need to choose SELECT > LOAD SELECTION so that the X on the layer becomes selected. Then choose FILL and then COLOR from the Pop Up Menu. 21. Play around with the layer modes of the different tile layers to get an interesting background effect. |

Figure 1
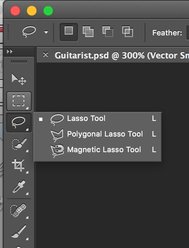
Figure 2
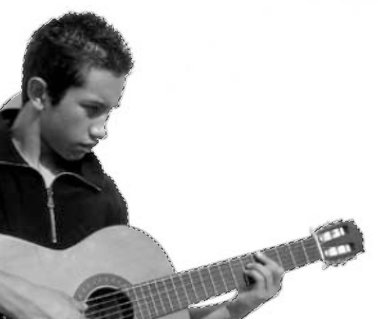
Figure 3
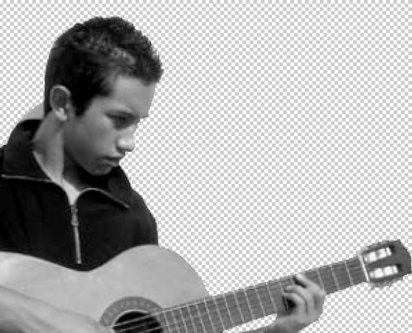
Figure 4
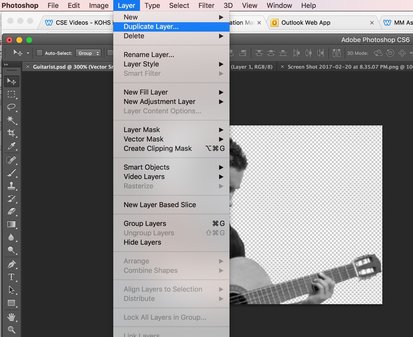
Figure 5
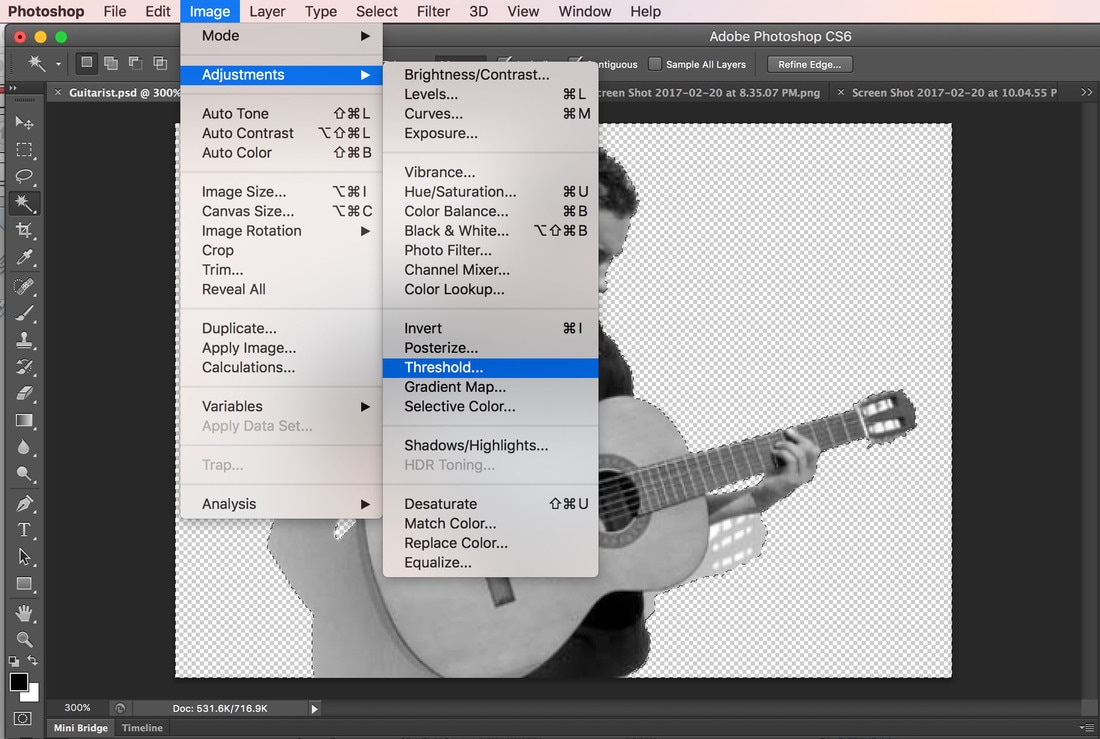
Figure 6
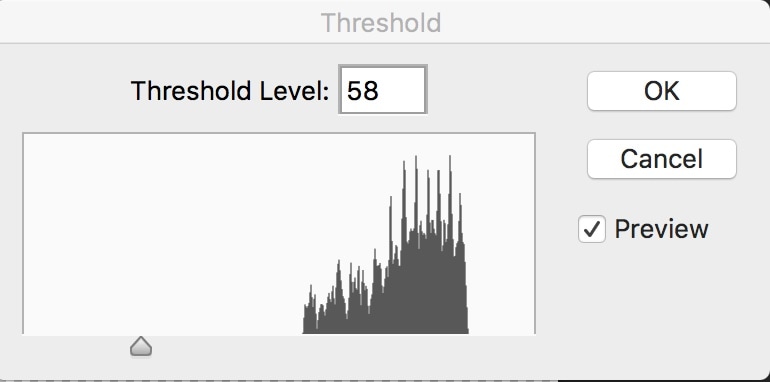
Figure 7

Figure 8
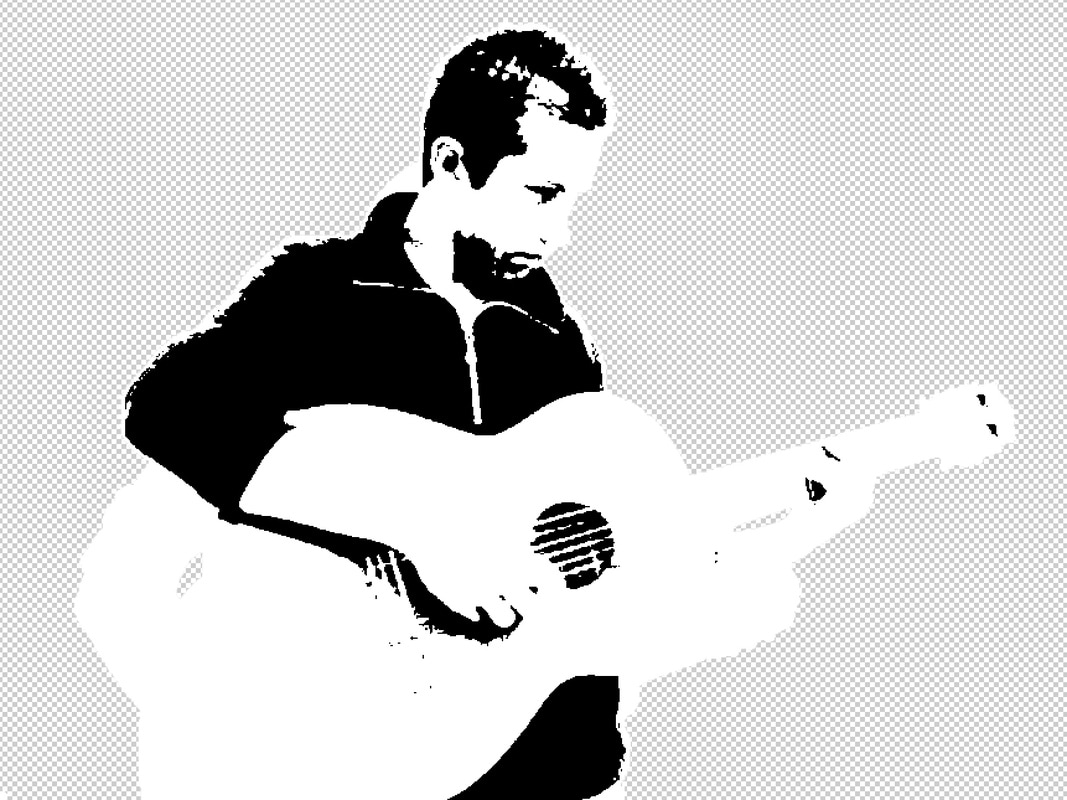
Figure 9
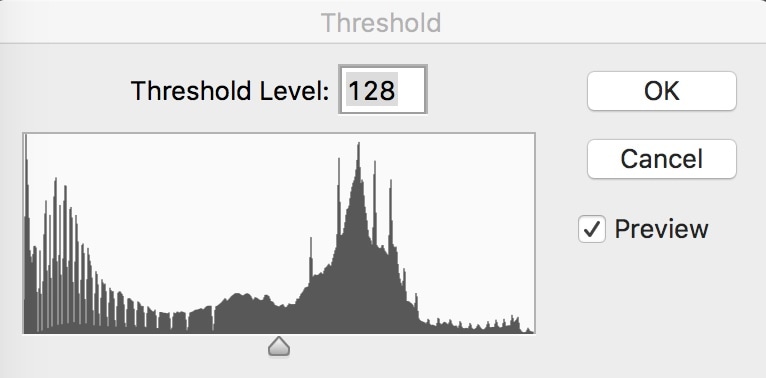
Figure 10
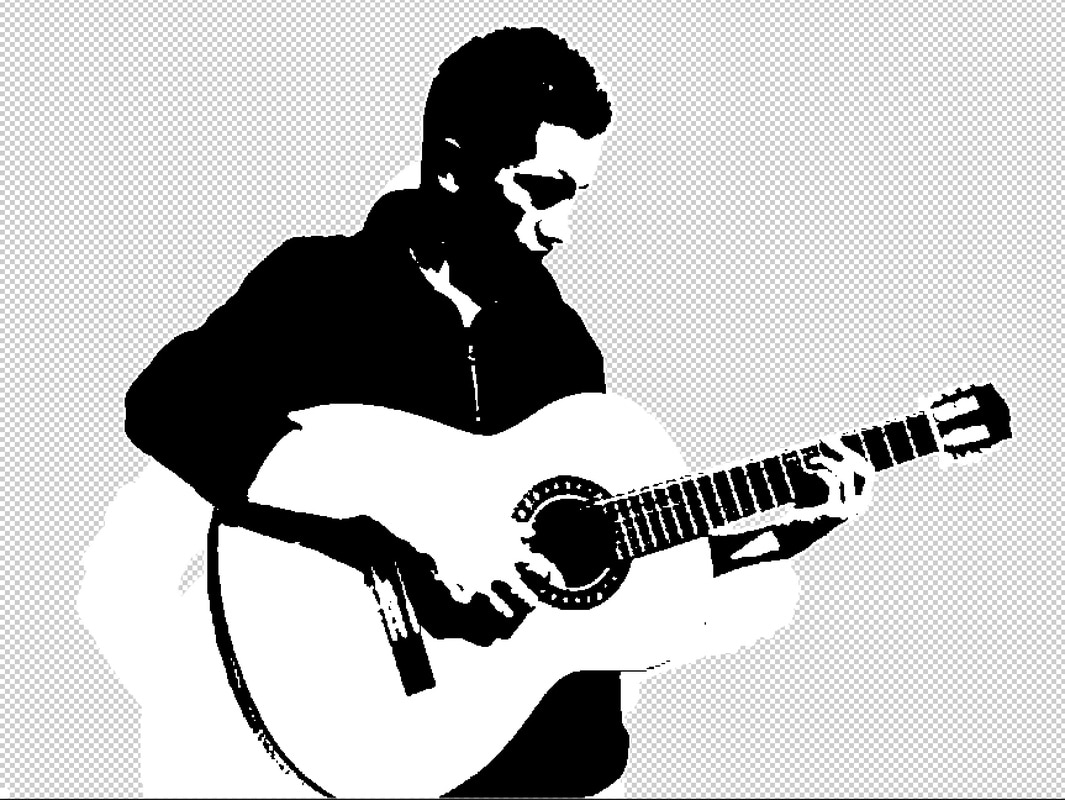
Figure 11

Figure 12
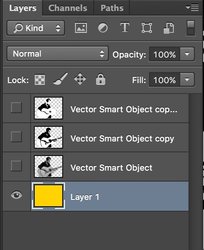
Figure 13
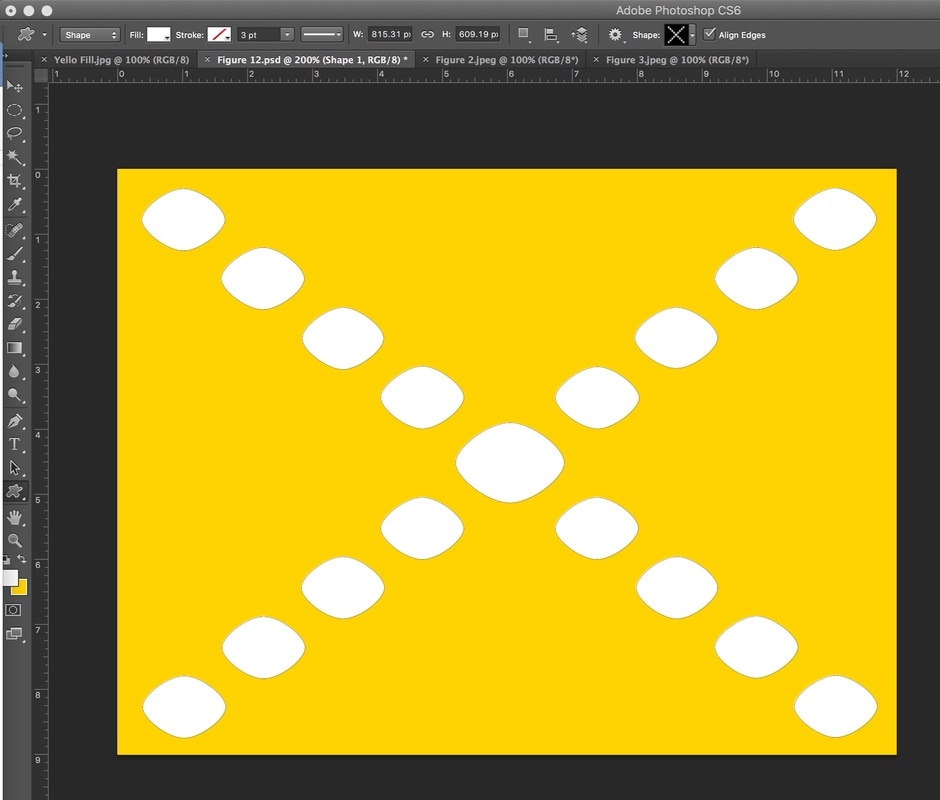
Figure 15

Figure 16
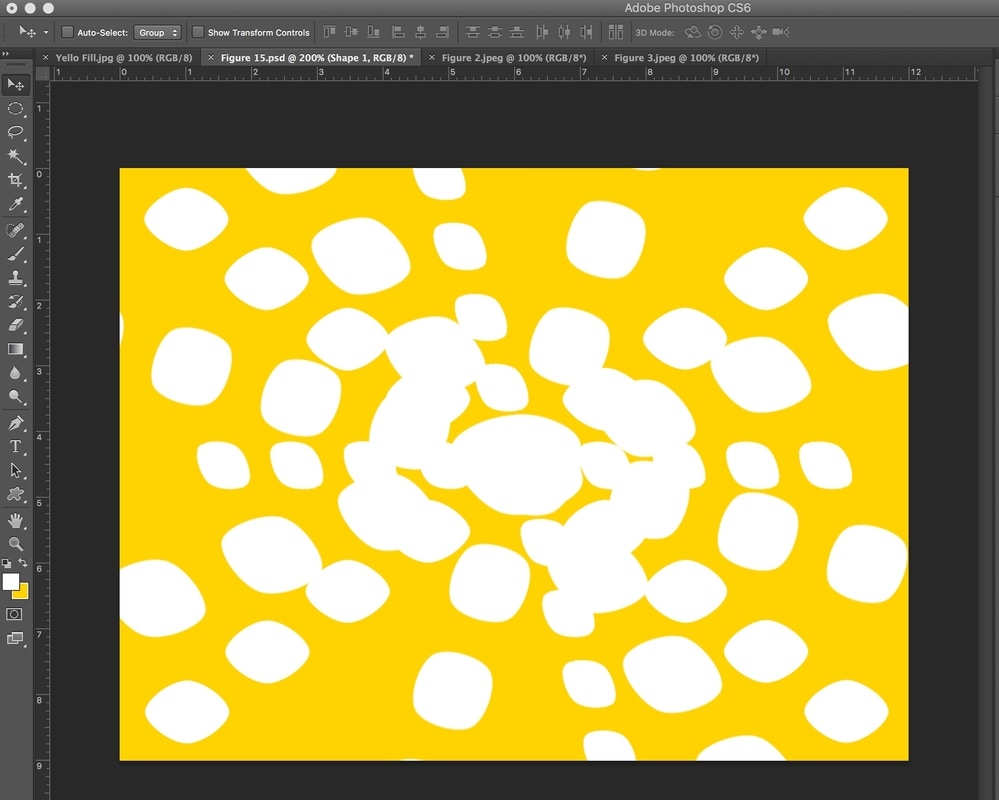
Figure 17
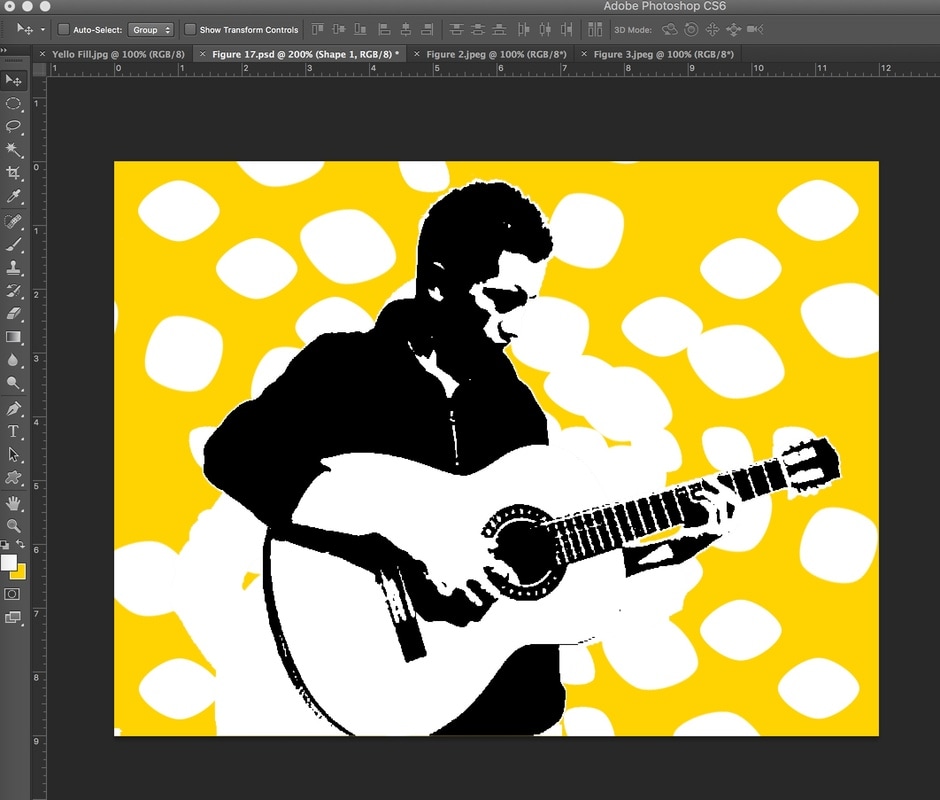
Figure 18
| ||||
PSA Poster
|
Due Wednesday, February 16 at the end of class.
Think of an issue that concerns you about society. It could be a local issue – like trash on campus, or lack of parking. Perhaps your concern is more global – like poverty, cancer or recycling. Pick a concern near to your heart, and create a poster campaign to increase awareness about the problem and your idea for a solution. Procedure: 1. Create a layout that is 8.5 x11 in size 2. Add images that will communicate to your viewers about your issue. 3. Think of a slogan to catch your viewer’s attention 4. Add text to explain/promote your cause and solution 5. You must include a meaningful headline that creates interest. 6. You must include a call to action that asks the audience to do something or act on something. |
| ||
Signature Tile Design
|
DUE: Wednesday, February 1
Repetition and Pattern In this project, you will be creating a repeating pattern design out of your signature. The objective is to make a simple design become a more complex and completely different design through the use of color and repetition. By repeating the same shapes, you will create a pattern that should create a feeling of rhythm and movement. Objective Understanding Closed shapes and how to fill them Using the transform, paint brush, and paint bucket tools Using creative thinking skills to figure out how to create a unique design using your name. Color theory. You will create two different tile designs. As you execute it in Photoshop, you will choose 2 different color themes to work with. Choose 2 of the following: Monochromatic, Analogous, Primary, Complimentary Warm or Cool . To Retrieve your scans: Click on your FINDER from the dock. Choose column view from the four icons at the top of the finder window. In the left most column, scroll down untill you see ALL. Click on ALL In the second column, scroll down to TEACHER STATION and click. Choose CONNECT AS. Username : eagles Pword: win Then choose Media Server 2 > Classes > 2016_17 > MM > P# > Sig Files Then navigate to your period and the sig File Folder. |
| ||||||
Tile Pattern
|
Due at end of class wednesday, January 18
Repetition and Pattern In this project you will create a repeating pattern design, by creating a simple design then duplicating and rotating it several times. The objective is to create a pattern with just a few parts. By repeating the shapes, you will create a pattern that presents a sense of rhythm as well as movement. Objective Understanding what layers are and how to use them effectively. Using math skills to reduce and increase the work area. Understanding the Principles of Design by using Repetition to create Rhythm Using creative thinking skills to figure out how to create an interesting design. Download the file to the right to get started |
| ||
Talk Shape Exercise
Due at end of class, Friday the....well, you know!
BASIC:
Creating the Talk Shape for dialogue –
TIP: If you wish to change the Text Instead of the Talk Shape - Select the Text layer in the Layers Palette. Double-click on the text in the Document Area. You may now change your text.
Creating a Path (Outlining) –
BASIC:
Creating the Talk Shape for dialogue –
- Open Photoshop.
- Choose File > New.
- Make the file pretty large, 1000 x 800 ppi.
- Name your file “Talk Shape.”
- Choose the"Rectangle Tool" from the tool box, right above the hand tool. Click and hold on the tool so the Pop Up window appears. Choose "Custome Shape Tool"
- About midway accross the Options bar at the top, is the Shape Picker. Click the downward facing triangle and the shape choices will appear.
- Choose the Talk Shape.
- Choose a Foreground color.
- In the Document area, drag out the Talk Shape. Make it large enough to hold the amount of text you plan to type.
- TIP: To change the direction of the stem use Edit > Transform Path > Flip Horizontal.
- Select the Type Tool.
- In the Character Palette, choose the font, font size, line strength, paragraph orientation and color.
- When you click in the Document area a New Type Layer will form in the Layers Palette.
- Type your message.
TIP: If you wish to change the Text Instead of the Talk Shape - Select the Text layer in the Layers Palette. Double-click on the text in the Document Area. You may now change your text.
- Save - Command-S
Creating a Path (Outlining) –
- Activate the Shape Layer in the Layers Palette.
- Open the Paths Palette. Notice the Shape Layer is a vector Layer.
- In the Paths Palette, click and hold the Shape 1 Vector Mask and drag it down to the Create New Path icon located at the bottom of the Paths Palette (next to the trash can) to duplicate it. Path 1 will be created.
- Choose the Shape tool.
- Use Command-T to select Free Transform.
- Drag the box outward. A line will appear around the Talk Shape. (Holding Shift while dragging will keep the proportions and the transformation centered.)
- Hit enter to transform your path.
- Click on the Layers tab to return to the Layers Palette.
- Make a new layer by clicking on the New Layer icon (bottom right of the Layers Palette next to the trash can).
- Choose the outline color you wish to use as your Foreground color.
- Select the Paintbrush in the Tool Box.
- In the Options bar, choose the width of the brush. To create solid lines use a hard-edged (dot) brush.
- In the Paths Palette select the Stroke Path button (second from the left). Your path will be drawn using your selected Foreground color.
- Click in the Paths Palette below your path, in an empty space, to deselect the active path and make the path line in your image disappear.
- Save - Command S.
SEMESTER BREAK
Powerpoint Final
Due at end of class on the day of your final
Present your final logo design with a Powerpoint Presentation.
Creativity: Remember that completing the minimal project requirements will earn C work. Adding more information, pictures, descriptions/explanations etc that are relevant and serve to a better understanding for the audience will earn the higher grades. So push past your first attempt, and dig deeper for the more solutions. This is a "design" project, so give it your best shot at being aesthetically pleasing. Create your own background template in either Illustrator, Photoshop or both, but make it custom.
Include:
Title Slide: Name Logo Project, Your Name, Period #, Fall 2016
Slide 2-4: Name logo Identities research. This may take 3 or 4 slides. You need to organize the information in a way that is easy to read if it were to be presented.
Slide 5-7: Your 15 sketches. This should take at least 3 slides. One for each of the pairs.
Slide 8-10: Your Final 3 logos. Present one logo per slide. You will need to open your .ai files in Photoshop, and resave them as .PNG files, so that they are transparent when brought into Google Slides.
Slide 11-12: A reflection of what you learned during the creative process. Be descriptive.
Slide 13-14: Relate and Apply what you learned here to other class assignments you have done.
Trademark Sketchbook Assignment
|
Due on Wednesday, November 30 at 11:59 pm.
Find 5 examples of the following trademark types. 1. You are to find them on magazines, packages around the house, etc. NOT ON THE INTERNET!. 2. Cut them out and paste them in your sketchbook. 3. Label them as to the category that they belong to. 4. Write a brief description of what each company does. 5. Take a picture when you are done and share it to [email protected] 6. You Cannot Use Any Of The Given Examples!!!!!!!!!!! 1. Wordmarks 2. Abstract/Symbols 3. Lettermarks 4. Combination Marks 5. Emblems Be sure to identify which marks you are submitting. |
| ||
Identities Pairs
Due, at end of class Monday, November 28
Now make a drawing of your interpretation of the two words together.
Make Five (5) drawings for each of the 3 pair of words as a minimum quantity.
The more quality drawings/pairs you do, the better your chance of developing a great logo!
Thats 15 drawings in all, plus the word list as a minimum.
The more you do, the more you earn!
Identities List
HOMEWORK
Due, at end of class Friday, November 18
Step 1 - List
Make a list of a minimum of 40 words which describe you. Use your name, not Bubba Bump or Bugs Bunny!
Step 2 - Matching
From your list, choose Three (3) pairs of words. Match words that offer a funny or unique pairing. The more naturally the words go together, the less creative or more expected the result will be. For instance, "green" and "pants". These 2 words naturally go together, so there isn't an unexpected outcome from this pairing. While "cereal" and "mustache" could create some very interesting images.
Identities
YOUR NAME STORY
Due by Friday, November 18, by the end of class
Sure, we know each other’s names, but do we know the story behind that name?
Think about the story of your name.
1. Create a new Google Doc, name it “Identities”
2. Jot down your thoughts and feelings about the story of your name.
3. State your name, age, birthday, place you were born
a-Why did your parents choose your name?
b-What is the family History?
c-If you were named after someone, who was it?
d-In what country did your name originate?
e-How the name changed over time?
f-What does your name mean?
g-How do you feel about the meaning of your name?
h-Would you change your name? To What?
ABOUT YOU:
i- School subjects and activities you excel in
j- Your personality
k- Your role models
l- Your plans after high school
m- Your favorite foods
YOUR HOBBIES
n- Your favorite things to do not at school
o- Your favorite music groups or singers
p- Your favorite places to eat
q- Favorite colors
r- Things you do for fun
i-List three stories in the news from the day you were born. What was happening in the world?
Create A Retro Badge
|
Due Thursday, November 10 at the end of class
This tutorial will help you create a vector retro badge or emblem. Particularly, in this year, the number of websites using these as attention grabbers is increasing, and it is being touted as a design trend that is not very likely to cease anytime soon. So, it becomes very important as a designer to know how to create these badges. Having these in your arsenal is sure to grab some eyeballs! So what are we waiting for, let’s get started. Step 1 Alright, let’s start off with the usual drill. Create a new document. I have started with an artboard of width and height of 1000px. Also, it helps to have Smart Guides turned on. They are very helpful for aligning elements on the artboard. If you haven’t already enabled them, hit Ctrl + U or go to View > Smart Guides. Now, with the Ellipse Tool,click anywhere on the artboard and in the pop up window, hit 280px in both width and height. Step 2 Now, click on the circle to select it and then change its Fill to white. Since this tutorial will be dealing a lot with different effects and such, it helps to have your Appearance Panel open. Hit Shift + F6 or alternatively, go to Window > Appearance. Add a stroke to the circle and change its weight to 2pt. You can use the Appearance panel to make these changes, as shown in the image. Step 3. With the circle selected, go to the Appearance Panel and hit the first button from the bottom-left to add a new stroke. Click on the word “Stroke” to change its settings. Now add in the values as shown in the image. Make sure that the new stroke is below the previous stroke. If it isn’t then drag it below the previous stroke. Step 4. With the circle selected go to Effect > Distort and Transform > Zig Zag and enter the values as shown in the image to the right. Step 5 Let’s round off the spikes. Again, with the circle selected, go to Effect > Stylize > Round Corners and enter a radius of 2 px. You would have observed in the previous step that there was an option to “Smooth” the points. Yes, that could have been done, but, having manual control on how smooth you want it to be is much better, which you could only achieve with this step. Step 6. Copy the circle by hitting Ctrl + C and paste it in front by hitting Ctrl + F. Now, select the new circle and change its dimensions by using the toolbar on the top (You can view it only after selecting any element.) Also, don’t forget to click on the link so as to make sure that the dimensions are equal and proportional. Step 7 Let’s modify this new new circle. With the Appearance Panel, select both the “Stroke” and delete them using the trash bin icon below as shown in the image. Step 8 Let’s give this new circle a different color. With it being selected, either use the Fill Square from the Tool bar or you can directly change the Fill using the Appearance Panel as shown in the image below. The color values are also given in the image for reference. Step 9 In the Appearance Panel, hit on the “New Fill” button to add a new fill. Also navigate to the Swatch Libraries Menu by clicking on the down pointing arrow next to the fill content (as shown in image). This would bring out a pop out menu. Click on the bottom-left first icon to go to “Swatch Libraries Menu”. From there, choose the “Diamond” texture by going to Patterns > Basic Graphics > Basic Graphic_Textures. Step 10 Now, set this new fill on overlay with 48% opacity. You can do this by clicking on the right pointing arrow next to the word “Fill”. Then with this Fill selected go to Effect > Texture > Grain and set both, Intensity and Contrast to 100. Step 11 Again, copy the circle by hitting Ctrl + C and paste it in front by hitting Ctrl + F. Now, select the new circle and change its dimensions by using the toolbar on the top. Step 12 With the Appearance Panel, add a new stroke to this new circle. Also change the existing bottom fill to values shown in the image. Step 13 Now, click on the texture fill. Let’s modify it. Again, just edit it (don’t add a new fill). Navigate to “Swatch Libraries Menu” as mentioned before. From there, go to Patterns > Decorative > Decorative_Geometric1 and select “Crosses Color”. Change the opacity from 48% to 10% and delete the grain effect. Step 14 Copy the new circle again, paste it, and change the dimensions of the latest circle again by using the toolbar on top. Step 15 Using the Appearance Panel, edit the stroke and the base fill. And yet again edit the texture fill to “Diagonal Lines” from Patterns > Basic Graphics > Basic Graphics_Textures and set the opacity to 34%. Change the “Overlay” to “Normal”. Step 16 Copy and paste the latest circle. Adjust the dimensions so that they are less that the previous circle by a small margin. In the Appearance Panel, delete everything except the “Stroke” and adjust it accordingly as shown in the image. This trick creates a cool “ring of dots”. Step 17 The base of our badge is done, let’s move on to add features to its face. Let’s start off by adding some text. Using the Type Tool (T) click anywhere on the artboard and type in anything that fancies you. I’ve typed in “League”. Adjust the Font, the Font style and the Font size accordingly as shown in the image. Change the Fill, if you wish. Step 18 With the text selected go to Effect > Warp > Arc Upper and set in the values as shown in the image. We are warping the text so that it fits nicely in the circular structure of the badge. This is editable, so even after warping you can easily edit the text. Step 19 Let’s add a good drop shadow to this text so as to make it look 3D. With the text selected, go to Effect > Stylize > Drop Shadow and set in the values as shown in the image. Step 20 Now put this text on the badge and align it as shown in the image. One neat trick by using Shift + Arrow keys to nudge the text by 10px. You can also select both the circle and the text by holding down Shift and clicking on both these elements. Then, using tools on the top, click on “Horizontal Align Center” to horizontally align the text centrally in relation with the circle. Step 21 Let’s move on to add some decorative elements on our badge. Start off by creating a star using Star Tool. Click on the Star Tool and drag out a star onto the Artboard. Hold down Shift to get a proportionate star and use the arrow keys to adjust how many points you wish to have. Duplicate this star (by clicking on it and then dragging it while holding Alt). Using the Direct Selection Tool (A) select the top point of the duplicated star and nudge it using Shift + Up arrow to nudge it in measures on 10px upwards. I’ve nudged it 70px. Step 22 Again duplicate the duplicated star and the turn it upside down by selecting it and going to Object > Transform > Reflect, choose “Horizontal” and click OK. Step 23 Align them as shown (Smart Guides will show you where their commmon centres are). Also you might have to change the stacking order so as to have the original star on top on the other stars. Use Ctrl + [ to push an element down and Ctrl + ] to pull an element up. Step 24 Make two copies of these stars and align them with the badge as shown in the image. Scale them accordingly as you wish. Step 25 Draw some basic rectangular shapes using the Rectangle Tool (M) and make two copies of this. Use the image below for reference. Step 26 Align these to the badge as shown. You will probably have to scale them. But, you can position them wherever you wish, however big you wish. Step 27 Add some extra text. I’ve added “of” with the font “Lobster 1.3″ at 35pt. Also, I’ve applied a basic drop shadow (Effect > Stylize > Drop Shadow). Place them between the rectangles we made, Use the image for reference. Step28 Using the Pen Tool (P) and Rectangle Tool (M) draw some shapes as shown in the image below. For now, set their stroke to black and fill to white. Step 29 Graphic Styles in my opinion is the best feature in Illustrator. You can apply a set of styles to any shape, path or text which also remains editable. Like Layer Styles in Photoshop, but, better and more flexible. Now, let’s create two graphic styles that we will apply to our shapes later. So, start off with any shape and modify its Fill and Stroke as shown in the image. Step 30 Add a new fill to this shape and again navigate to “Swatch Libraries Menu” and go to Patterns > Basic Graphics > Basic Graphics_Textures and select “Diamond”. Set this fill on overlay. Step 31 Let’s add some drop shadows to give it a 3D effect. So, select the shape and go to Effect > Stylize > Drop Shadow and hit in the following values. Step 32 We’ll give it another drop shadow, so in the appearance panel, duplicate the Drop Shadow and edit it and just edit the color as shown in the image. Make sure that this drop shadow is below the previous drop shadow. Step 33 Now open up your Graphic Styles Panel by going to Window > Graphic Styles or you can alternatively hit Shift + F5. Select the shape again, and click on the “New Graphic Style” button on the Graphic Styles Panel. Voila! There you have it, you can then apply this Graphic Style to any other shape/path/text. Step 34 Now, onto our second graphic style. It is pretty similar, just delete the texture fill and change the base fill’s color to white. Then again add this to the Graphic Styles Panel. Step 35 Apply the first Graphic Style to the ribbon shapes we made. Don’t apply it to the two mini triangles, just change their fill and delete their stroke. Now align all those shapes as shown in the image below. Step 36 Align the ribbon onto the badge as shown in the image below. To move around the whole ribbon and not just any single shape, just select all the elements of the ribbon and group them by hitting Ctrl + G. Also don’t forget to change the stacking order of “of” so that it appears above the ribbon. |

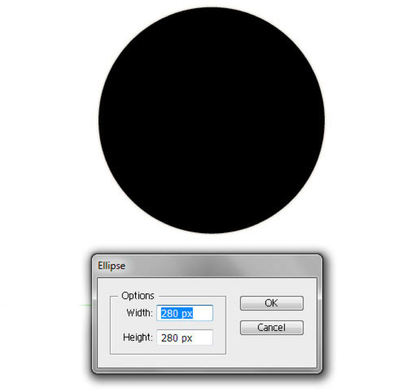
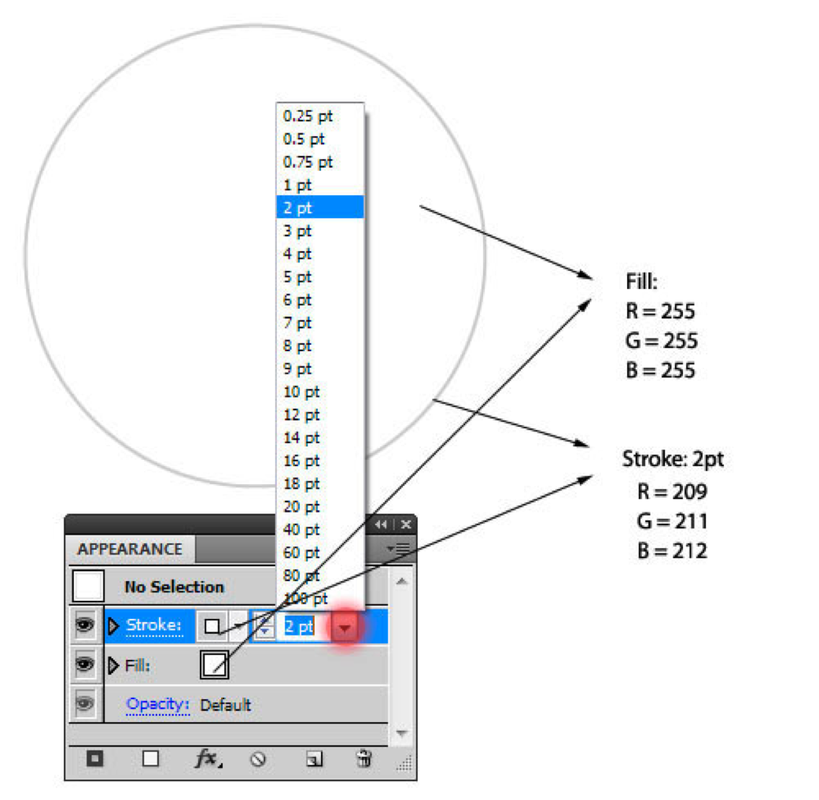
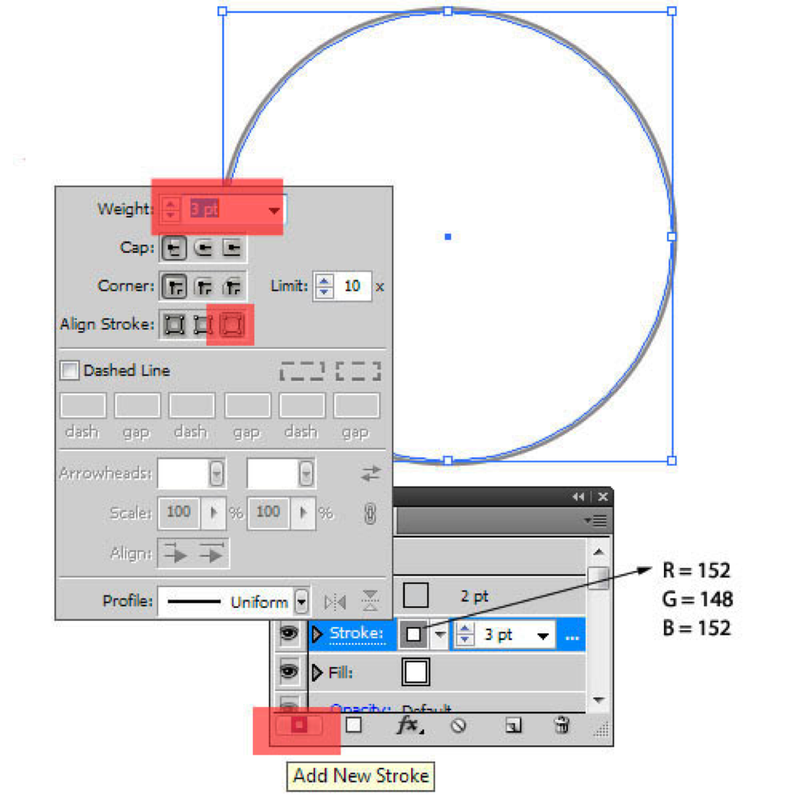
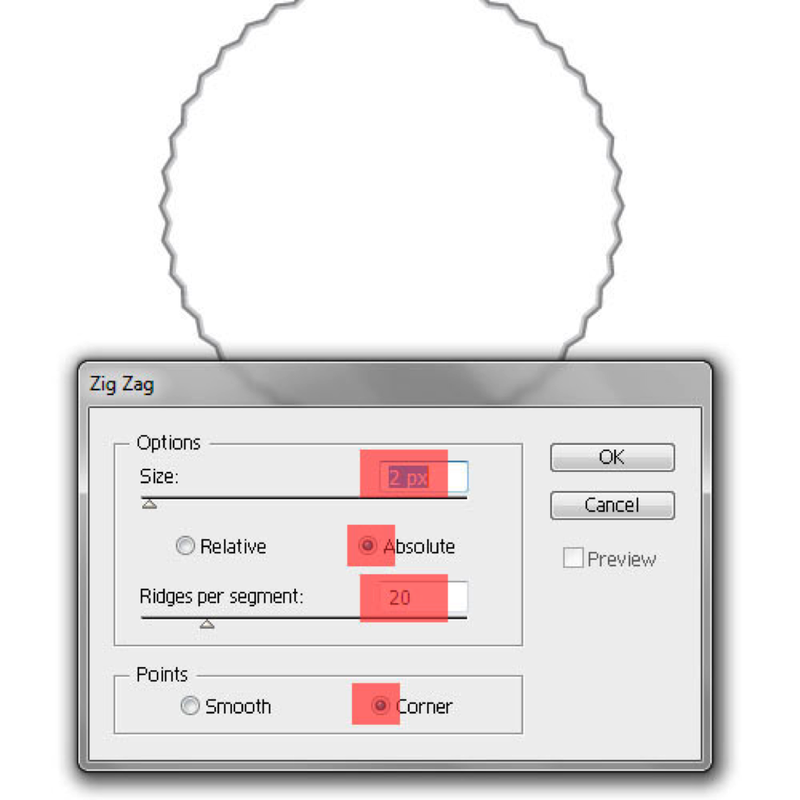
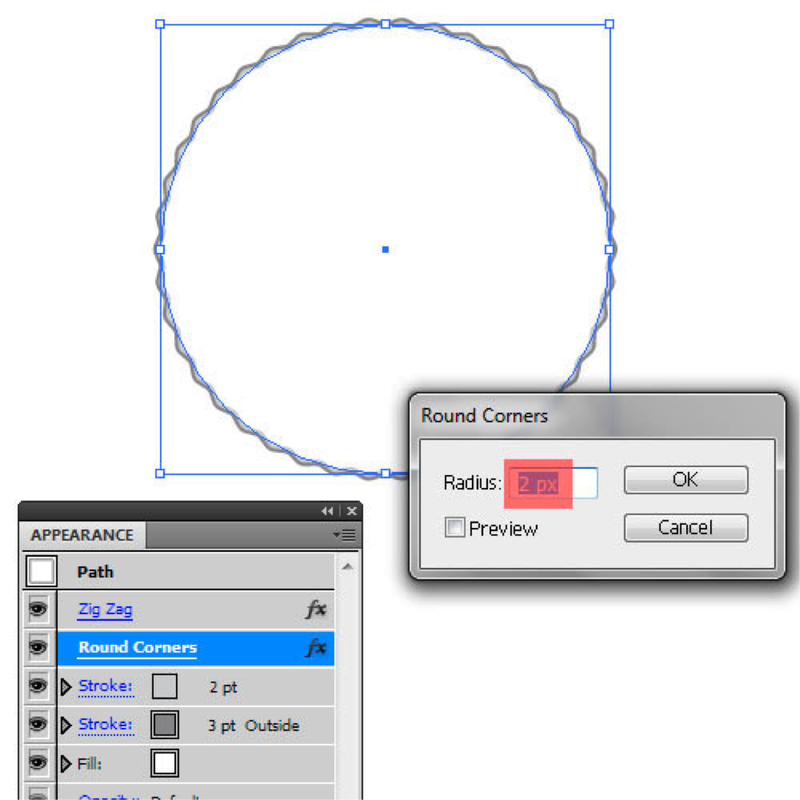
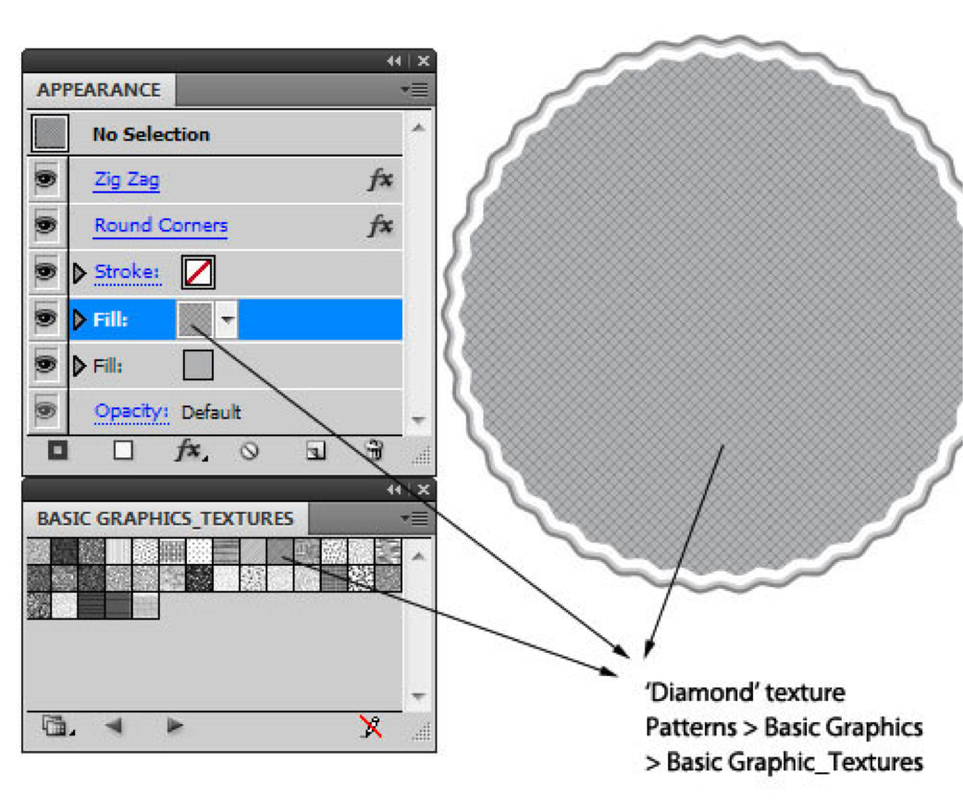
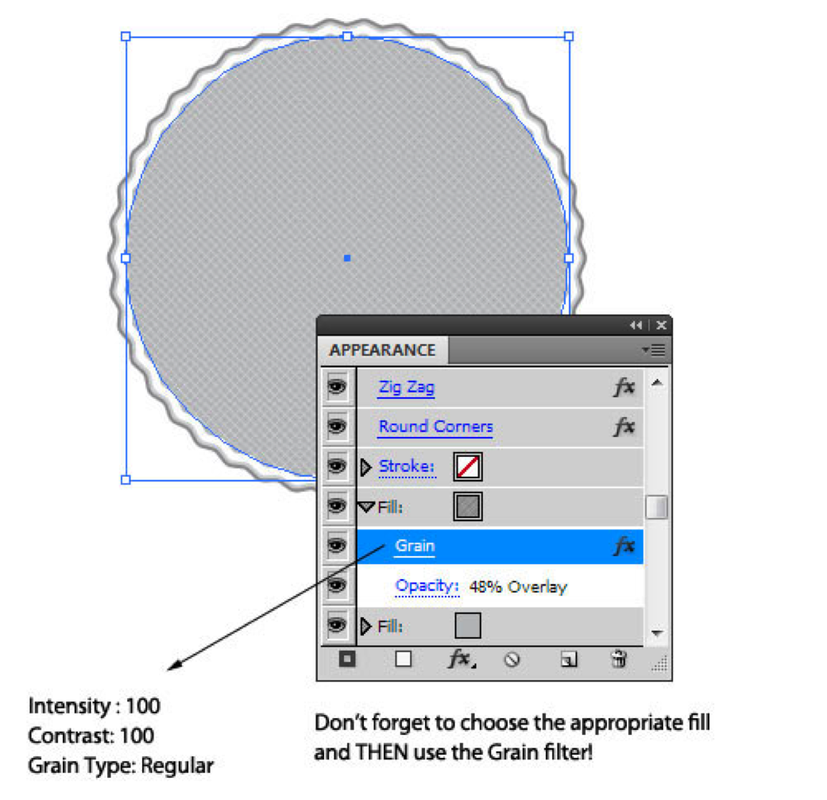
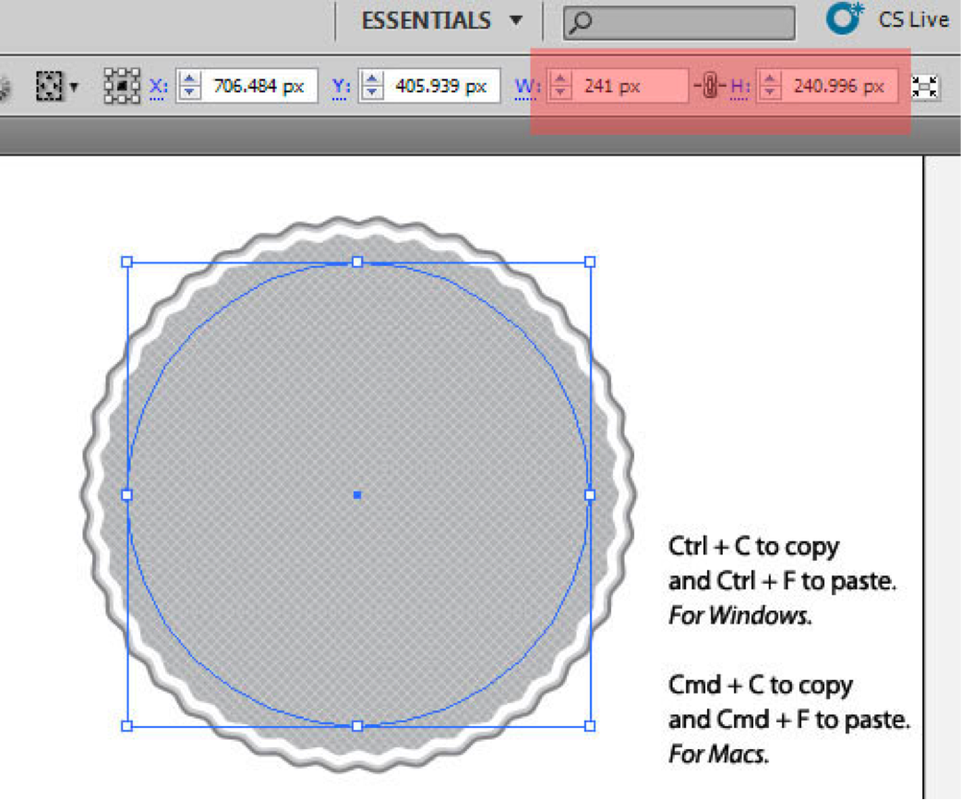
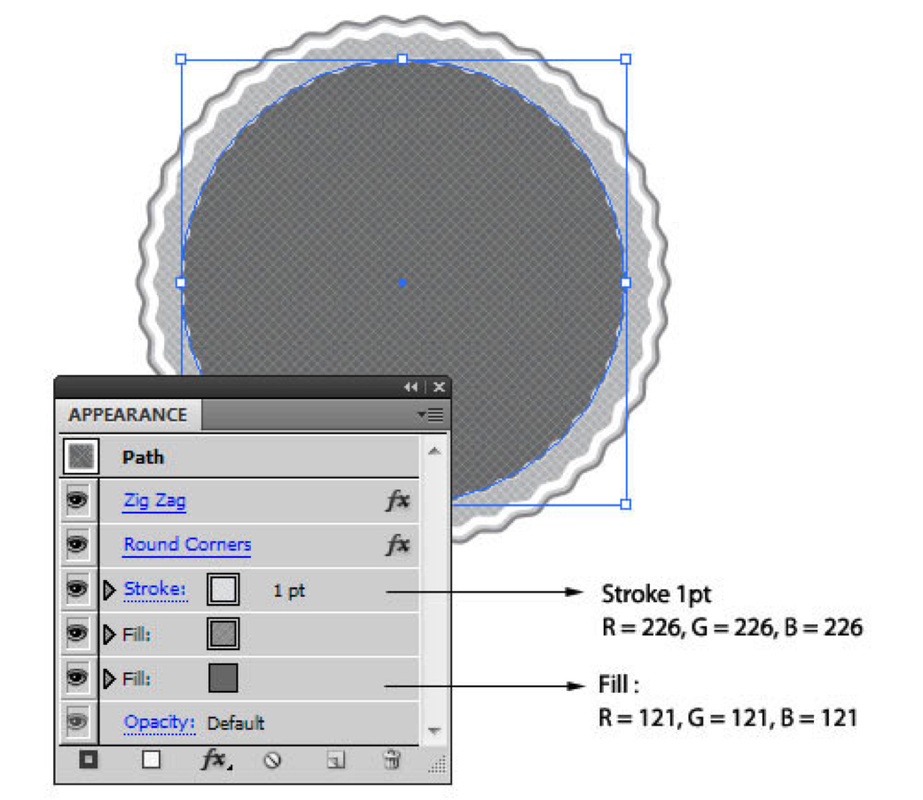
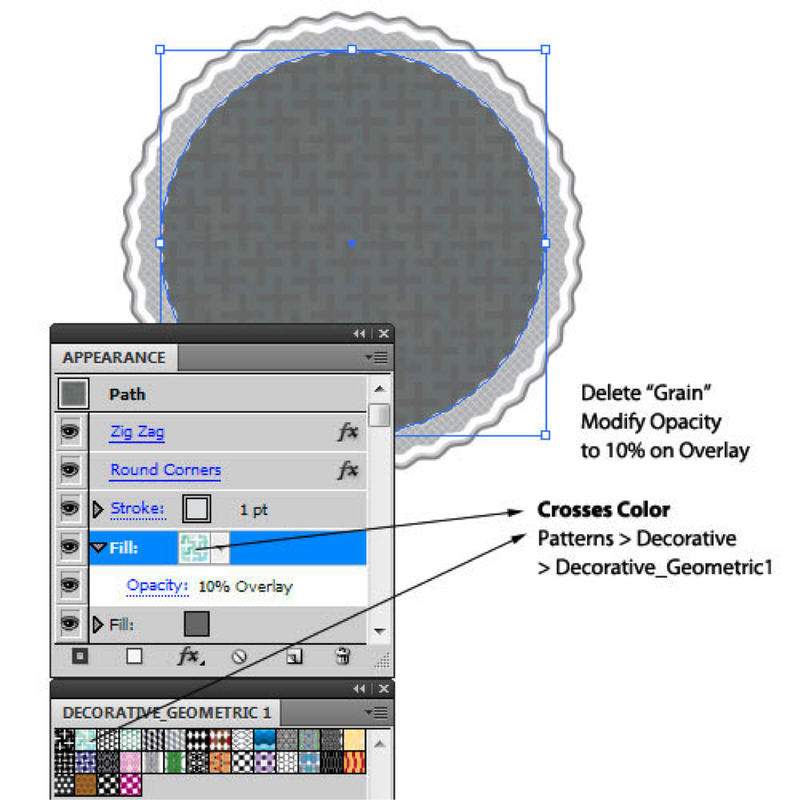
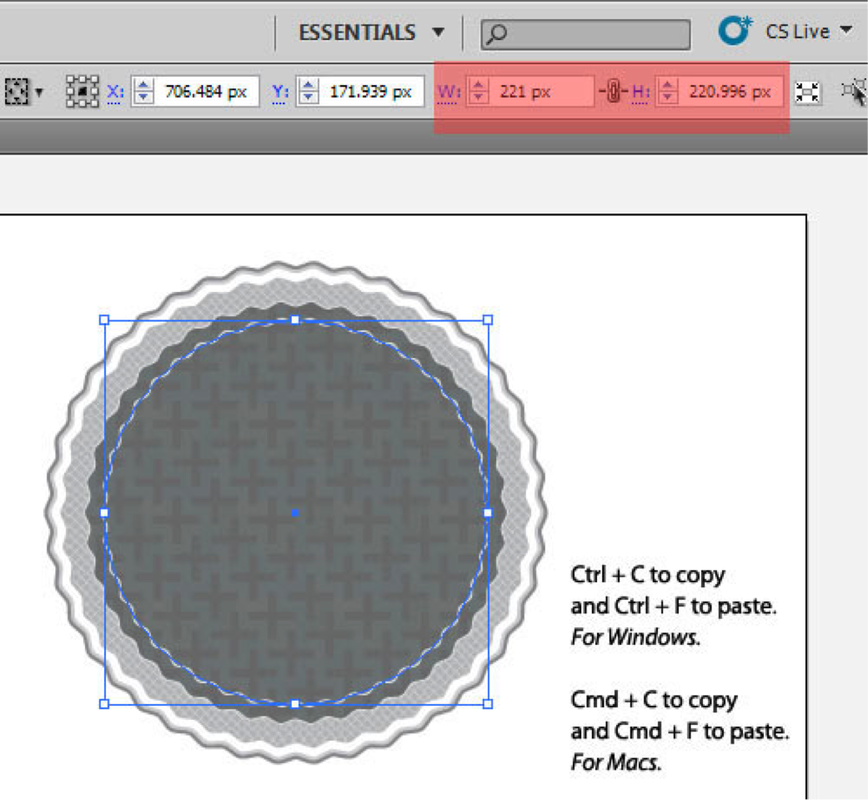
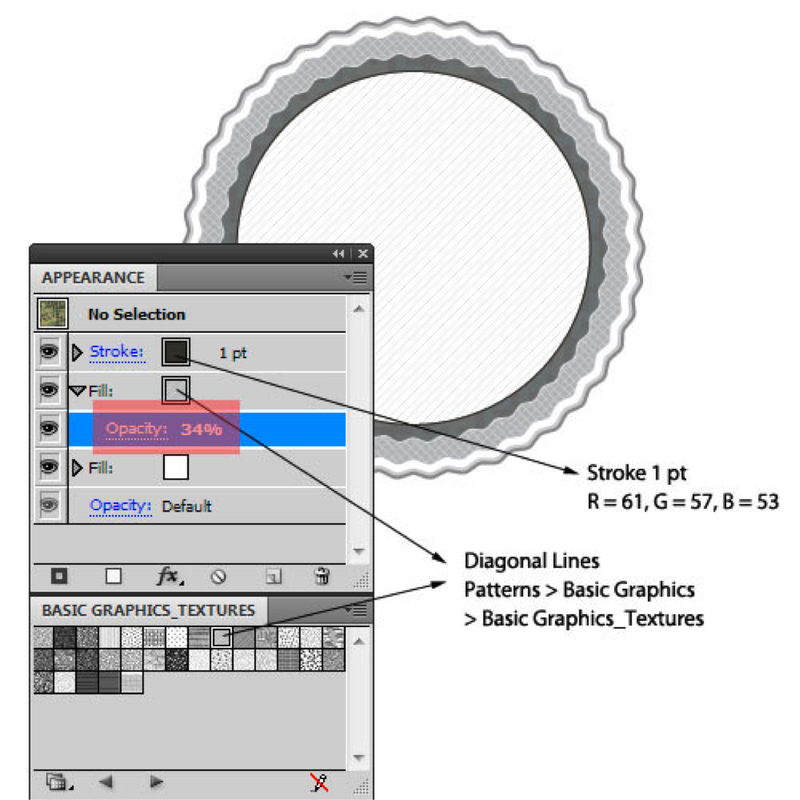
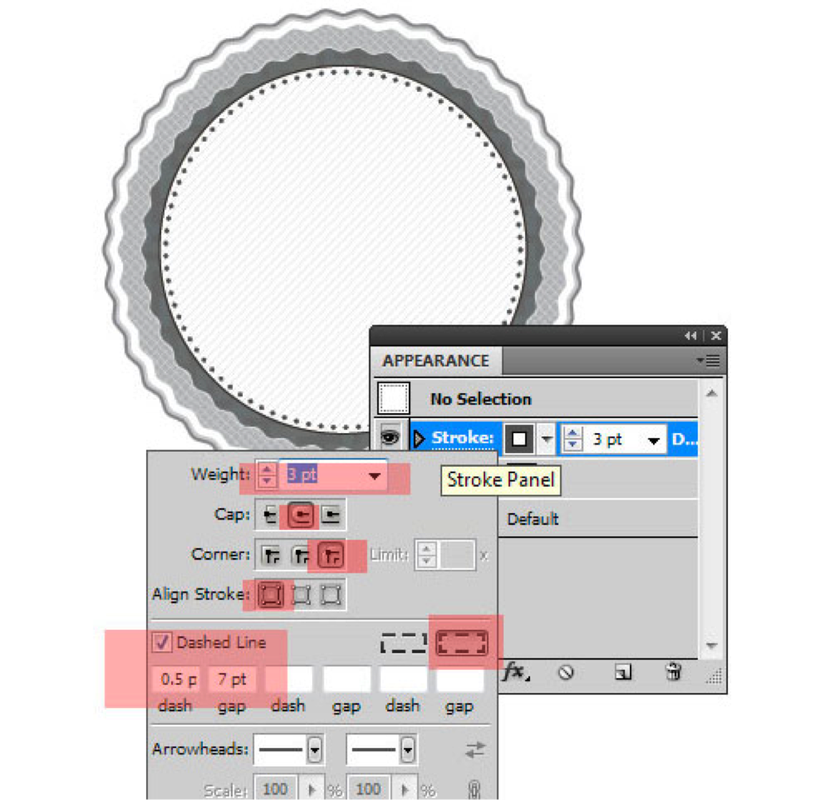
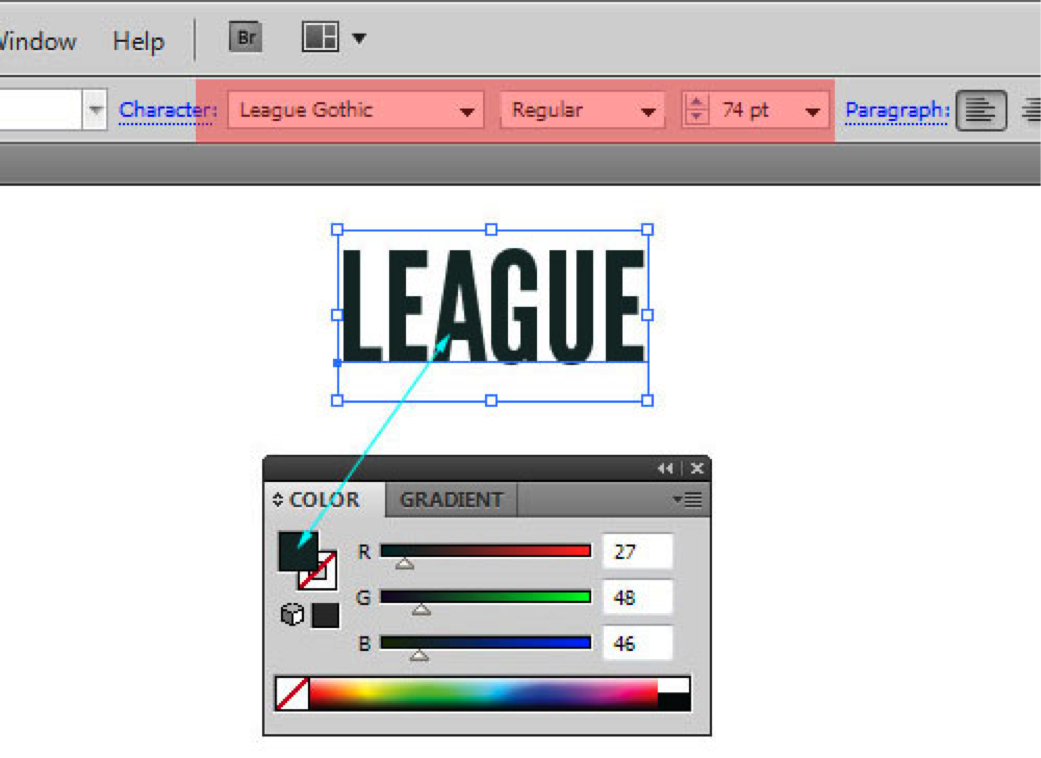
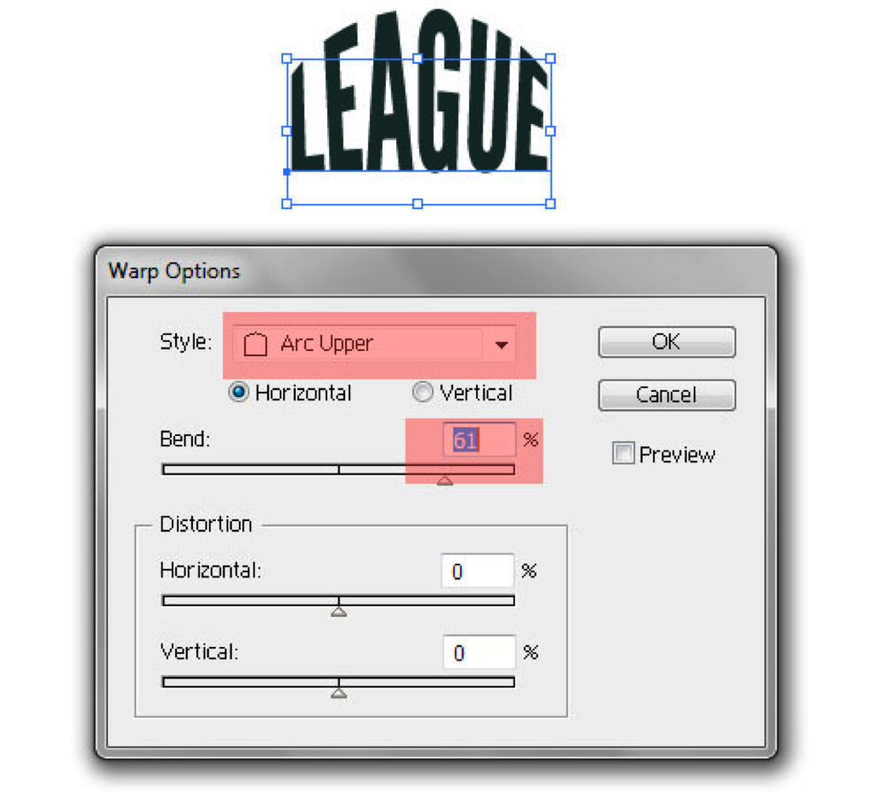
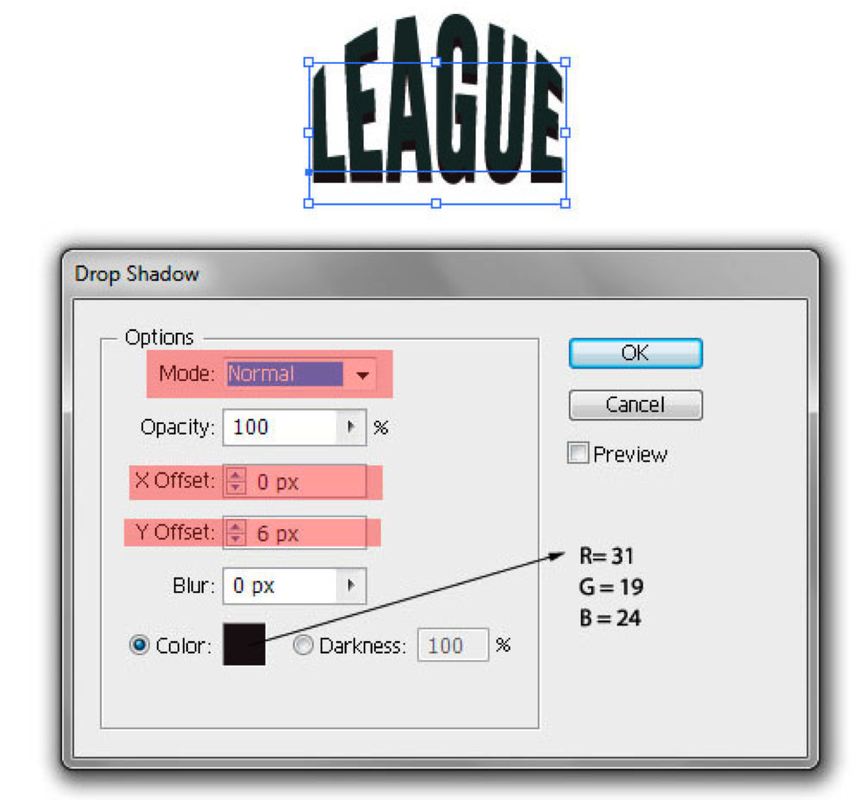
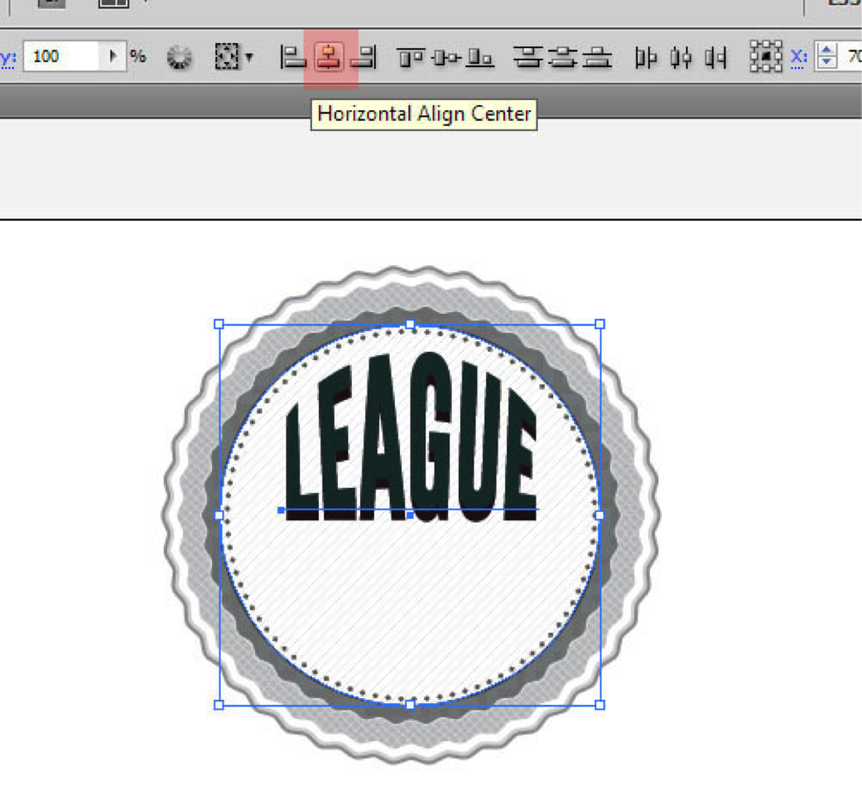
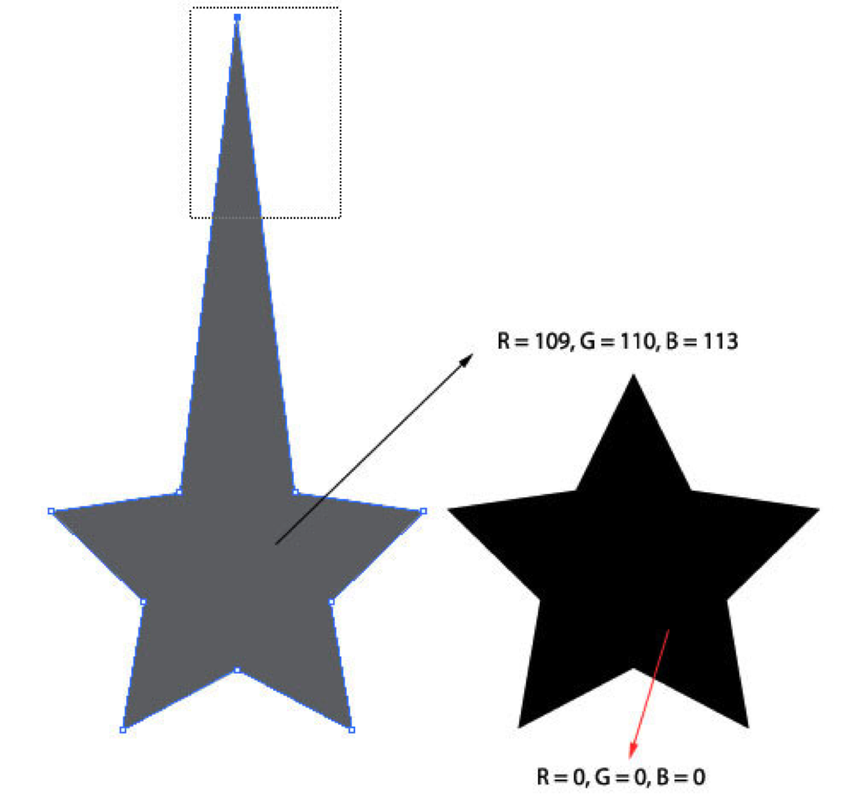
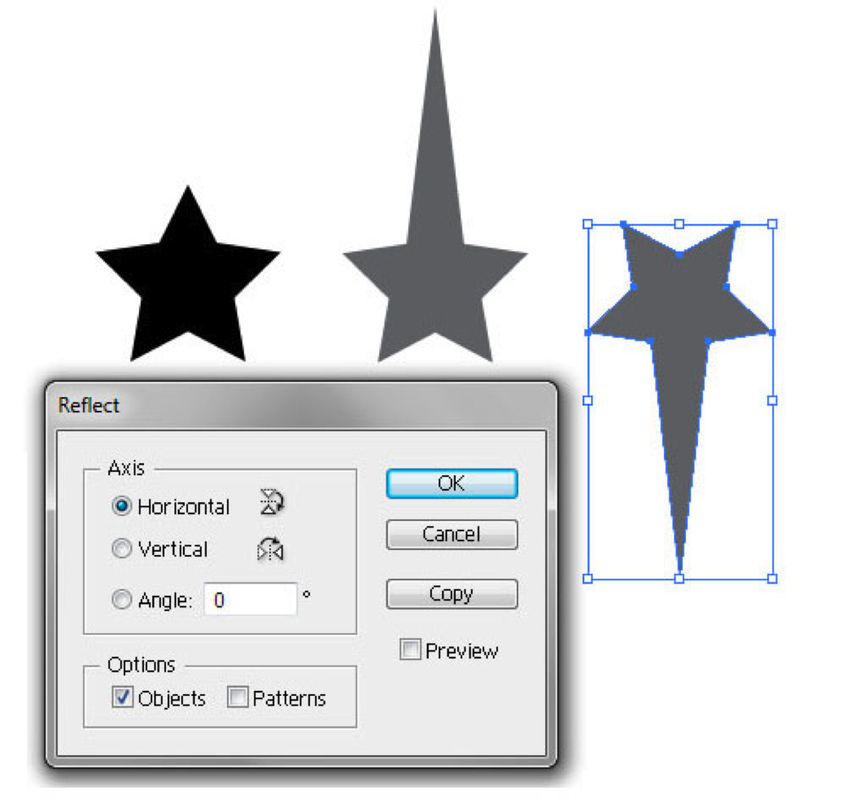
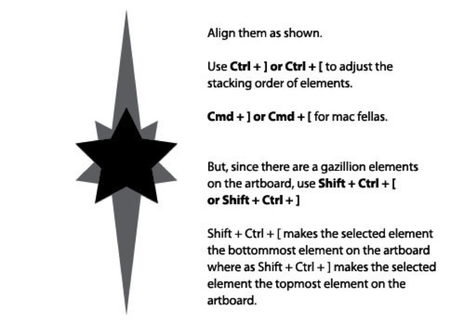
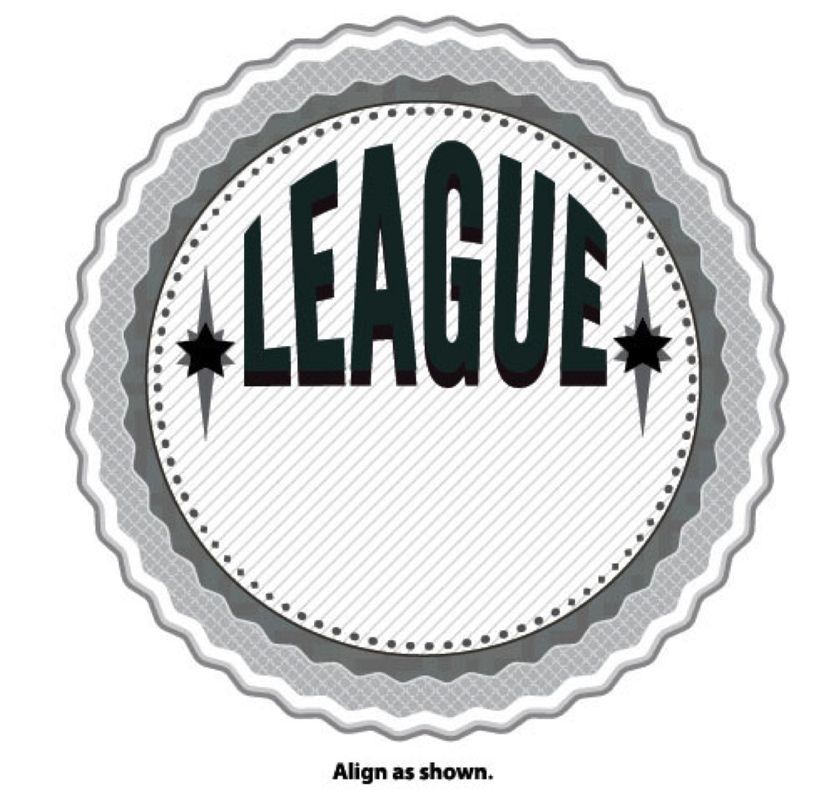
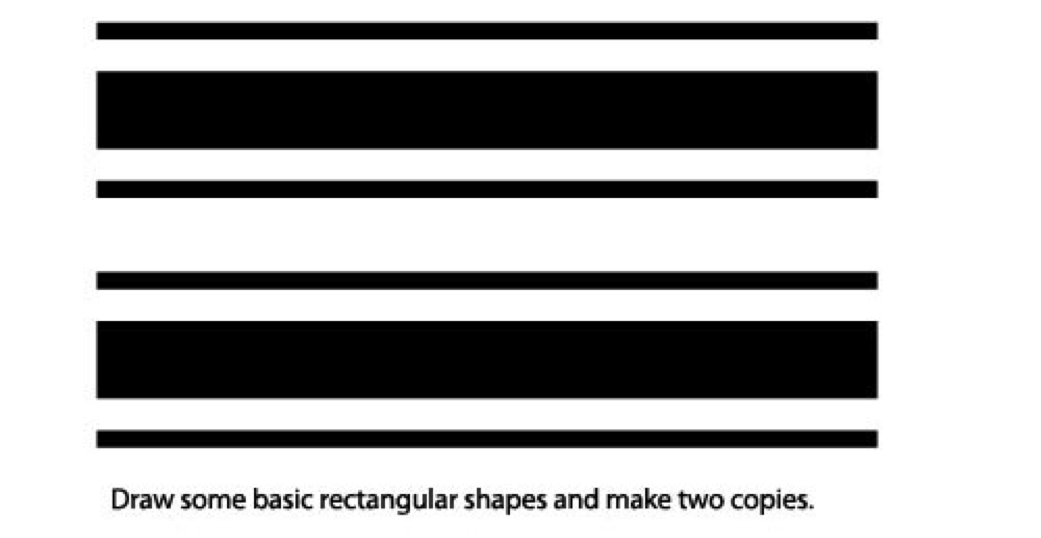
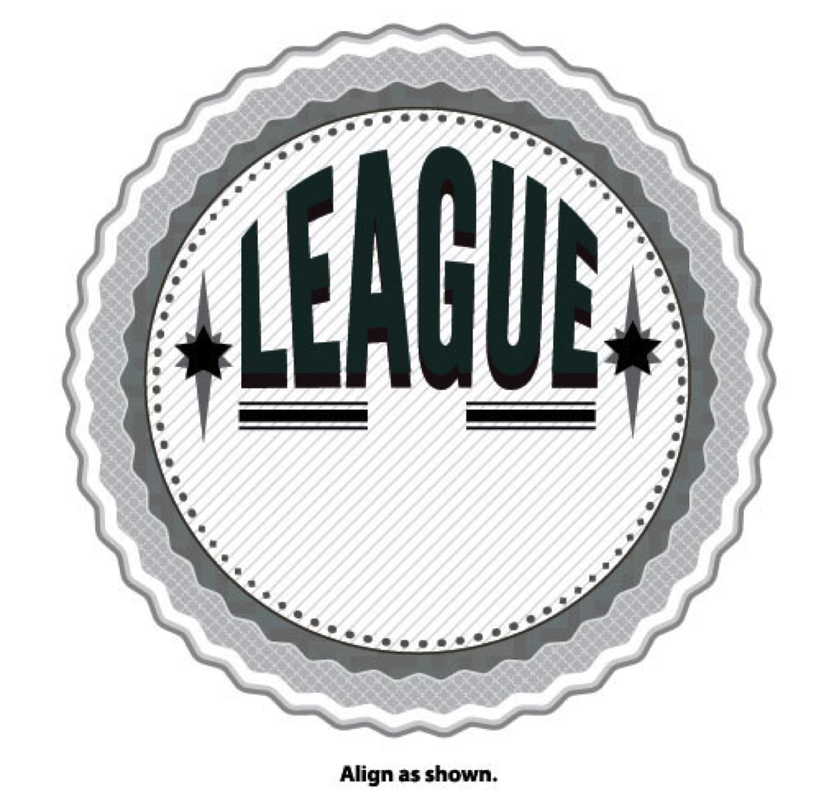
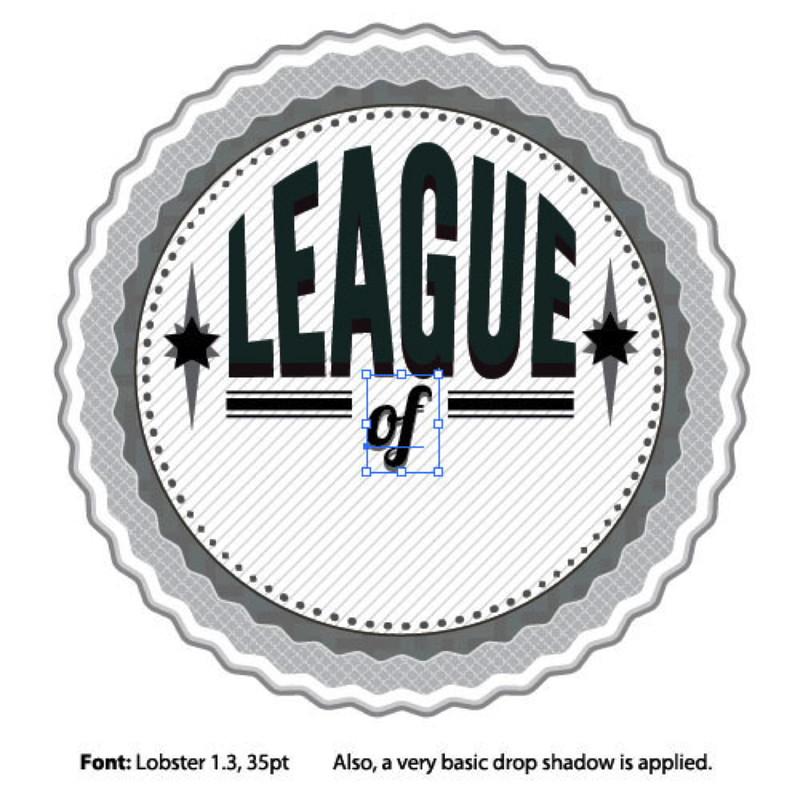
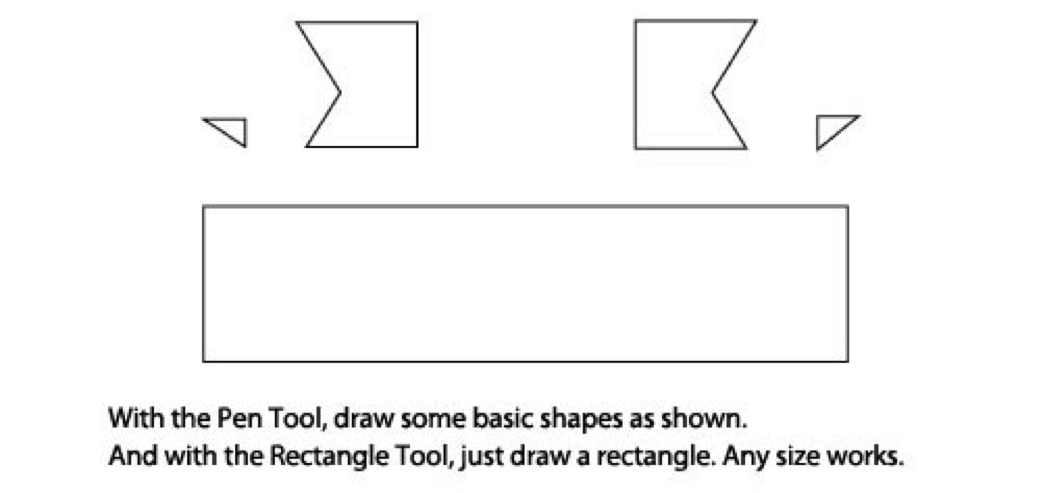
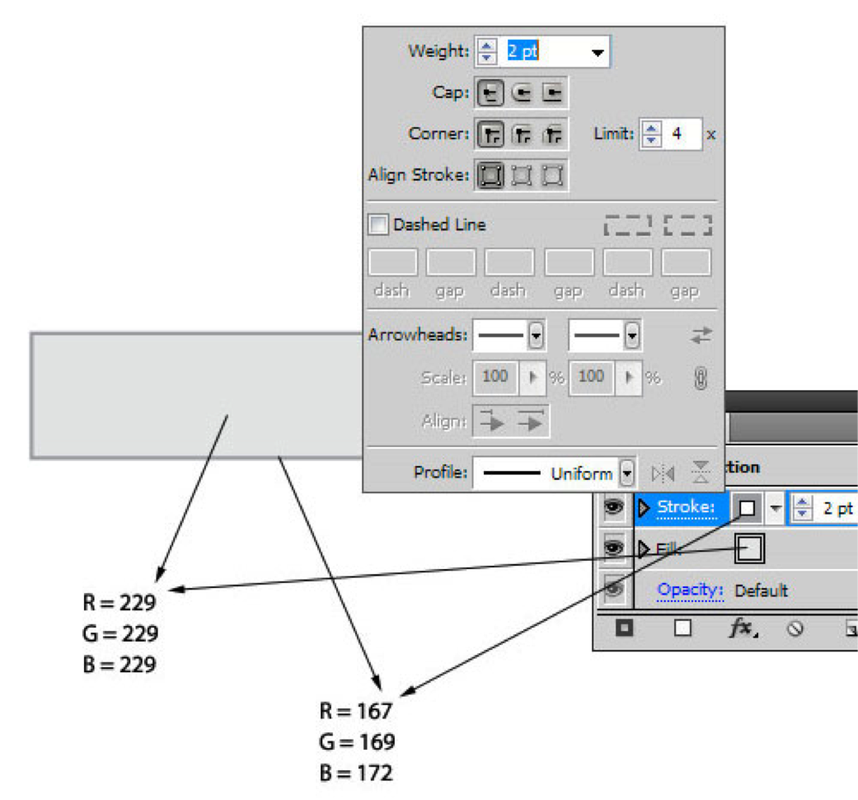
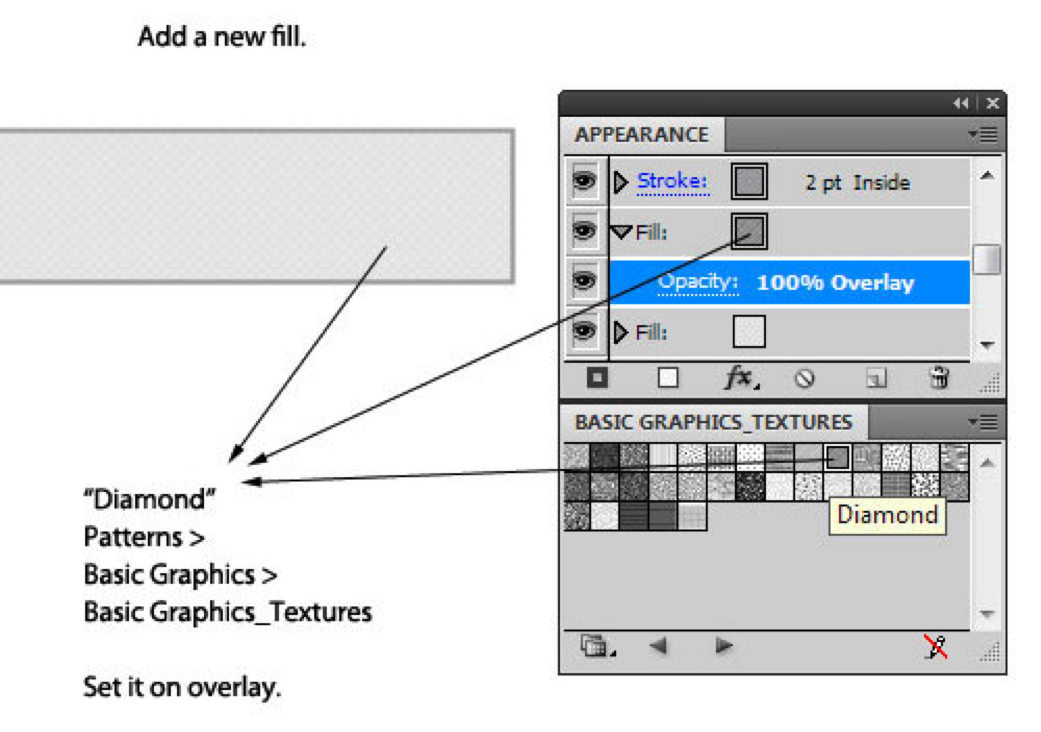
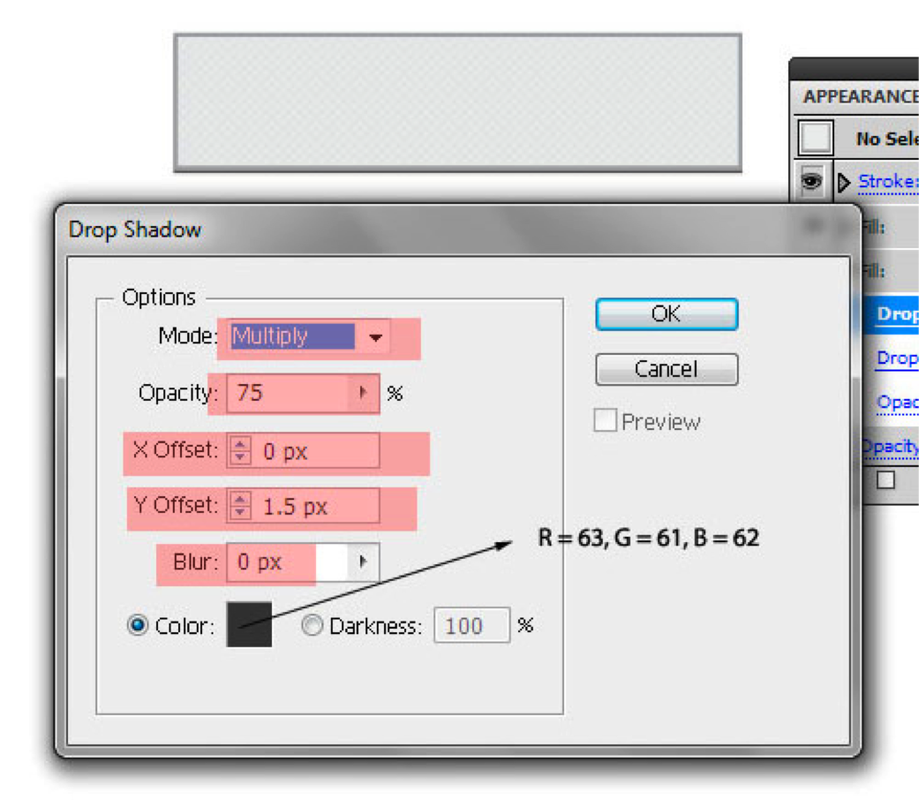
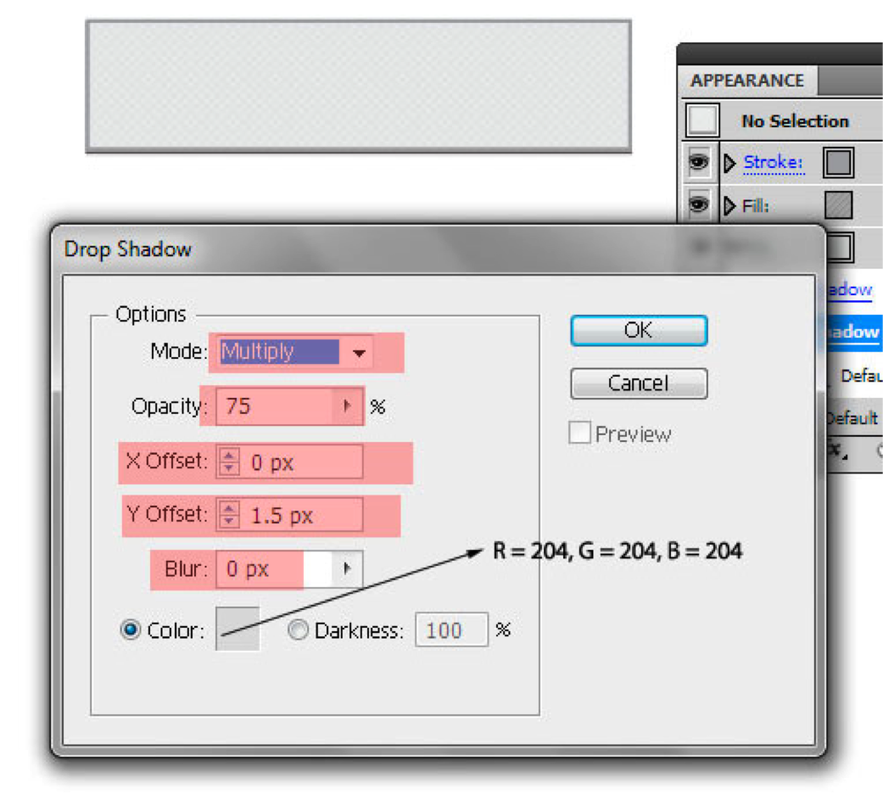
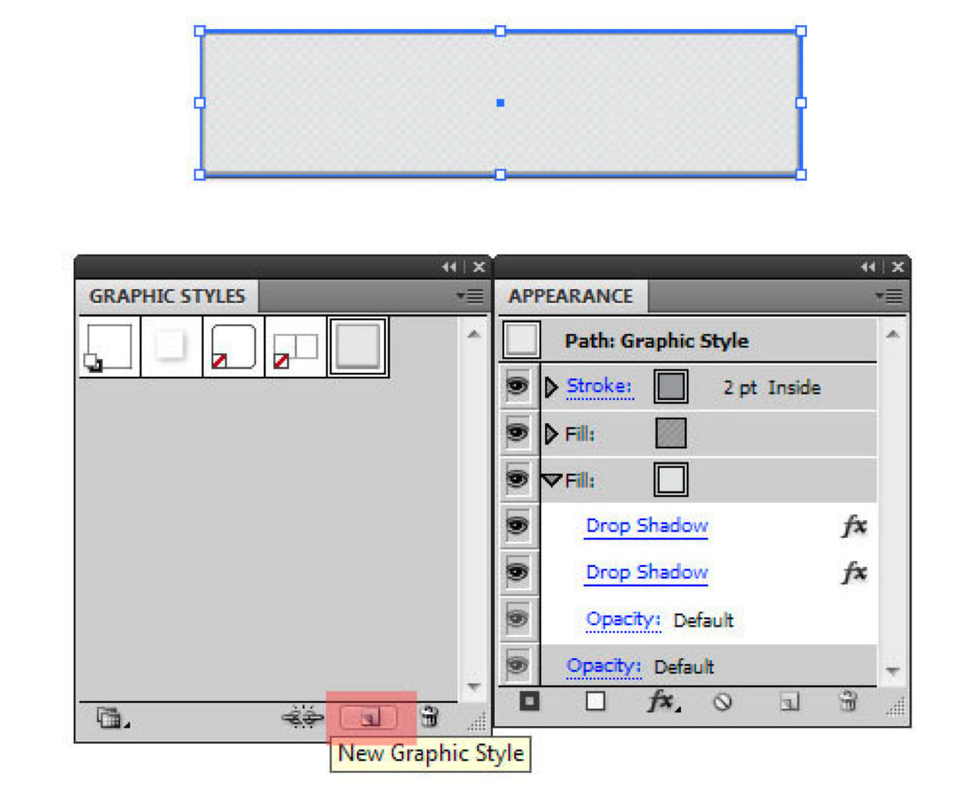
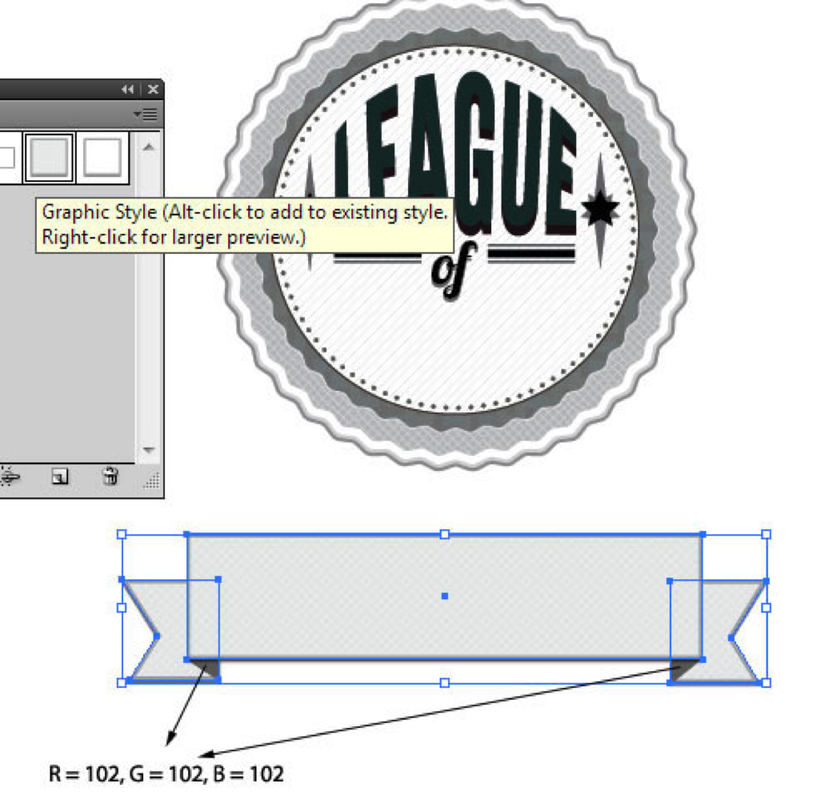
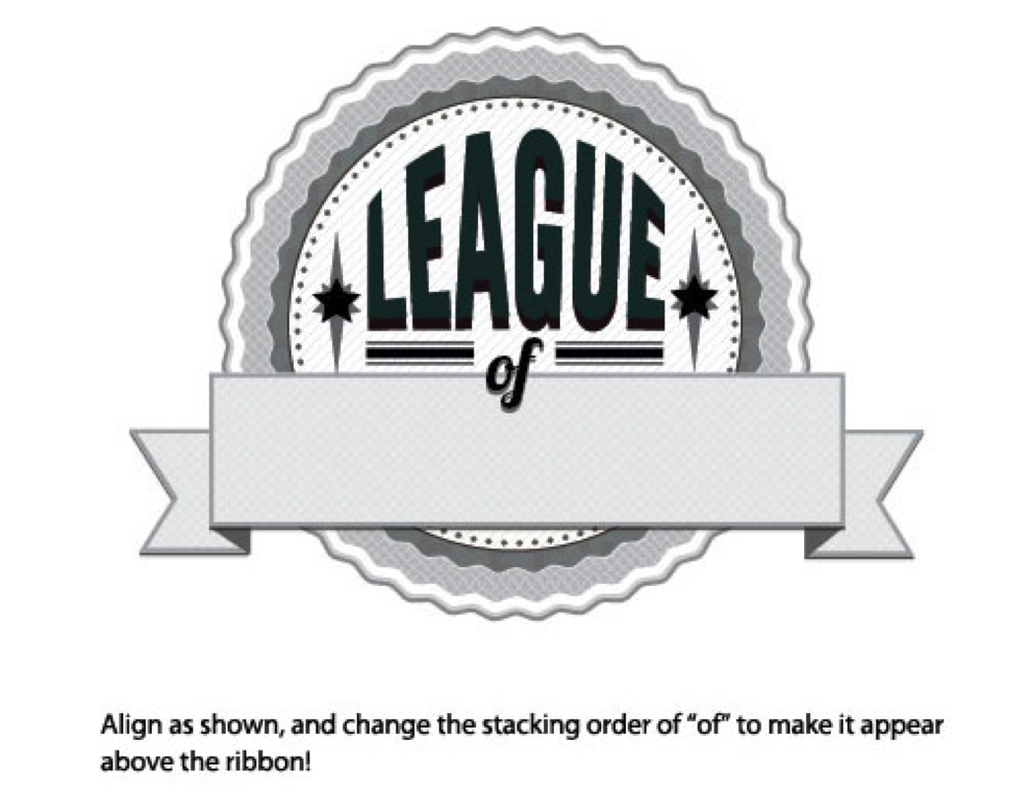
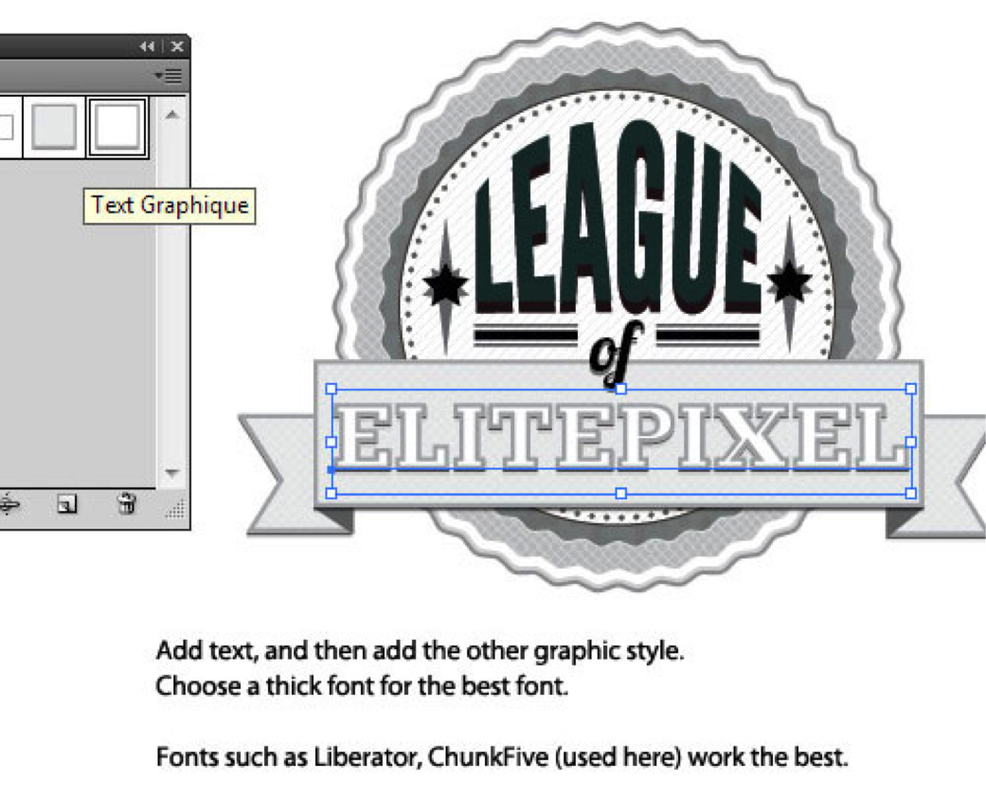
|
Broker SignDownload the picture to the right, and save it to your desktop in the project folder. Open a new document in illustrator, and choose
FILE > PLACE to place the picture onto your page. You are going to use various tools to draw over the picture, so you'll want to lock it down so it doesn't move on you. To do this, have the picture selected, and choose OBJECT > LOCK > SELECTION. From there, start drawing using the pen tool. Remember that all SHAPES need to be closed, which means you have to click the pen tool back onto the starting point to close it. Sometimes, if you are filling while |
| ||
Pictograms
|
Final Artwork Due Friday, October 21 at the end of class
Preliminary Work (Outline and sketchbook) Due Monday, October 10 @ 11:59pm Objectives: Approach a problem from a unique perspective. Streamline a complex storyline into a simple, clear visual narrative. Improve your drawing skills with Adobe Illustrator. Draw simply but well. Consider the design of the whole page. Pictograms Graphic stylized symbols Visual symbols that give information Pictures without words Graphic symbols that tell a story in a simple way A way to communicate messages without words Universal, visual, wordless language This kind of symbol surround us in our daily lives.: on the street in supermarkets in department stores in public buildings on roads show us where to find telephones restrooms train stations airports restaurants examples: •Caution: School Crossing •Caution: Slippery When Wet •Caution Rail Road Crossing Project: Create a pictogram that conveys the essential storyline of a famous book, movie or TV Show, in a simple, clear, FUN and easy-to-understand way. Preliminary Work (Outline and sketchbook) Due Monday, October 10 @ 11:59pm 1. Write an outline or overview that explains what each of your shows are about, main characters, themes etc that you will show in your visual solution. Choose 3 shows to work with 2. Make at least 5 sketches for each of your shows. Not 5 versions, but 5 different ways to solve the visual problem of communicating the essential info about the show visually. 3. You will pick the best idea for each of your shows and execute them in illustrator. |

|
COPYRIGHT
|
Due Monday, September 12 @ 11:59pm
Download the document "Copyright Basics" located to the right. Read these 3 sections: What Is Copyright? Who Can Claim Copyright? What Works Are Protected? |
| ||
Benedict.com provides a lot of useful information regarding copyright, patent and trademark rules and regulations. This page also offers stories of documented copyright infringement disputes. The stories are divided into three (3) main categories: movies, music and web.
ASSIGNMENT:
ASSIGNMENT:
- Go to http://www.benedict.com.
- Move your mouse to the web section, and choose "Process More". Explore the disputes in the WEB section and choose two (2) cases to write about from the left hand column of the website (Batman, Devil's Advocate, 12 Monkeys etc..
- Open Google Docs
- Title your document “Copyright Cases” and IN YOUR OWN WORDS, give a brief account (Summary) of the two (2) cases you have chosen. 3 paragraphs for each case as a minimum.
- Include in your Summary: The parties involved, what they are arguing about and who won the case. If the case is still in court, state that the outcome is pending.
- Download at least two (2) images per story from the Internet to illustrate your stories.
- If you search for “Free Use” or “Royalty Free” images, many sites will come up. It is OK if the images you choose have watermarks.
- You may use Photoshop to edit each of your images but it is not required.
- Insert the pictures into your stories. (In Word: Insert > Photo > Picture From File).
- You may resize the photos once you insert them into Microsoft Word.
- When finished, Save and share your document. Please include your name and period number at the top of the document
DIGITAL SCAVENGER HUNT 1
DUE Monday, SEPTEMBER 5, 2014
Take the words from the word list below, and make a powerpoint/Google Slides presentation. One word per slide. Find the most outrageous photo to use as an example of the word.
DO NOT USE THE STANDARD TEMPLATES FROM THE PROGRAM. BUILD YOUR OWN MASTER SLIDE!!!!!!!!!!!
You must include your sources! You can make a references section in the back, or include it on each slide as in the example.
This project is about perception, creative thinking and digital media use. Be inspired to show the world through your eyes.
1. Site the definition for each of the words.
2. Find a picture that expresses the essence or the spirit of the word.
REMEMBER- Don’t stop at your first idea. Find the most eccentric way out example of the word. Be creative, use the definition to help you find the most expressive picture you can find…..and have fun with it.

EXAMPLE
proximity [prok-sim-i-tee]
noun
1. nearness in place, time, order, occurrence, or relation.
Although his presence was sporadic and invisible, just the thought of hisproximity delighted and intimidated me.
Show me a picture that exemplifies this definition. Keeping with the context of graphic design.
Use the word list below
WORD LIST:
BUTTONS
RED
SQUARE
CLUTTER
UNDERNEATH
CAN'T LIVE WITHOUT
STRIPES
CURVY LINES
SOUND
EMPTY
DELICIOUS
UPSIDE DOWN
SILENCE
WATER
PATTERN
TOGETHER
PUSH
DEVELOP
PASSION
OCCUPATIONS PRESENTATION
Due Sunday August 14th, 2016 by 11:59pm
SPECIFICATIONS
Length: Your PowerPoint must be a Minimum of 22 slides.
Text: Your Title slides must be easy to read:
Tips: Choose fonts that are clear and simple. Choose good color contrast. Must be able to be read from across the room when being presented (don’t use too small of a type size.) Don’t use too busy of a background.
Creativity: Remember that completing the minimal project requirements will earn C work. Adding more information, pictures, descriptions/explanations etc that are relevant and serve to a better understanding for the audience will earn the higher grades. So push past your first attempt, and dig deeper for the more interesting pictures, or the more intriguing facts. You want to visually communicate what the job is all about. This also is your first "design" project, so give it your best shot at being aesthetically pleasing.
TIPS:
1. Don't use too many font families or styles. Two fonts are usually enough, but you decide what looks best.
2. Don't have too many facts on a slide. We need to see it from across the room when presented. It is OK to have more than the required number of slides. When you have paragraphs of info on one slide, the text gets too small. Generally speaking, you want to have just one thought per slide.
3. If you put text or headlines over a photo, make sure the text is still readable. You shouldn't have to strain to read it. If you do, you will lose your audience.
4. When getting the content for this project, don't plagiarize!
DOCUMENT YOUR SOURCES
DO NOT COPY AND PASTE FROM ANY SOURCE. THIS IS IN YOUR OWN WORDS!!!!!
Use this as a check list as you progress through the completion of the project. This is just as much a design project as it is a written assignment. How it looks is as important as what it says. It is all part of the story you are telling.
SLIDE CRITERIA:
Slide 1- Title Slide
Must include: Occupation name, Your name, Period # and Fall 2016
Use a background image that will be relevant to your topic.
Slide 2-3 Skill Set
Must Include: Job Skills Needed: Minimum of 6.
“Describe” what the skills are. Don’t just make a list that doesn’t communicate anything.
Slides 4-6 Work Station
Must Include: Photos of Typical Workdesks or Workstations or workplace
2 or 3 Important Facts per slide describing it.
Slides 7 - 8 Compensation
Must Include: Salary statistics for the Occupation
Must have the National; Regional; and Local statistics
Slide 9 - 10 Descriptions
Must describe in detail What They Do
Show examples of what the work looks like
Slide 11 - 13 Training, Qualifications, and Advancement
What formal training/education is required for entry into this occupation.
Are there degrees, certificates etc? Name a few colleges or universities that have the degree you would need.
Slide 14 Professional Organizations
List the Professional Organizations/Associations affiliated with this occupation (Unions etc)
Give a short description of each, explain their purpose
Slide 15-17 Favorite Person
Choose your favorite or a famous person from this occupation:
Include Name, birth date, his/her contribution to this occupation or the industry as a whole, and why you chose him/her
Slide 18 – 19 Your interpretation
Why did you choose this Occupation?
What are your final impressions about this Occupation?
What impressed or stood out to you the most about this occupation while doing your research?
Slide 20-21
Your Reflection.
Slide 22+ References:
Include the website URL for each of the facts that you used in the project. You must site your work, or it will be considered plagiarism.
Creative Juice Exercises
Creativity is something that should be trained everyday, or else it would get out of shape.
Thus, doing some creativity exercises would ensure that your brain remains sharp enough for you to do your projects effectively.
Aside from that, it’s inevitable that you will run into a creative block where it would seem that your fountain of creativity has run out. Doing some light doodling will help getting you back in the zone. I’ve listed some mini design exercises you can do to get your creative juices flowing.
Shape Ups
|
Due at Beginning of class, August 1st, 2016
Many graphics and logos contain letters that are drawn to form the shape of an object or an idea. There is freedom to drawing these types of words because there are no rules - the letters can simply morph into whatever you want them to be. A. Make a list of 5 Target words that are not objects. Remember our example of emotions or words like that. B. Pick the one you like the best. C. Now, make a list of 5 outline words that you can make outlines of to put your target word into, that would help to describe the spirit or meaning of your target word. D. Now make at least 3 sketches of each outline word with your target word inside E. You should end up with at least 15 sketches. F. These are to be made in your sketch book. Take a picture with your phone, upload it to your google drive, and share it with me at [email protected] Step 1 Draw a faint simple outline of your object. Step 2 Draw the middle letters of the word in the center of the outlined shape to establish the spacing of the letters. Step 3 Add the remaining letters. Step 4 Erase your outlined shape and refine your letter shapes Step 5 Add Color. Turning it in 1. Take a picture of your finished work and of all your sketches. 2. Upload them to your Google drive in a folder for Multimedia, and inside that a folder for Shape ups. 3. Share it to [email protected] |
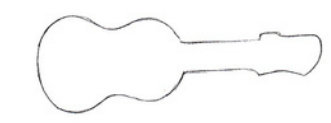
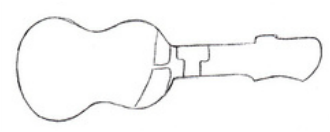


|
The Many Faces of Your Imagination
|
Due at Beginning of class, August 1st, 2016
This exercise is pure fun. All you have to do grab a pencil, download the face template and begin drawing! 1. The template has nine areas for you to draw different types of faces. Try to be as descriptive as you can in your drawing. We want to see the emotion of the character. Anger, Fierceness, Timidity etc. Make a different emotion for each of the nine examples. Make it detailed. 2. Spend some time developing the personality of each of the characters. 3. You can add color to your drawings with a class set of colored pencils. The sub can get them for you if you ask. 4. Sketching is always a great way to sharpen your creative skills. Who knows, maybe one of the faces you draw will be a starting point for a great, 3D animated character in the future. |
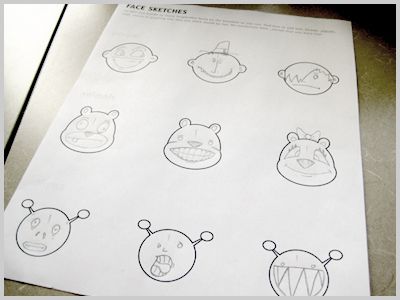
| ||
Monster Doodles
|
Due at Beginning of class, August 1st, 2016
This mini-exercise requires the company of at least two other friends. Together, the three of you will be collaborating to create a monster. The trick is that you won’t see what each of you will draw until the very end. First, fold three pieces of paper into three linear sections. See picture #2 at right to see how to fold it. On each folded section write a number 1 for top, 2 for middle and 3 for bottom. Each person gets a piece of paper and starts to doodle a monster head on the top section 1. Get creative! It can have 20 eyes, three mouths, a Mario Bros hat on, whatever you want to draw is perfectly fine, as long as it is school appropriate. After each person is done, pass the paper to another person in your group. Now everyone begins to draw a monster mid-section on the #2 panel of your piece of paper. Once again, pass the paper around and then have everyone draw the legs and feet (or slime blob if your creature has no legs or feet) on section #3. After everyone is done drawing, open up your papers and see the finished monster creation that you have drawn together with friends. |
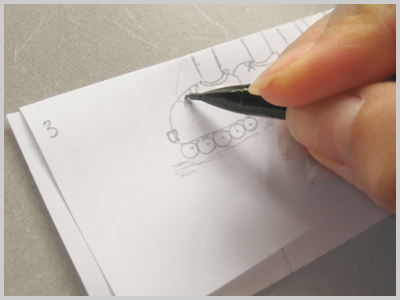
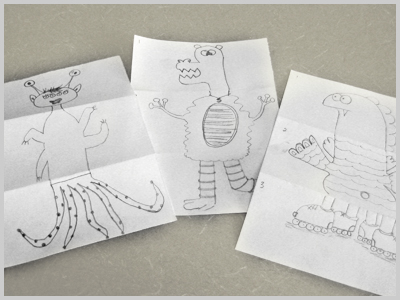
|
Tear It Up
|
Create a poster for a concert, going on in your town.
1. Sketch out in your sketchbook the layout and design for your poster. Include a main focal point picture. Example - the lead singer, the drummer or if it is a benefit concert, maybe for animal rights say, use an animal. Be creative. Think about who the audience is and what would make them want to buy tickets. Include a main headline, the dates, the name of the concert, a location and the cost of the tickets. 2. Now, Instead of executing your actual poster design with a pencil, make the poster completely out of torn things; pieces of paper, solid objects, magazines, found elements and make it a collage of found objects. 3. Plan for it. You will need to collect all of your torn or found elements at home and bring them to class. |
|
Here is where I draw the line
Lets get rid of the “I can’t draw” mentality.
Take out some sketch paper.
Now, find an object in the room you are in, and bring it in to class to draw tomorrow.
You are going to draw this object, but with a catch. You can’t look at the paper.
Look solely at the object. Don’t give in to the urge to look at the paper and see how you are doing.
Just draw. Have some fun with this.
|
Due August 1st, 2016
Sketchbook Due July 25th, 2016 |
| ||
Google Account/Inspirational Quote
Due, @ 11:59pm Sunday, July 24th, 2016
Send me an unbelievably inspirational quote from your google account. Be sure it is an account with your name in it. I wont know who [email protected] is.
This must be a gmail account, not yahoo, hotmail or anything else, just gmail.
Send me an unbelievably inspirational quote from your google account. Be sure it is an account with your name in it. I wont know who [email protected] is.
This must be a gmail account, not yahoo, hotmail or anything else, just gmail.

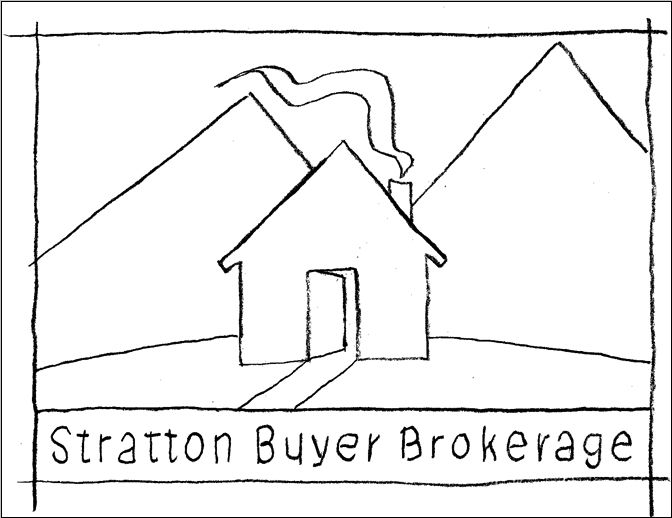