| kohs_videoauthorization_1718.pdf |
Final Artwork Due Friday, October 21 at the end of class
Preliminary Work (Outline and sketchbook)
Due Monday, October 10 @ 11:59pm
Objectives:
Approach a problem from a unique perspective.
Streamline a complex storyline into a simple, clear visual narrative.
Improve your drawing skills with Adobe Illustrator.
Draw simply but well.
Consider the design of the whole page.
Pictograms
Graphic stylized symbols
Visual symbols that give information
Pictures without words
Graphic symbols that tell a story in a simple way
A way to communicate messages without words
Universal, visual, wordless language
This kind of symbol surround us in our daily lives.:
on the street
in supermarkets
in department stores
in public buildings
on roads
show us where to find
telephones
restrooms
train stations
airports
restaurants
examples:
•Caution: School Crossing
•Caution: Slippery When Wet
•Caution Rail Road Crossing
Project:
Create a pictogram that conveys the essential storyline of a famous book, movie or TV Show, in a simple, clear, FUN and easy-to-understand way.
Preliminary Work (Outline and sketchbook)
Due Monday, October 10 @ 11:59pm
1. Write an outline or overview that explains what each of your shows are about, main characters, themes etc that you will show in your visual solution. Choose 3 shows to work with
2. Make at least 5 sketches for each of your shows. Not 5 versions, but 5 different ways to solve the visual problem of communicating the essential info about the show visually.
3. You will pick the best idea for each of your shows and execute them in illustrator.
Preliminary Work (Outline and sketchbook)
Due Monday, October 10 @ 11:59pm
Objectives:
Approach a problem from a unique perspective.
Streamline a complex storyline into a simple, clear visual narrative.
Improve your drawing skills with Adobe Illustrator.
Draw simply but well.
Consider the design of the whole page.
Pictograms
Graphic stylized symbols
Visual symbols that give information
Pictures without words
Graphic symbols that tell a story in a simple way
A way to communicate messages without words
Universal, visual, wordless language
This kind of symbol surround us in our daily lives.:
on the street
in supermarkets
in department stores
in public buildings
on roads
show us where to find
telephones
restrooms
train stations
airports
restaurants
examples:
•Caution: School Crossing
•Caution: Slippery When Wet
•Caution Rail Road Crossing
Project:
Create a pictogram that conveys the essential storyline of a famous book, movie or TV Show, in a simple, clear, FUN and easy-to-understand way.
Preliminary Work (Outline and sketchbook)
Due Monday, October 10 @ 11:59pm
1. Write an outline or overview that explains what each of your shows are about, main characters, themes etc that you will show in your visual solution. Choose 3 shows to work with
2. Make at least 5 sketches for each of your shows. Not 5 versions, but 5 different ways to solve the visual problem of communicating the essential info about the show visually.
3. You will pick the best idea for each of your shows and execute them in illustrator.


digital scavenger hunt
Due Sunday, April 19 @ 11:59pm
This project is about perception, creative thinking and digital media use. Be inspired to show the world through you eyes.
1. Site the definition for each of the words.
2. Find a picture of a literal example of each word.
3. Find a picture that expresses the essence or the spirit of the word.
REMEMBER- Don’t stop at your first idea. I dont want the obvious picture. Be creative. Interpret the meaning. Find the most eccentric way out example of the word. Use the definition to help you find the most expressive picture you can find…..and have fun with it. All of the words should be searched within the context of GRAPHIC DESIGN
Audience
Imagery
Tone
bleed
collaboration
craftsmanship
cropping
diagram
format
gradient
layers
mask
compound
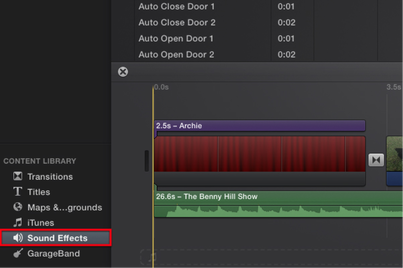
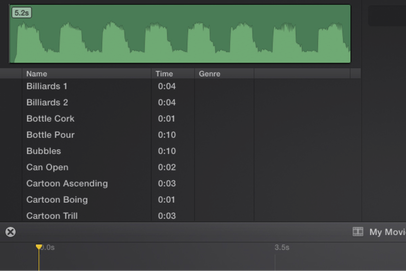
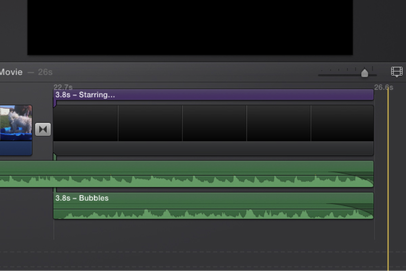
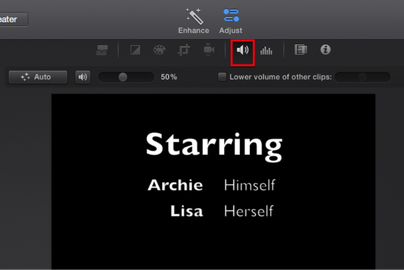
CD Business Card
|
Phase One Due Monday, March 9 2015
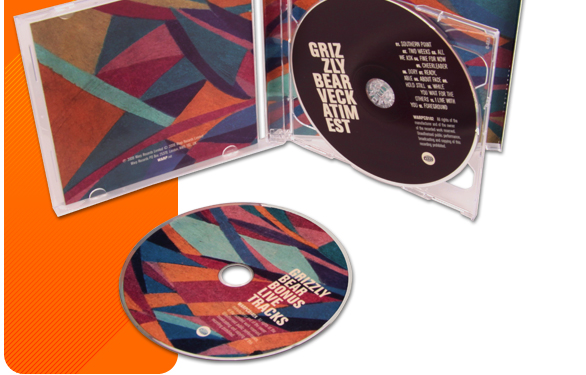
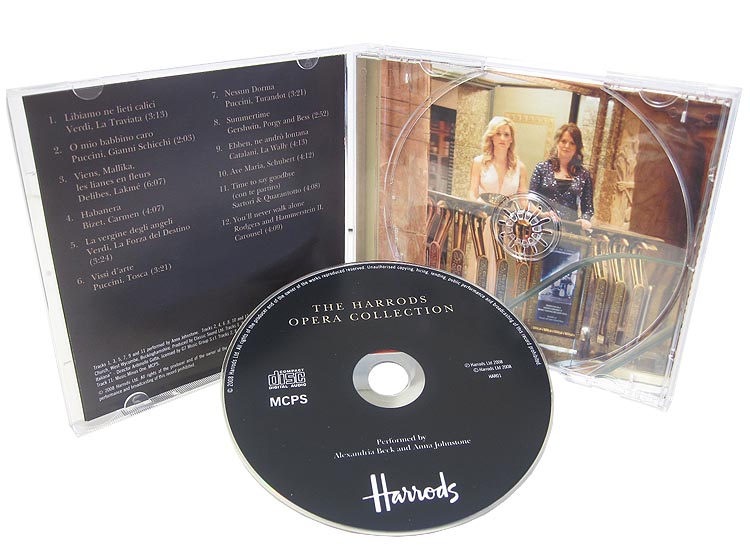
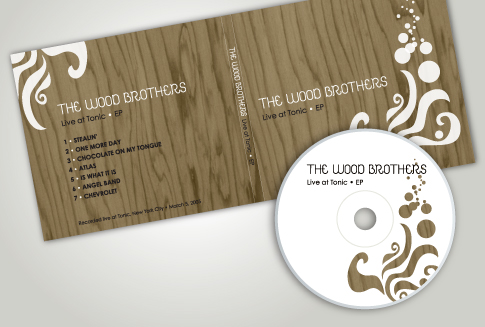
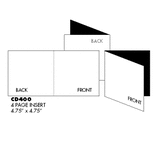
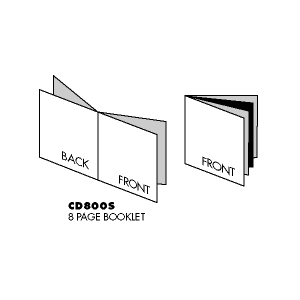
You can send potential clients or friends a CD that contains your presentation that runs automatically when they put the CD in their CD-ROM drive. The presentation can start automatically and run from beginning to end by itself. This technique works well for sales brochures that you create in PowerPoint, for a narrated slide show of your vacation pictures, or any other use you can imagine. The beauty of it is that the receiver doesn’t even have to have PowerPoint. You can also create many variations on the steps below. For example, you can add music instead of narration. Or, you don’t need to add timing to slides; instead, you can add an instruction to click on the slide to go to the next slide. This project is a Four-step process, so focus on one particular phase at a time. 1. PHASE ONE - PRELIMINARY PLANNING Build a concept for your Multimedia Presentation. You can make a promotional CD for your Band, a Sales promotion for a product or service, or a family photo album about an event. Whatever it is going to be, it must include the following: A word list describing the product/band/service/ or event. 40 word minimum. A summary of the story or promotion. You must tell a persuasive story that moves the audience to do something. This is called a CALL TO ACTION. Call 800..., Buy Now, Get involved....etc and include the instructions on how they get in contact with you. A storyboard showing the main scenes of the promotion. The Video Line is where you explain the visual scene. The Audio Line is where you tell us what we are hearing, either the talking lines from the script or the music or a sound effect or all! You should turn in at least 2 sheets. 3 boxes does not show the progression of the commercial well enough. Each box should show a key frame of the commercial. 2. PHASE TWO - PRESENTATION Must include the following: A Title page and Introduction You must describe the event/product/service Must include a minimum of 15 slides in the presentation Must include music or a narration audio component 3. PHASE THREE - AUTHORING 4. PHASE FOUR - CD PACKAGE DESIGN Your CD package must include the CD label design, the CD Liner Notes booklet and the CD Jewel case tray design. To the right you will find several booklet templates along with the tray and the CD template. Open the template in Illustrator. Create a new layer for your artwork, and begin the design of your CD package. This design should capture the intended feeling |
Phase One Storyboard Template
Phase Four - CD Case Templates
| ||||||||||||||||||||||||||||||||||||||


signature tile
|
Due Wednesday, February 25, at the end of class (P2&3)
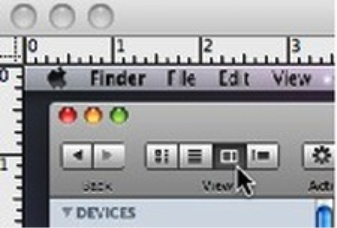
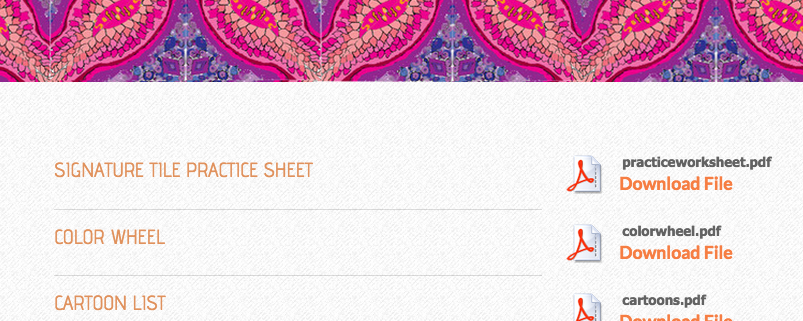
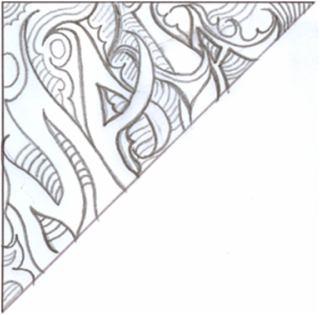
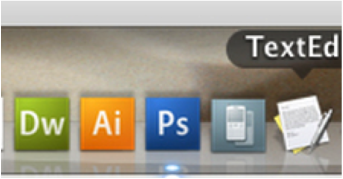
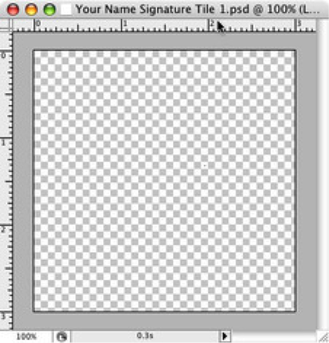
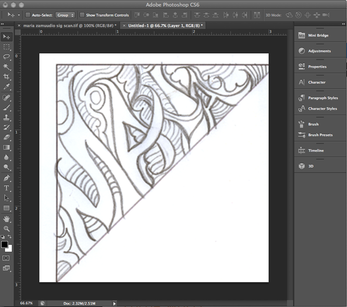
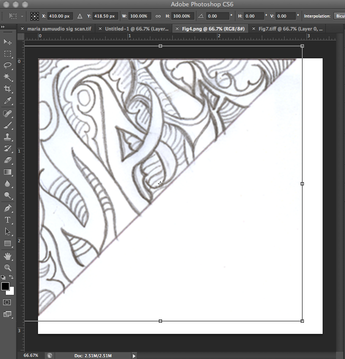
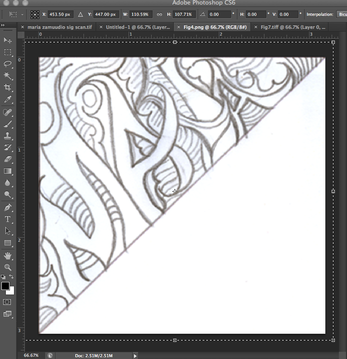
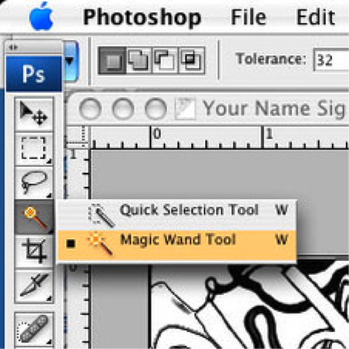
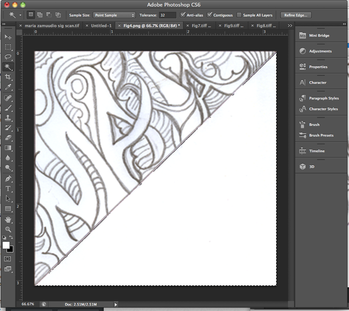
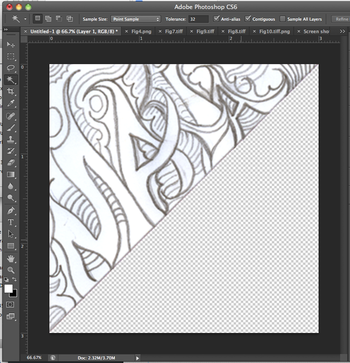
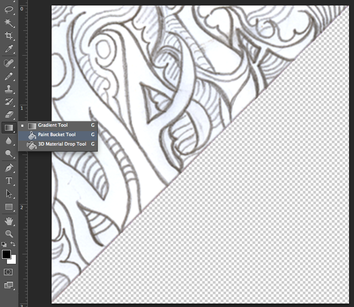
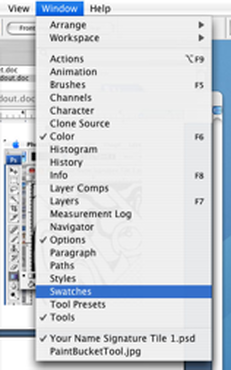
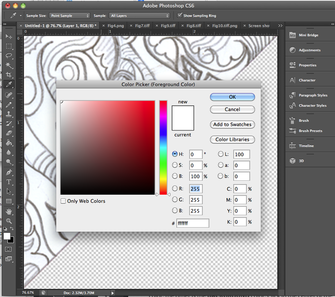
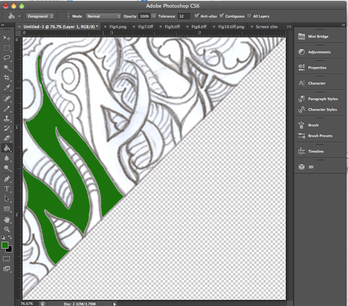
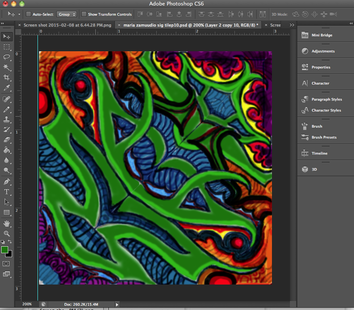
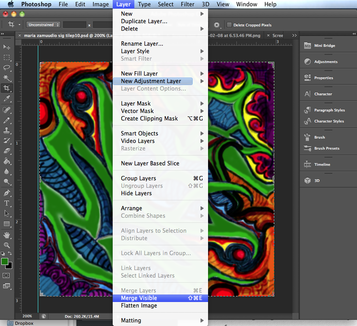
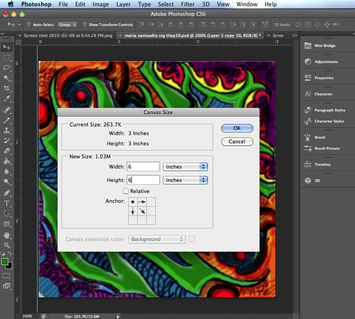
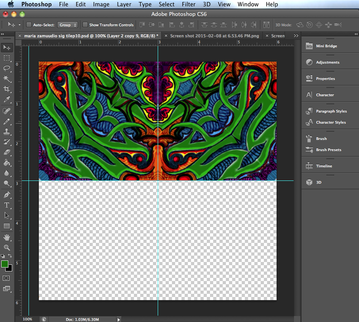
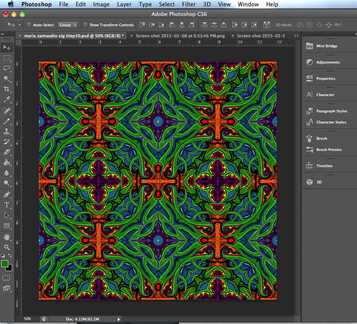
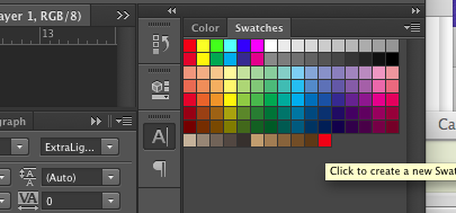
Due Thursday, February 26, at the end of class (P4&5) Repetition and Pattern In this project, you will be creating a repeating pattern design out of your signature. The objective is to make a simple design become a more complex and completely different design through the use of color and repetition. By repeating the same shapes, you will create a pattern that should create a feeling of rhythm and movement. Objective Understanding Closed shapes and how to fill them in photoshop. Mastering the Transform, Paint Brush, and Paint Bucket tools. Using critical thinking skills, applying intellectual curiosity and the ALP skills of Analyze and Synthesis to create 3 unique patterns. Applying color theory to the designs while employing the color schemes of Analogous, Complimentary and Monochromatic. Instructions You will create three different tile designs. As you execute it in Photoshop, you will choose 3 different color themes to work with. One must be Complimentary colors. The others are your choice between Monochromatic, Analogous, Primary or Tertiary. Step 1 1. Log on to Computer 2. Click on the Mac OS icon (Finder) in the Application Dock. 3. Choose File > New Finder Window from the File menu. You should see a new window open. Step 2 Select the column view At the top left corner of the finder window, select the third most VIEW selection, which is column view. Step 3 Open Practice Worksheet From the class web site, download the practice worksheet from the downloads tab. Print it out (Only if handouts are not made available.) Step 4 Start tile design Using the triangle design on the practice worksheet, start by writing your name along the long edge of the triangle. See figure to the right. Use all 4 triangles. We will use the best 3, so make many sketches. Use multiple sheets if you need to. Note-Keep in mind that we are going to fill these shapes with color later, so everything needs to be a shape, not a line. Notice the name ALDO is outlined so that we can fill it with color later. Add design elements to your background to add dimension to your design. Be sure to keep everything as an outline. Refer to your name lists to use your own interests as a source to develop a theme. Use things that you like or that describe you. Use one practice sheet per design. So you'll have one sheet of four versions for Complimentary, and one each for the other two schemes. Indicate which of the 4 versions you consider the winner for each sheet. Identify which color scheme you will use with which design, then, Turn it in to Mr Exum to scan. Step 5 Scan Your Artwork Step 6 Open Photoshop From the Application Dock, located at the bottom of your screen, click on the icon with a blue box and the letter PS inside the box. This will launch the Photoshop application. Step 7 Create a New Document Select file>new from the menu bar at the top of the screen. Enter the following settings. Name: YourName_p#_SignatureTile1.psd Note: Use Upper Lower case, no spaces; Use underscore for in between words; DO NOT DELETE the .psd at the end of the name. Width = 3 inches Height = 3 inches Resolution = 300 pixels Color = RGB Background = Transparent Step 8 Open Scan From the Menu Bar, choose FILE>OPEN. Navigate to the MEdia server>Classes>Multimedia>Period# and select your scanned image file. Step 9 Select the Tile From your Menu Bar, choose SELECT>SELECT ALL Then from the Edit Menu, choose EDIT>COPY. Step 10 Choose your SignatureTile.psd file and then EDIT>PASTE to place your scanned image into the new file. Step 11 From the Select Menu, choose SELECT>SELECT ALL. Then, from the EDIT MENU, select EDIT>TRANSFORM>SCALE. Move your artwork so that the left side is placed to the right edge of the page, and the top edge of your artwork is to the top of the page. See figure to the right. Then pull the right side handle to the right untill the top right corner of your triangle meets the top right corner of your page. Do the same for the bottom left corner of the artwork. When the artwork is placed PERFECTLY, move your tool inside the live area, and double click to let go of the tool. See figure to the right. Step 12 Select the Magic Wand Tool From your Tool Box, select the magic wand tool. Step 13 Position it over the empty triangle in your image, and click once with the mouse. Notice the marching ants around just the empty part of the triangle. If your selection goes into the art, you have a leak and you need to close it off. If this is the case, Try this. Choose the pencil tool. Place it in the bottom left corner. Hold the shift key, and click the mouse once and let go. While still holding the shift key, Move the mouse to the upper right corner, click again and let go of the mouse, then the shift key. This will draw a perfectly straight line between the 2 points that you clicked. Be sure your foreground color is black before you try this. Step 14 With the white triangle selected, choose EDIT>CUT from the menu bar. Now choose SELECT>DESELECT from the menu bar. Step 15 To add color to your tile, you need to look closely at your artwork and see where all the closed shapes are. You cannot fill an open shape because it will fill other areas that you don’t want filled. Use the pencil tool to close all your shapes. Change the color to white, adjust your brush thickness, and clean up the artwork. Step 16 Filling a shape From the Tool Box, click on the gradient tool and hold the mouse button down until the pop up window appears. From that, select the paint bucket tool. Step 17 Open the Swatches Palate. Choose WINDOW>SWATCHES from the menu bar. Step 18 Select a color At the bottom of the tool box, there are 2 overlapping squares; one black and one white. The one in front represents the FOREGROUND color, the other is the BACKGROUND color. Click in the center of the foreground box to get the color picker window. Click anywhere in the gradient to change the value of red. If you want a different color, select anywhere in the rainbow bar next to it . When you have the color that you want, select ADD TO SWATCHES. Add up to six colors to your swatches palate before clicking OK to this window. Choose colors that are correct for the color scheme you have chosen for this design. (Complimentary, Monochromatic, Analogous, Secondary, Tertiary or Primary). Step 19 Use the Paint Bucket Tool. With your desired color showing in the foreground box at the bottom of the tool box, move the paint bucket over the shape you want to fill and click. Step 20 Repeat Repeat this step, changing between the six colors you chose from your swatches palate, until your tile design is filled with the colors of your scheme. Step 21 Building Your Tile Now that you have your tile colored the way you want, we are going to create more sections of this tile as you did in the Tile Pattern project. Choose LAYER>DUPLICATE LAYER from the menu bar. Choose EDIT>TRANSFORM>ROTATE from the Menu Bar. Choose EDIT>TRANSFORM>FLIP VERTICLE from the Menu Bar if you need to. You should have a mirror image of your first triangle. Step 22 Duplicate Choose LAYER>MERGE VISIBLE from the menu bar. You should now have only one layer in your layers palate. Choose IMAGE>CANVAS>ROTATE CANVAS to determine the positioning of your artwork. Step 23 Increasing the work area Click on Image>Canvas size. Change the canvas size to 6 inches by 6 inches, and select the top left box in the Anchor selector. Now put a guide at 3 inches from both horizontal and vertical rulers. Choose the MOVE Tool from the tool box, and drag the tile to the top left corner if it is not already. Step 24 Now duplicate the layer. Now choose EDIT>TRANSFORM>FLIP HORIZONTAL and move the new artwork to the top right position. Repeat this for the other two quadrants of the image. Step 25 Increase the canvas size again to 12 by 12 and repeat the last two steps to end up with the tile you see to the right. Step 26 Save your file to your name folder>Signature Tile folder on your desktop. 27. Choose FILE>SAVE AS and select : ohs307_MacPro1 > MediaServer > 2014_15 > Multimedia>P# > SignatureTile. YOUR FILE NAME MUST BE AS FOLLOWS TO GET CREDIT FOR THIS PROJECT YourName_P#_SigTile_Complimentary.psd. Do not delete the .psd from the name or you (and I) will not be able to open it. |
|
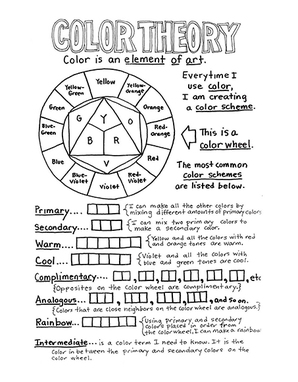
color wheel
|
Due Monday, February 9 2015, at the end of class
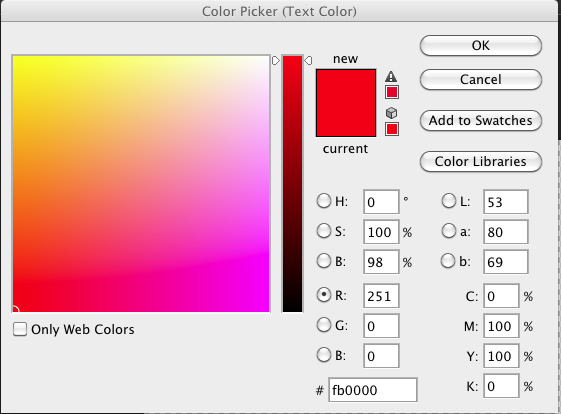
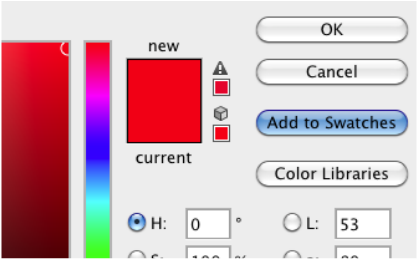
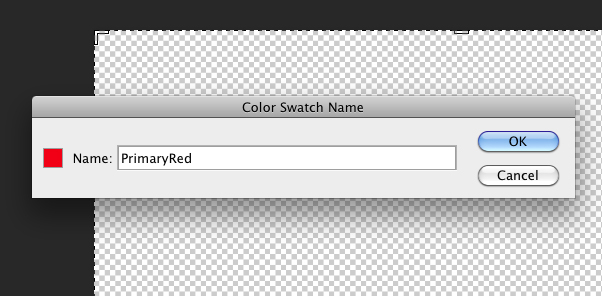
Download the COLOR WHEEL handout from the downloads page. Save it into your name folder and make a new folder for your color wheel work. Open the document in Adobe photoshop. Proceed to fill each part of the color wheel and the subsequent boxes below it with the appropriate color. For the Primary colors, you must create your own color swatch and be sure there are no parts of any other color in them. See example: To create Primary Red: Click on your foreground color box to get this pop-up window. Enter a value of 251 for red, 0 for Green and 0 for Blue. Choose Add Swatches in the Dialogue Box. Name your Swatch - Primary Red Your Custom Swatch is added to your swatch palatte. Repeat this process for your Yellow (Red:251, Green:251, Blue 0;) and for Blue ( Red:0, Green:0, Blue:251.) |
|
photoshop Tile ProjectDue Monday, February 2 at the end of class
Repetition and Pattern In this project you will create a repeating pattern design, by creating a simple design then duplicating and rotating it several times. The objective is to create a pattern with just a few parts. By repeating the shapes, you will create a pattern that presents a sense of rhythm as well as movement. Objective Understanding what layers are and how to use them effectively. Using math skills to reduce and increase the work area. Using critical thinking skills to figure out how to create an interesting design. Instructions Step1 Open Photoshop From the Application Dock, located at the bottom of your screen, click on the icon with a blue box and the letter PS inside the box. This will launch the Photoshop application. Step2 - Create a New Document Once it opens, select file>new from the menu bar at the top of the screen. Enter the following settings. Name= (Your Name) Tile 1 Width = 6 inches Height = 6 inches Resolution = 300 pixels Color = RGB Background = Transparent Click the OK button Step 3 - Show Rulers From the Menu Bar, choose View>Rulers. If “Rulers” has a check by it, they are already appearing in the image window. If not, select rulers with the mouse once you highlight rulers in the menu. Rulers should now be On in your image window. Step 4 -Divide your image Place the curser inside the ruler at the side of the image window. The cursor turns into an arrow. That’s how you know you are inside the ruler. See fig 2. To grab a guide from inside the ruler, click and hold the mouse button inside the ruler, and drag the pointer across to the 3 inch mark on the horizontal ruler. Once the guide is exactly at 3 inches, let go of the mouse. You should now have a vertical guide set at 3 inches. Repeat these steps for the horizontal guide. Step 5 - Select the Elipse Tool Click and hold on the marquee tool in the tool box (located on the far left of your screen running vertically, it is the second tool from the top) Choose the Eliptical tool from the pop out window. Step 6 - Draw a Circle Now hold the shift key on your keyboard, click and hold the mouse while dragging your mouse from the uppermost left corner of the image area to the lowermost right corner of the image area and let go of the mouse. This should create a circle that just fits inside of your image area. Step 7 - Fill it with black. Choose EDIT>FiLL Choose Black from the Pop up menu. Step 8 - Draw another Circle Start your mouse 1/2 inch in and 1/2 in down from the top left corner, drag it down diagonally to 1/2 inch in and 1/2 inch up from the lower right corner. You should be able to see a faint guide line on the ruler that line up with where your mouse is on the screen. Step 9 - Fill Choose EDIT>FILL from the menu bar, and choose white from the pop up menu. Step 10 - Repeat Repeat this step, moving in 1/2 inch at a time and changing the colors from black to white and white to black until your image looks like figure 6. Step 11 - Crop your Image Choose the CROP TOOL from the tool box (5th tool from the top) Click and drag your mouse from the upper left corner down to the center where the guides cross at 3 inches. Double Click inside the selected area. Your image is now cropped. Step 12 - SAVE AS Choose FILE>SAVE AS from the file menu, and name your file YourName_P#_Tile 1 Cropped, then choose save. Now you are going to decorate your artwork by filling in the white areas with black squares and black circles Step 13 - Drawing Squares and Circles From the Tool Box, choose the Rectangle Marquee Tool (same place as the elliptical marquees tool). Hold the Shift key down while you drag the mouse in a diagonal direction to draw a square as indicated in figure 8. Let go of the mouse. Step 14 - Repeat this process until your image resembles figure 9 Step 15 - Save the file. Choose FILE>SAVE AS from the file menu, and choose photoshop from the format pop up menu. Step 16 - Create a New Document Select file>new from the menu bar at the top of the screen. Enter the following settings: Width = 3 inches Height = 3 inches Resolution = 300 pixels Color = RGB Background = Transparent Step 17 - Choose FILE>SAVE from the file menu, and name the document (your name) PatternTile. Now you should have 2 documents open. Step 18 - Click on your cropped tile document From the select menu, choose SELECT>ALL From the Edit Menu, choose EDIT>COPY Open the new tile final document, and choose EDIT>PASTE Step 19 - Scale Drag a guide from the ruler to 1 ½” Vertically and Horizontally. Choose VIEW>SNAPTO>GUIDES from the View Menu From the edit menu, choose Transform>Scale. Drag the bottom right handle from the corner to the center where the 2 guides intersect. Step 20 - Duplicate Choose LAYER>DUPLICATE LAYER from the Layers Menu on the Menu Bar. Name the new Layer TOP RIGHT Now you have 2 layers. From the Edit menu, choose TRANSFORM>SCALE/ROTATE etc) to manipulate your artwork to resemble figure 10 Repeat these steps until your image resembles fig 10 Step 21 - Increasing the work area Now you are ready to triple your work area and duplicate your new pattern again. Click on Image>Canvas size. Change the canvas size to 9 inches by 9 inches. Select all 4 layers in your layer palatte by holding shift and clicking on each layer. From the layers menu in the menu bar, select LAYERS>MERGE LAYERS to put all four tiles onto one layer. Step 22 - Bring new guides from your ruler to 3 inches and 6 inches vertically and horizontally. Step 23 - Duplicate the layer 8 times and move each new layer in to a position that will complete a page of patterns. See Figure 11 You are now done. Save your files to your folder on the desktop. Then save as your PatternTile document. Name it in this format: YourName_P3/4_PatternTileFinal. YOU MUST HAVE YOUR NAME AND PERIOD# IN THE NAME OF THE FILE!!!!!!!!! |
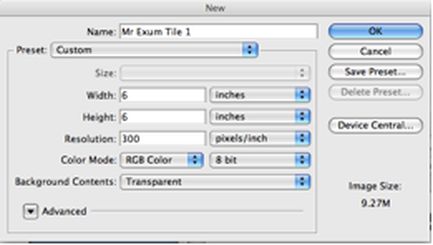
figure1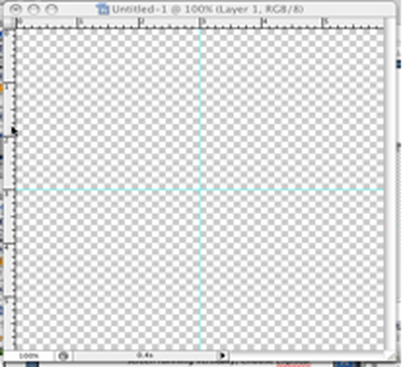
figure 2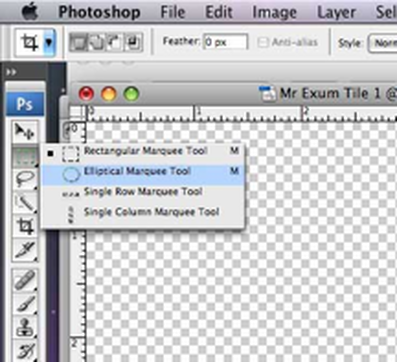
figure3
figure 4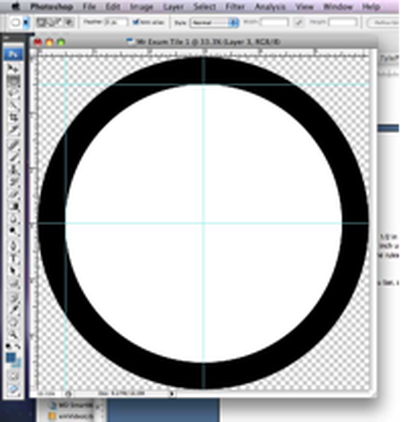
figure 5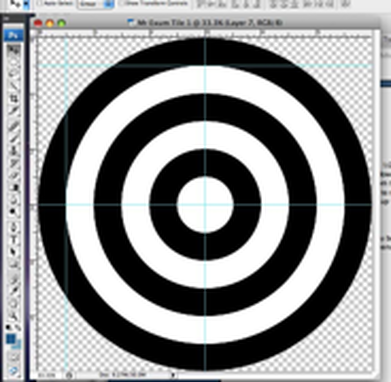
figure 6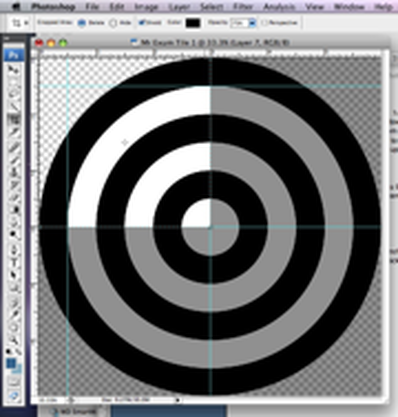
Figure 7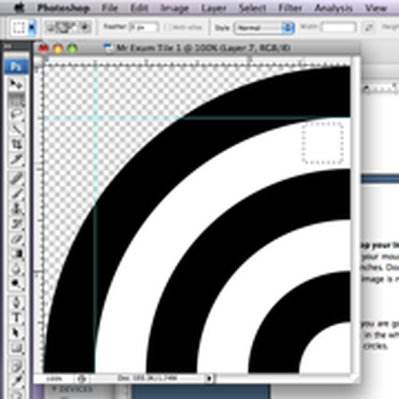
Figure 8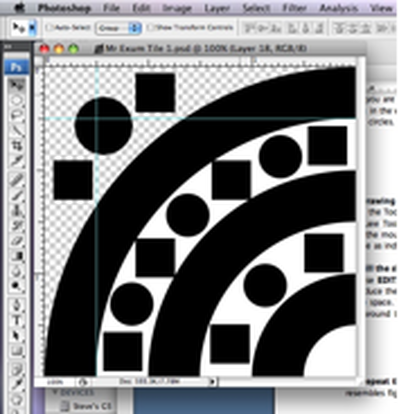
figure 9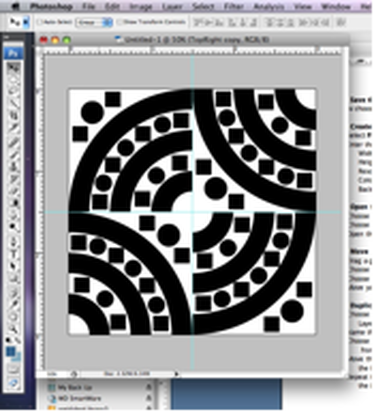
figure 10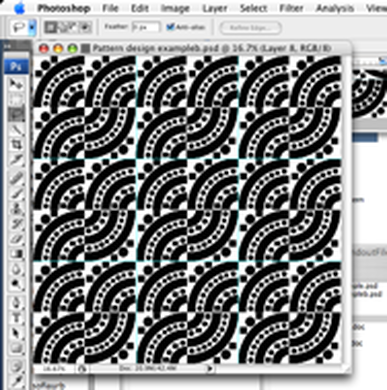
figure 11 |
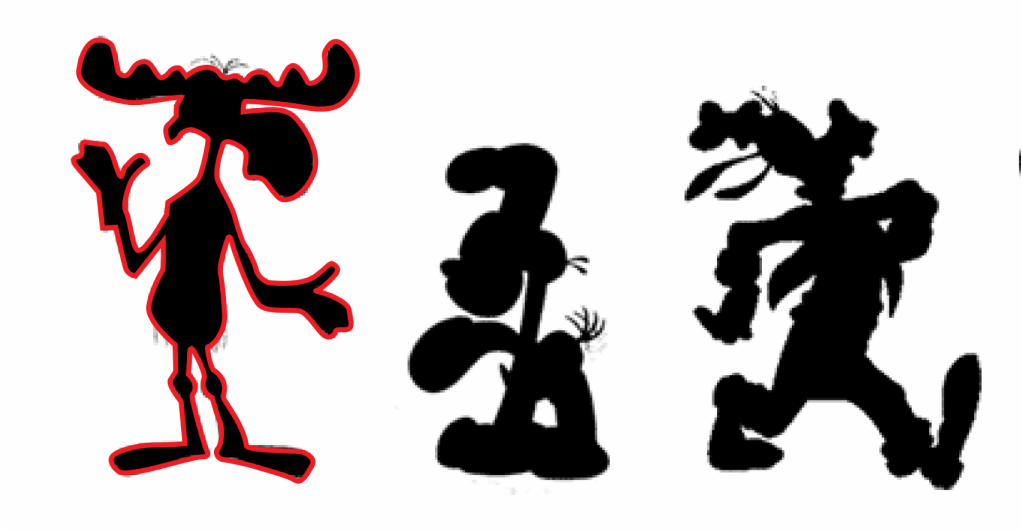
CARTOON FLIER
Due, Friday, January 16 at the end of class.
You are going to create a promotional flyer for a fictitious illustration class at a fictitious school or University. You can change the name, subject matter and title of the course, but the components need to be the same.
Download the Cartoons.pdf from the downloads page.
Save it to a project folder on your desktop.
Step 1
Open Adobe Illustrator.
Open the cartoon document
Choose OBJECT > LOCK to lock the object in place.
Step 2
Choose 4 of the characters that you want to use in your Flier. They should vary in difficulty from simple to difficult.
Use the pen tool to draw each of the 4 cartoons. Choose a wide line weight and a bright color (like red) so you can see the line that you are drawing. Also, be sure that your “fill” is turned to “none”
Once it is drawn, select the outline, then open a new document. Paste the selection onto the new page, and save it as the name of the character. Return to the cartoon.pdf document, and draw your second character. Repeat this process for all four characters.
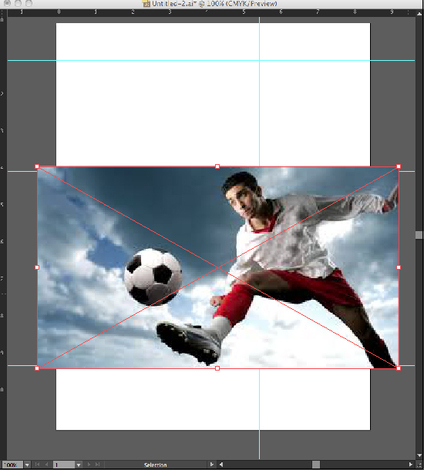
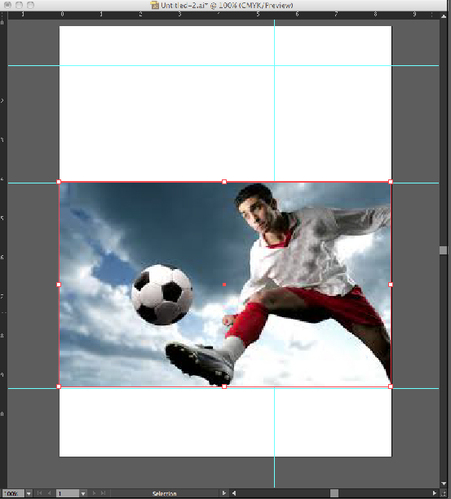
Step 3
Choose a Landscape (wider than it is tall) Action Photo from Google Images that resembles the body position of one of the cartoons that you chose to draw. Trace the outline contours of the main subject in the photo. Choose a color for your outline and a weight (thickness) that will allow it to be easily seen over the colors of the photo.
Choose a Landscape (wider than it is tall) Action Photo from Google Images that resembles the body position of one of the cartoons that you chose to draw. Trace the outline contours of the main subject in the photo. Choose a color for your outline and a weight (thickness) that will allow it to be easily seen over the colors of the photo.

Step 4
Create a new 8.5”wide x 11”tall document.
Save it to the folder and name it: “Cartoon Flier”
Choose VIEW > RULERS > SHOW RULERS
Drag a horizontal guide from the ruler to 2” from the top and another to 4” from the top and another to 1.75” from the bottom.
Drag a vertical guide to .5” from the left, 5.5” from the left and .5” from the right.
Step5
Place your Action Photo on your document by choosing FILE > PLACE.
Enlarge or reduce your image to extend from one side of the flier to the other, and taller than the rectangular area that the guides have created.
Place your Action Photo on your document by choosing FILE > PLACE.
Enlarge or reduce your image to extend from one side of the flier to the other, and taller than the rectangular area that the guides have created.
Step 6
Choose the rectangle tool. Starting at the top left corner of the rectangular area click and hold the mouse button down simultaneously dragging the mouse to the bottom right corner, then let go.to the bottom right.
Choose the rectangle tool. Starting at the top left corner of the rectangular area click and hold the mouse button down simultaneously dragging the mouse to the bottom right corner, then let go.to the bottom right.
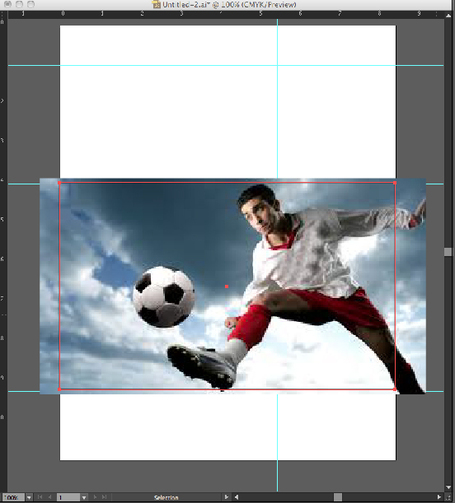
Switch to the black arrow tool. With the rectangle selected, hold the shift key and also select the Action Picture. With both items selected, choose OBJECT > CLIPPING MASK > MAKE. This will crop the picture to the size of the rectangle.
Step 7
Now place the 4 cartoons in the 3” row above the Action photo.
Type your name and period # in the top right corner using the 5.5 and the 1” intersection of the guides.
Write a headline and place it in the white area above the main photo.
Write a short paragraph of benefits for your course some where on the right side of the main photo using the existing gtid.
Name Logo Powerpoint
Due Sunday, December 7 @ 11:59 pm
The final step to your project is to make a presentation that explains all the steps you took to get to the final design.
Slide 1
Title Slide. Include your name, class period, project name
Slides 2-3
This is where you should state your name and summarize what you learned when you did the Identities assignment. That was where you asked the family history and the meaning of your name. Give us the background of how you got your name and what it means or represents.
Slide 4-5.
Show us your word list. Explain what you learned from this step and how you got so many words.
Slide 6-8
Show us your word pairings and your set of sketches for each pair. One pair per slide. You may have to crop the original picture that you turned in for the thumbnails assignment. We want to see clearly what you drew for each pair.
Explain how you came up with the drawings
Slide 9
Show us your final Illustrator Logo. Explain each part and how this represents you.
Slide 10
Reflect on this assignment and tell us what you learned about yourself from executing this project.
NOTE: To get your final .ai logo file into google presentation, we need to change the file format first.
Step 1 - Open Adobe photoshop.
Step 2 - Open your logo file in photoshop.
Step 3 - Make sure your color mode is in RGB, so go to IMAGE > MODE > RGB.
Step 4 - Choose FILE > SAVE AS. A pop-up window will appear.
Step 5 - In the fFORMAT box of the pop-up window, Choose CompuServe GIF.
Be sure you have the destination pointed to the correct folder.
Step 6 - Then choose SAVE from the pop-up window
Digital scavenger hunt 3
Due Tuesday, December 2 @ 11:59pm
This project is about perception, creative thinking and digital media use. Be inspired to show the definitions through you eyes.
1. Site the definition for each of the words.
2. Find a picture that expresses the essence or the spirit of the word.
REMEMBER- Don’t stop at your first idea. I dont want the obvious picture. Be creative. Interpret the meaning. Find the most eccentric way out example of the word. Use the definition to help you find the most expressive picture you can find…..and have fun with it. All of the words should be searched within the context of GRAPHIC DESIGN
1. Background
2. Capture
3. Compression
4. interactive
5. Script
6. navigation
7. rollover
8. treatment
9. negative space
10. texture
11. proof
12. form
13. unity
14. proximity
15. Saturation:
Assignment for 11/10/14
Today you are to be doing one of two things:
1. Refine your name logo to determine which final 3 logos we will discuss when we meet individually. Remember, these are name logos, so start designing in how you will include your name as part of the final design. Have them ready by Wednesday.
2. Completing any past assignments that you have not turned in.
Some points are better that no points.
ShepArd Fairey Reflection
Due at 11:59pm, November 9, 2014
After watching the video, and having participated in the class discussions and the powerpoint, write a reflection on Shepard Fairey taking one of two positions.
1. You believe he is a free spirited artist just trying to make his way
2. You believe he practices plagiarism and has no regard for ethics or copyright.
Either way, support your claim with sound arguments, not opinions.
Site your resources.
Must be a full page length, single spaced, 12pt type
Make a Collection of 30 Logos
Due at 11:59pm, October 14, 2014
Below, is a list of 5 categories that logo designs are classified by.
Find six logos for each category.
Read the description for each category, and identify them when you add them to the powerpoint.
1. Use your browser to visit web sites to find logos.
2. Right click the logo and choose SAVE AS to your project folder.
3. import them into a powerpoint.
4. Identify which category the logo belongs to
5. Give a brief explanation of what the company does.
6. Do not use any of the examples shown here as one of your logos
The goal of this assignment is get you started in thinking about logo design by researching what kinds of logos exist.
|

Word Mark Examples
Symbol Examples

Lettermark Example

Combo Mark Examples:

Emblem Mark Examples
|
Digital Scavenger Hunt 2
Due Sunday, September 21@ 11:59pm
This project is about perception, creative thinking and digital media use. Be inspired to show the definitions through you eyes.
1. Site the definition for each of the words.
2. Find a picture that expresses the essence or the spirit of the word.
REMEMBER- Don’t stop at your first idea. I dont want the obvious picture. Be creative. Interpret the meaning. Find the most eccentric way out example of the word. Use the definition to help you find the most expressive picture you can find…..and have fun with it.
LIST
animation
occupied
abstract
collaboration
abundant
rhythmic
exuberant
tablet
fury
layers
neutral
nimble
awkward
thumbnail
Identity List
HOMEWORK
Due, and end of class Monday, September 15
Step 1 - List
Make a list of a minimum of 25 words which describe you. Use your name, not Tony Stark, Peter Pan, Batman, Spider Man.....or Cap'n Crunch!
Step 2 - Matching
From your list, choose Three (3) pairs of words. Match words that offer a funny or unique pairing. The more naturally the words go together, the less creative or more expected the result will be. For instance, "green" and "pants". These 2 words naturally go together, so there isnt an unexpected outcome from this pairing. While "cereal" and "mustache" could create some very interesting images.
Now make a drawing of your interpretation of the two words together.
Make Five (5) drawings for each of the 3 pair of words as a minimum quantity.
The more quality drawings/pairs you do, the better your chance of a higher grade.
Thats 15 drawings in all, plus the word list.
IDENTITIES
YOUR NAME STORY
Due by 11:59pm Sunday, August 7
Sure, we know each other’s names, but do we know the story behind that name?
Think about the story of your name.
Create a new Google Doc, name it “Identities”
Jot down your thoughts and feelings about the story of your name.
You may want to include the following:
State your name, age, birthday, place you were born
-Why did your parents choose your name?
-What is the family History?
-If you were named after someone, who was it?
-In what country did your name originate?
-How has it changed?
-What does it mean?
-How do you feel about it?
-Would you change your name? To What?
-What were some of the main stories in the news the day you were born
digital scavenger hunt
DUE SUNDAY, AUGUST 17, 2014
This project is about perception, creative thinking and digital media use. Be inspired to show the world through you eyes.
1. Site the definition for each of the words.
2. Find a picture that expresses the essence or the spirit of the word.
REMEMBER- Don’t stop at your first idea. Find the most eccentric way out example of the word. Be creative, use the definition to help you find the most expressive picture you can find…..and have fun with it.
EXAMPLE
1. sur·prise [ser-prahyz, suh-] verb (used with object), sur·prised, sur·pris·ing. 1. to strike or occur to with a sudden feeling of wonder or astonishment, as through unexpectedness: Her beauty surprised me.
2.

WORD LIST:
BUTTONS
RED
SQUARE
CLUTTER
UNDERNEATH
CAN'T LIVE WITHOUT
STRIPES
CURVY LINES
SOUND
EMPTY
DELICIOUS
UPSIDE DOWN
SILENCE
WATER
PATTERN
TOGETHER
PUSH
DEVELOP
PASSION
BUTTONS
RED
SQUARE
CLUTTER
UNDERNEATH
CAN'T LIVE WITHOUT
STRIPES
CURVY LINES
SOUND
EMPTY
DELICIOUS
UPSIDE DOWN
SILENCE
WATER
PATTERN
TOGETHER
PUSH
DEVELOP
PASSION
Occupations presentation
Due Sunday August 10th, 2014 by 11:59pm
SPECIFICATIONS
Length: Your PowerPoint must be a Minimum of 20 slides.
Text: Your Title slides must be easy to read:
Tips: Choose fonts that are clear and simple. Choose good color contrast. Must be able to be read from across the room when being presented (don’t use too small of a type size.) Don’t use too busy of a background.
Creativity: Remember that completing the minimal project requirements will earn C work. Adding more information, pictures, descriptions/explanations etc that are relevant and serve to a better understanding for the audience will earn the higher grades. So push past your first attempt, and dig deeper for the more interesting pictures, or the more intriguing facts. You want to visually communicate what the job is all about. This also is your first "design" project, so give it your best shot at being aesthetically pleasing.
TIPS:
1. Don't use too many font families or styles. Two fonts are usually enough, but you decide what looks best.
2. Don't have too many facts on a slide. We need to see it from across the room when presented. It is OK to have more than the required number of slides. When you have paragraphs of info on one slide, the text gets too small. Generally speaking, you want to have just one thought per slide.
3. If you put text or headlines over a photo, make sure the text is still readable. You shouldn't have to strain to read it. If you do, you will lose your audience.
4. When getting the content for this project, don't plagiarize!
DOCUMENT YOUR SOURCES
DO NOT COPY AND PASTE FROM ANY SOURCE. THIS IS IN YOUR OWN WORDS!!!!!
Use this as a check list as you progress through the completion of the project. This is just as much a design project as it is a written assignment. How it looks is as important as what it says. It is all part of the story you are telling.
SLIDE CRITERIA:
Slide 1- Title Slide
Must include: Occupation name, Your name, Period # and Fall 2014
Use a background image that will be relevant to your topic.
Slide 2-3 Skill Set
Must Include: Job Skills Needed: Minimum of 6.
“Describe” what the skills are. Don’t just make a list that doesn’t communicate anything.
Slides 4-6 Work Station
Must Include: Photos of Typical Workdesks or Workstations or workplace
2 or 3 Important Facts per slide describing it.
(facts can be on separate slide so as not to interfere with pictures if you like, as long as there is a caption under the photo to identify it)
Slides 7 - 8 Compensation
Must Include: Salary statistics for the Occupation
Must have the National; Regional; and Local statistics
Slide 9 - 10 Descriptions
Must describe in detail What They Do
Give examples of what the work looks like
Slide 11 - 13 Training, Qualifications, and Advancement
What formal training/education is required for entry into this occupation. Are there degrees, certificates etc? Name a few colleges or universities that have the degree you would need.
Slide 14 Professional Organizations
List the Professional Oraganizations/Associations affiliated with this occupation (Unions etc)
Give a short description of each.
Slide 15-17 Favorite Person
Choose your favorite or a famous person from this occupation:
Include Name, birth date, his/her contribution to this occupation or the industry as a whole.
Slide 18 – 19 Your interpretation-
Why did you choose this Occupation?
What are your final impressions about this Occupation?
What impressed you the most about this occupation while doing your research?
Slide 20+ References:
Include the website URL for each of the facts that you used in the project. You must site your work, or it will be considered plagiarism.
Google Account Set up
Expectations Contract
Contract Due August 8th, 2014
Download it from the downloads page, print it out, and have both you and your parents sign it, then turn it in on or before August 8th, 2014
Download it from the downloads page, print it out, and have both you and your parents sign it, then turn it in on or before August 8th, 2014
Materials You will need for class
HAVE ITEMS IN CLASS BY AUGUST 8, 2014
ITEM DESCRIPTION ESTIMATED COST
Must have a gmail account. Free - District has provided you with one
ITEM DESCRIPTION ESTIMATED COST
Must have a gmail account. Free - District has provided you with one
|
|
|
|
List of Items to Donate
Tissue Box Disinfectant Wipes Hand Sanitizer Paper Towels UHU Glue Sticks (jumbo/Large) Scotch Tape |
|
