Del Mar Fair Entries |
| ||||
Individual Video Schedule for Spring
Due February 9
1A - JOURNALISM is for reporting timely news, such as a real event. OR
1B - MUSIC VIDEO a compilation of still or action images combined with music.
Due March 9
2A - PSA 30 or 60 second announcement. FOLLOW THE RUBRIC FOR PSA. SEE BELOW
2B - DOCUMENTARY is for informational material, not necessarily timely or even real. Less than 5 minutes
Due April 3
3A - STOP ACTION has all or most visual elements created stop action photography sequencing.
3B - EXPERIMENTAL is for any work that doesn’t fall into any other category.
STOP ACTION Criteria
1. Write a script. Create a story that has a character, beginning, a middle, and an end.
No Demonstrations or how tos
2. Film must be 60 seconds. ( You will need at least 300 photos )
Be sure to set your camera to the lowest resolution, or your photos will be too large in editing, and you will have to reduce all 300 piks one at a time.!
3. Must have an intro title.
CHECKLIST To Turn In
Brainstorm 10pts
Outline 10 pts
Storyboard (Fully Annotated) 50 pts
Film 100 pts
Reflection 30 pts ( See Prompt Below )
REFLECTION PROMPT:
Discuss what worked well with your creative process
Analyse what didn't work so well or what needs improvement.
Evaluate your growth from the start of the semester to now as a Storyteller/Film maker.
What are your strengths and weaknesses.
Storyboard
This is where it all begins. This is where the original idea begins to take life through visual communication. Think of your video in terms of the story. All good stories contain the 5 W's; Who, What, When, Where, and Why. If you can answer these questions during the duration of your video, chances are it will be a good story.
1. You must include all of the scenes that you are going to shoot.
Indicate in your drawings what the environment is, what is the location, etc. Include all props.
Breakdown each scene to show the choreography of the scene, how does the camera move,
2. Indicate all transitions
3. Indicate all camera movements
4. Must include camera angle indications and mark up.
5. Annotate the storyboard.
Acquire Your Assets
1. Film all of the scenes that are indicated in your storyboard.
If something happens in the living room, and then the kitchen, then something else happens back in the living room, film all of the living room scenes together, then film all of the kitchen scenes. This will save you a lot of set up and breakdown time.
The storyboard is your guide to making sure that you get all of the scenes. Be sure to have that with you as your checklist.
2. Acquire any songs, music tracks, sound effects etc. You must download the actual mp3 file. All of the assets that you import to Premier must be on your hard drive and in the same master project folder. Otherwise, it may loose track of the path and those files will come up unrecognizable. Be sure to credit all the source material. Include a separate document when submitting the storyboard and the outline.
Export
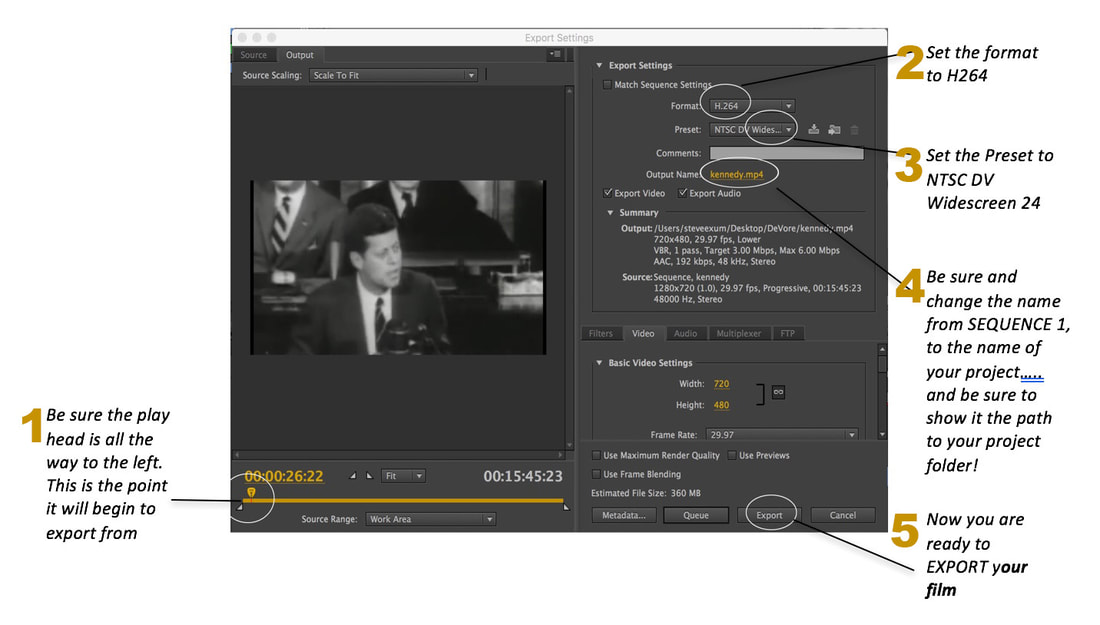
1. Download the file to the right, and follow the directions to export with the correct
settings. Export To your own project folder
2. Connect to the server: TeacherStation > MediaServer2 > KOHS_2017-2018 > Sem2Videos > NameFolder
Username: eagles Password: win
Follow the path to our class folder, then create a name folder for yourself, and save your files there, Including paperwork. Then upload this folder to your google account and share it to [email protected]
3. Follow this naming convention
LastName_FirstName_FilmName.mp4
The Final PSA Rubric : 100pts
1. Was the Claim Made, and how clear was it? 10pts
2. Was there a Call To Action. Was it clear? 10pts
3. Did the story support the claim ? 10pts
4. To what degree was the storyboard Annotated? 10pts
5. Did the drawings indicate environment, props and settings? 10pts
6. Were there appropriate use of camera angles, movement and transitions? 25pts
7. Was the run time exactly 30 or 60 seconds? 10pts
8. Was the file named to the correct convention? 10pts
9. Was the final file archived correctly to the server. 5pts
1A - JOURNALISM is for reporting timely news, such as a real event. OR
1B - MUSIC VIDEO a compilation of still or action images combined with music.
Due March 9
2A - PSA 30 or 60 second announcement. FOLLOW THE RUBRIC FOR PSA. SEE BELOW
2B - DOCUMENTARY is for informational material, not necessarily timely or even real. Less than 5 minutes
Due April 3
3A - STOP ACTION has all or most visual elements created stop action photography sequencing.
3B - EXPERIMENTAL is for any work that doesn’t fall into any other category.
STOP ACTION Criteria
1. Write a script. Create a story that has a character, beginning, a middle, and an end.
No Demonstrations or how tos
2. Film must be 60 seconds. ( You will need at least 300 photos )
Be sure to set your camera to the lowest resolution, or your photos will be too large in editing, and you will have to reduce all 300 piks one at a time.!
3. Must have an intro title.
CHECKLIST To Turn In
Brainstorm 10pts
Outline 10 pts
Storyboard (Fully Annotated) 50 pts
Film 100 pts
Reflection 30 pts ( See Prompt Below )
REFLECTION PROMPT:
Discuss what worked well with your creative process
Analyse what didn't work so well or what needs improvement.
Evaluate your growth from the start of the semester to now as a Storyteller/Film maker.
What are your strengths and weaknesses.
Storyboard
This is where it all begins. This is where the original idea begins to take life through visual communication. Think of your video in terms of the story. All good stories contain the 5 W's; Who, What, When, Where, and Why. If you can answer these questions during the duration of your video, chances are it will be a good story.
1. You must include all of the scenes that you are going to shoot.
Indicate in your drawings what the environment is, what is the location, etc. Include all props.
Breakdown each scene to show the choreography of the scene, how does the camera move,
2. Indicate all transitions
3. Indicate all camera movements
4. Must include camera angle indications and mark up.
5. Annotate the storyboard.
Acquire Your Assets
1. Film all of the scenes that are indicated in your storyboard.
If something happens in the living room, and then the kitchen, then something else happens back in the living room, film all of the living room scenes together, then film all of the kitchen scenes. This will save you a lot of set up and breakdown time.
The storyboard is your guide to making sure that you get all of the scenes. Be sure to have that with you as your checklist.
2. Acquire any songs, music tracks, sound effects etc. You must download the actual mp3 file. All of the assets that you import to Premier must be on your hard drive and in the same master project folder. Otherwise, it may loose track of the path and those files will come up unrecognizable. Be sure to credit all the source material. Include a separate document when submitting the storyboard and the outline.
Export
1. Download the file to the right, and follow the directions to export with the correct
settings. Export To your own project folder
2. Connect to the server: TeacherStation > MediaServer2 > KOHS_2017-2018 > Sem2Videos > NameFolder
Username: eagles Password: win
Follow the path to our class folder, then create a name folder for yourself, and save your files there, Including paperwork. Then upload this folder to your google account and share it to [email protected]
3. Follow this naming convention
LastName_FirstName_FilmName.mp4
The Final PSA Rubric : 100pts
1. Was the Claim Made, and how clear was it? 10pts
2. Was there a Call To Action. Was it clear? 10pts
3. Did the story support the claim ? 10pts
4. To what degree was the storyboard Annotated? 10pts
5. Did the drawings indicate environment, props and settings? 10pts
6. Were there appropriate use of camera angles, movement and transitions? 25pts
7. Was the run time exactly 30 or 60 seconds? 10pts
8. Was the file named to the correct convention? 10pts
9. Was the final file archived correctly to the server. 5pts
End Semester
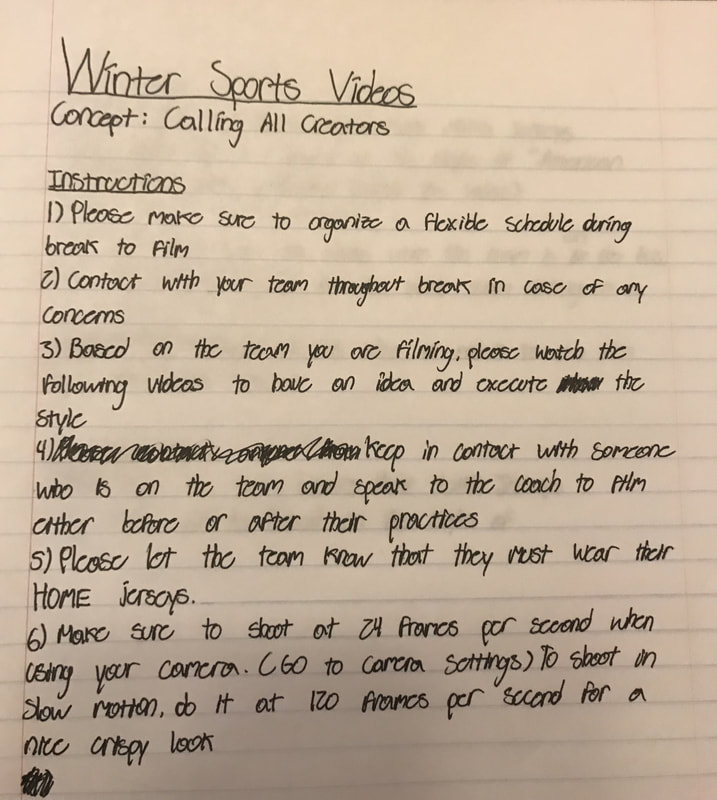
Winter Break Sports VideosBoys Soccer
Link: Creativity Gets You Noticed Girls Soccer Link: American Woman Girls Water Polo Link: Team USA: The Golden Girls Boys Basketball Link: Clark College Basketball PROMO Girls Basketball Link: EOU Women's Basketball Promo Boys and Girls Wrestling Link: NCAA Wrestling Championships Promo Please share videos to Marco and to [email protected] Contact info: Email: [email protected] Phone Number: (619) 205-2646 |
|
Step 3: Ad Final
|
Due Thursday, December 8 at the end of class. Your 60 second commercial is your final. It must be complete and demonstrate your mastery of all of the lessons that we have had along our journey of becoming good story tellers through film (video). Step One: Outline 1. State the claim. What is the main claim that you will make in your commercial about your product? What is the main benefit to the consumer? What point will you be making in your commercial. 2. The Story. What is the premis of the story. What is occurring that will make the claim and move the audience to your call to action? This should at least be 2 paragraphs long. It should tell me everything I need to know about what is going to happen. 3. Call to Action. What do you want the customer to do, specifically. Call? Come in to the store? Go online and do something? Redeem a coupon? Etc.? 4. Contact info. You must include the company contact information ie, web address, phone number, location, places product is sold etc. Step Two: Storyboard Your 60 second Commercial This is where it all begins. This is where the original idea begins to take life through visual communication. Think of your video in terms of the story. All good stories contain the 5 W's; Who, What, When, Where, and Why. If you can answer these questions during the duration of your video, chances are it will be a good story. 1. You must include all of the scenes that you are going to shoot. Indicate in your drawings what the environment is, what is the location, etc. Include all props. Breakdown each scene to show the choreography of the scene, how does the camera move, 2. Indicate all transitions 3. Indicate all camera movements 4. Must include camera angle indications and mark up. 5. Annotate the storyboard. Step Three: Acquire Your Assets 1. Film all of the scenes that are indicated in your storyboard. If something happens in the living room, and then the kitchen, then something else happens back in the living room, film all of the living room scenes together, then film all of the kitchen scenes. This will save you a lot of set up and breakdown time. The storyboard is your guide to making sure that you get all of the scenes. Be sure to have that with you as your checklist. 2. Acquire any songs, music tracks, sound effects etc. You must download the actual mp3 file. All of the assets that you import to Premier must be on your hard drive and in the same master project folder. Otherwise, it may loose track of the path and those files will come up unrecognizable. Be sure to credit all the source material. Include a separate document when submitting the storyboard and the outline. Step Four: Export 1. Download the file to the right, and follow the directions to export with the correct settings. Export To your own project folder 2. Connect to the server: TeacherStation > MediaServer2 > KOHS_2017-2018 > AdvertisementVideos > NameFolder Username: eagles Password: win Follow the path to our class folder, then create a name folder for yourself, and save your files there, Including paperwork. Then upload this folder to your google account and share it to [email protected] 3. Follow this naming convention LastName_FirstName_CommercialName.mp4 The Final Movie Rubric : 200pts 1. Was the Claim Made, and how clear was it? 20pts 2. Was there a Call To Action. Was it clear? 20pts 3. Did the story support the claim ? 20pts 4. To what degree was the storyboard Annotated? 20pts 5. Did the drawings indicate environment, props and settings? 10pts 6. Were there appropriate use of camera angles, movement and transitions? 50pts 7. Was the run time exactly 60 seconds? 20pts 8. Was the file named to the correct convention? 10pts 9. Was the final file archived correctly to the server. 20pts 10. Download and complete the reflection sheet found to the right. 20pts CHECKLIST To Turn In Ad Analysis Client Research Brainstorm Outline Storyboard (Annotated) Film Reflection ( See Below ) REFLECTION PROMPT: Discuss what worked well with your creative process and Analyse what didn't work so well or what needs improvement. Evaluate your growth from the start of the semester to now as a Storyteller/Film maker. What are your strengths and weaknesses. |
| ||||
Step 2: Client Research
|
Due at 11:59 pm Wednesday, November 15
To really know how to advertise a product successfully, we need to know about the client that hired us and the product we are promoting. Review the background of E-Force by looking at their website (www.eforce.com) and prepare for your client meeting by answering the following questions about the company: (Create a google doc and share it to [email protected]) 1. Who is the client's primary audience? 2. What are the current strengths of the client's product, from what you have seen? 3. Where do you think the client's mission/product needs clarification or revision? Next, list five questions you have for the client to help clarify confusions or bring your further understanding about the client’s needs. Please see the sample Client fact sheet to the right. You are seeking to know the same info about your client. |
| ||||
Step 1: Ad AnalysisDue at 11:59 pm Sunday, November 12
Assignment 1 You will choose THREE video commercials and answer the following questions for EACH. Identify the commercial and give link for each commercial. Purpose 1. What is the name of the product being advertised? Describe the product. 2. How does the writer/director want to affect the readers' attitudes or behavior? 3. What central claim does the commercial make? Language and Graphics When you first glance at the commercial, what do you see, rather what is the focal point of the Ad? How does the Ad direct your attention through the use of image and color? What tone does color set for the Ad? How does the Writer/Director use language to accomplish a purpose with the target audience? What is the tone of voice in the ad? Is it serious, authoritative, funny, pleading, angry, thoughtful, assertive? Explain how the word choices and statements convey this tone? What is the CALL TO ACTION? (What does the Advertiser want the audience to do?) Audience Describe the target audience? Why should they care about this product or service or subject? How is it relevant to them? What do they need to know for the ad to have a significant impact on them? Does the Ad convince them they need this product? How? Evidence How does this ad or page utilize the 10 Principles of Effective Advertising? Which does it focus on most? Where could it improve? Refer to your notes from the lecture. |
| ||||
Need Help Filming Interviews?
Week of August 14
Focus this week is to produce our first news show. Group A will be anchors until we vote on the auditions. In the meantime, everyone is working on producing a report. A report is done with a reporter, interviews and B-roll. A commercial is done with a story, and a claim, and a call to action.
Please turn in proposals and brainstorms, and outlines for approval before you get equipment and start to shoot.
All forms are posted on the downloads page.
Procedure:
Monday - Brainstorm, Proposal and outline
Tuesday - Script/Outline, pre film organization
Wednesday - Film
Friday - Film
Monday - Edit
Tuesday - Edit/Export
Wednesday - review, pre-plan for next film
Anchor Audition Script |
| ||
Exporting with Premiere Pro CS5 and Adobe Media Encoder
What Is Compression?
When you encode a video, you're compressing it so it takes up less disk space. There are tons of different codecs that let you do this and many different file formats. For example, H.264 is a codec and MOV is a file format. H.264 can encode your video, but you've probably seen it delivered as an MOV, AVI, or MP4 file. That's because all these formats can serve as a content container for H.264 video. There's no real significant difference between H.264 files with these various file types, so don't worry too much about how to deliver. My preference is MP4, because pretty much everything can play it, but most video software can handle the other formats too.
Bit Rates
When you're encoding video, you're going to be dealing with bit rates. Bit rates are how much data is used for each second of video. Let's say you have a video that was encoded at 1000kbps. Despite what it looks like, that doesn't mean each second of video takes up 1000KB, but rather 125KB. In this case, kbps stands for kilobits per second, not kilobytes. Kilobits are basically eight times the number of kilobytes, so you can get kilobytes per second by dividing your number of kilobytes by eight. If your video was exactly 94 seconds long and encoded at a bit rate of 1000kbps, that means it would be 11.75MB in size. This is all assuming that every second of video equals exactly 1000 kilobits, which is only the case if you encode at a constant bit rate (CBR). CBR encoding is generally used for streaming media to keep the flow of data as consistent as possible, but for progressively downloaded video (what you find on YouTube, Vimeo, and most other video sharing sites) you're better off encoding at a variable bit rate (VBR). VBR encoding can work in a couple of ways, but most encoders just have you specify a single number (in kilobits per second) as the average bit rate. This means that if you specified 1000kbps, each second of the video would be encoded at around 1000kbps. Some seconds of your video will not be as complex as others, so ones with lower complexity won't require all 1000kbps. The ones that require more will take more, and on average this will result in seemingly higher quality video without affecting the file size too much. There's more to it than that, but that's the basic idea.
Key Frames
One more thing you should know about encoding is key frames. Pretty much every codec you'll use to export video for the web, DVD, Blu-ray, etc., will have key frames. Codecs that don't use key frames are generally designed for editing purposes because they're less processor-intensive and therefore make editing a bit faster. The DV codec is one such codec. Compare it to H.264 and see how much faster it is when editing. So what are key frames? Key frames are the full picture. Let's say you have 30 frames of video and the first and 30th frame are key frames. You can think of those frames like photos—all the detail of the video exists in that frame. Frames 2 through 29, however, do not have the full picture. Instead, frame 2 just contains the changes that have happened since frame 1 because frame 2 is not a key frame. How often do you need to use key frames? Less often than you'd think. Every six seconds is customary nowadays, but the more key frames you have the easier it is to scrub through the video. The downside is that more key frames tends to result in lower-quality video. Why? Because it takes a lot of data to store a key frame, and if you only have 1000 kilobits (or whatever) every second, the more frames in that second that use a full frame mean you have less room to store the changes between those frames. If you use key frames too frequently it'll degrade the quality of those changes and the quality of those key frames to try and stick to the average bit rate. It may seem like many key frames is better, but you generally just end up with a lot of lower-quality key frames and, therefore, lower quality video.
How to Design an Encoding Specification
When designing a specification or a preset of your own, the first thing you need to figure out is how you're delivering your video. If you're delivering it on the web, you're not going to want to target anything slower than the slowest broadband connection because anything at that level isn't really fast enough to handle video worth watching in the first place. (Well, unless it's a cellphone, but we've learned to be patient with those.) The slowest broadband connection you're going to find is probably the 768kbps DSL connection. This is the peak data rate, so if you're thinking you should encode your video at 768kbps you are setting yourself up for trouble. If you're reading this, you're paying for an internet connection. Does it always perform at the peak rate? Probably not. If you want people to be able to progressively download your video in real time you need to take the lowest target connection speed and reduce it by one third. For 768kbps, that's 512kbps, so you want to encode your video at 512kbps. This is really only a useful bit rate for standard definition video and so you shouldn't use it with anything larger than 640x360 or 640x480. Around 1000-1200kbps is a good target video bit rate for 720p files and 1080p should be twice that, if not more. If you're simply creating a source file to upload to YouTube, Vimeo, or some other video service, those bit rates can be much higher because those sites will re-compress the file using their own standards. If that's the case, you should allocate bit rates closer to 3500-4000kbps for 720p and 8000-9000 for 1080p. Since your video is getting compressed for a second time, this extra quality will make a difference in the final product people see when you upload it to a video sharing site. As far as audio goes, I like to use 192kbps for MP3 or AAC audio, although you'll need to keep it to 160kbps if you're encoding for an Apple device. Why? Good question.
All of the suggestions mentioned in the last paragraph are based on the H.264 codec, but they should work well with pretty much any modern codec. The better the codec, the lower the bit rate can be. That means that 512kbps will look a lot better in H.264 than it will if you use a codec that's not as good. Try encoding a file at 512kbps using both H.264 and the standard MPEG4 codec. You'll see a difference, although it may be a little subtle.
The Most Important Thing You Should Know
Don't mess anything up!
Yeah, in a perfect world, right? The thing is, if you shoot terrible quality video your encode will look even worse. Sometimes you will shoot terrible video and you won't even realize how bad it is until you encode it and it looks like someone blurred out all the detail.
A lot of us think our poorly-lit video looks pretty good at 1080p, but that's because you're getting quite a bit of detail at that resolution. That video is also at a really high bit rate, so detail is retained. The more you compress your video the more detail is thrown out, so if your video isn't well shot or lit, you're going to lose a lot more detail when encoding than you would if you just shot it properly in the first place.
While it's easier said than done, do the best you can do get the highest quality video you can before you bring it into post production. We can do some amazing things in post, but nothing miraculously turn your poor quality footage into a work of art. In fact, there's almost nothing you can do to save bad footage regardless of how good you are. You just can't find detail that isn't there.
So before you sit down to create your amazing film, how to video, or whatever, take the time to shoot it well with good light or you will be kicking yourself when everything is over. It sucks to put a ton of work into something and then find out it looks terrible when you put it online or on a DVD, so do everything you can to make it look good so you don't have to try to salvage it in post.
TV Homework 1
Due Monday August 7 @11:59pm
Watch TV with a critical eye. Review 3 commercials or 3 news reports for the following:
Commercials - Identify which commercial you are reviewing
1. Call to Action
2. What was the main claim
3. Relevance of story to the product
4. Camera Angles
5. What was good about it.
6. What was awkward or not effective
Reports - Identify which news show and anchor you are reviewing
1. Anchor's delivery
2. What was the structure of the report
3. How did it fit in the overall news show
4. Camera Angles
5. What was good about it.
6. What was awkward or not effective
Week of August 7
Monday - Homework
Monday and Tuesday - Review The Walking Videos
Wednesday - Anchor Auditions
Group A - Producing Mock Show
Friday - Assignment distribution for first show
Monday and Tuesday - Review The Walking Videos
Wednesday - Anchor Auditions
Group A - Producing Mock Show
Friday - Assignment distribution for first show
Exercise 1 - Walking
|
All paperwork is dueFriday, July 28th
The edited video is due at 11:59 pm Wednesday, August 2 Shoot a 90 second video. Of course, using the elements of composition, camera angles, and your best creative ideas. Please review the Camera Angles powerpoint to the right. I have also placed the storyboard template and the brainstorm template to the right for your convenience. 1. Use the brainstorm form to write down your initial ideas as you come up with ideas for the story you will tell in your film. try to come up with 5 or 6 angles to a story. Then EVALUATE them and decide on the winner (the one you will create). Take a picture of the filled out form, and upload it to your Google Drive, and share it to [email protected]. 2. Using Google Docs, write an outline/overview of what your story will be about. Discuss the progression of the story, explain the characters, DESCRIBE the environment/location etc. We should fully understand the story from this document. Once you are satisfied with your overview, share it it [email protected] 3. Use the storyboard document to show me the full progression of the story. Preview the Camera Angles PowerPoint (to the right) to familiarize yourself with some common camera angles before you execute the storyboard. I am looking for a diverse set of angles. You should break down each scene and ask yourself, what is the coolest way to show..... If it is a person walking through a gate, why not shoot the subject from the front as he walks to the gate, then another shot from behind as he starts to reach for the handle, then a close up of his hand on the handle, then a shot from the other side of the gate as he walks through it towards the camera, then an extreme close up of his shoes as he takes a couple of steps.... . We want to keep the story fairly simple so we can break it down as in this example. This is an example of a story you could tell: 1 or 2 people walking into the school, through the gate somewhere (any gate). They Stop at a drinking fountain. They Stop at a table and talk to friends. Then, They end up in the TV Classroom, and Sit down at a desk and get ready for class. What is Due Utilize as many of the elements of composition. Utilize good camera angles. 1. Provide a brainstorm form correctly filled out 2. Create an outline, which explains the overview of what is going to happen in your film. 3. Create a storyboard that shows us everything that is going to happen as well as each camera angle you plan to use. Supplement your main storyboard with a second page of more detailed camera angle coverage. 4. Your assetts properly loaded to your desktop job folder and the server. 5. Edit your film 6. Export your film Example: Close Up (CU) of a person face. Extreme Long Shot (ELS) of students Turning and walking towards school Medium Shot/ Full Shot (MS/FS) of 2 students walking towards the camera Medium Close Up (MCU) of Camera behind heads walking towards school Extreme Close Up (ECU) of feet as they step up curb MS of ... etc. |
| ||||||||
Materials NeededItem Description Estimated Cost
1. Must have a gmail account. Free 2 16 or 32 GB SD Card Suggestion: http://www.bestbuy.com/site/pny-16gb $19.99 3. (1) 9 x 12 hardcover sketchbook $10 - $15 range Suggestion: http://www.walmart.com/search Donatable Materials List These are items that we need in class, but the district does not supply for us. Donations are completely voluntary. Due at any time. Any quantity Paper Towels Optional Disinfectant Wipes Optional Hand Sanitizer Optional Tissues Box Optional Scotch Tape Optional Uhu Glue Sticks ( Jumbo size) Optional |
| ||
Google Account/Inspirational Quote
Due July 28th, 2017
Send me an unbelievably inspirational quote from your google account, and include an explanation as to why it is important to you.
Be sure it is an account with your name in it. I wont know who [email protected] is.
This must be a gmail account, not yahoo, hotmail or anything else, just gmail.
Send me an unbelievably inspirational quote from your google account, and include an explanation as to why it is important to you.
Be sure it is an account with your name in it. I wont know who [email protected] is.
This must be a gmail account, not yahoo, hotmail or anything else, just gmail.
2017/18 Submit FormsExpectation Contract
Internet Use Contract TV Film Syllabus Due July 28, 2017 Download it from the docs to the right, print it out, and have both you and your parents sign it, then turn it in on or before July 28, 2017 |
| ||||
